Help with AirFix 1/24 P-51K

Ad: This forum contains affiliate links to products on Amazon and eBay. More information in Terms and rules

Heywhire

Recruit
6
0
Dec 6, 2015
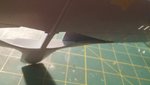
I started my P51 awhile ago and then put it aside because I got to the wing section and realized that there is NO wheel well detail, I mean NOTHING.

I am looking for any advice on how to box in the wheel well and add some detail. I get stuck because I cannot figure out how to make a template of the area when both top and bottom wings are put together. Or how to figure out the contour of the wing so I can cut the styrene.

Any help or pictures would be much appreciated. I dont know why Airfix would do a pretty decent job on the rest of the airplane and leave the wheel well detail out.

Did they do that on other kits? I also have the 1/24 spitfire
but have not opened to see if it is the same way.

Thanks again for any help

a12005a-box.jpg
a14003a--front.jpg
 
I think it's quite an old kit, dating back to the days when such details weren't as expected as they are now. I have the 109E that I never finished and I think the situation is the same. The cockpit and engine are quite nice though.

I have used a couple of techniques for the problem you describe. One way to do this is, after gluing the wing halves together, use a trial and error method of cutting shapes out of paper until you find a piece that fits and then use that as a template to cut the bits of plastic card that you will use in the finished model.

The second is to cut bits of styrene card that you know are wider than you need and then glue one edge to the top or bottom half of the wing. Then bring the opposite half over and gradually file the free edges of the wheel well walls down until the other half of the wing contacts all the surfaces it's supposed to. This requires constant checking and slow trimming and also requires the wall to be quite secure so you'll likely need to reinforce the initial joints with suitable backing and plenty of CA glue to the areas that won't be seen later.

Your Mustang has a very busy wheel well and is well-documented by photos on the net. There's a rat's nest of tubing, fittings, cooling hoses, stringers, and ribs that you're going to have to deal with and then the landing light as well. Part of your rear wall will be recessed deeply behind the opening and will be best tackled with the second technique that I've described above as there will be no easy way to insert this part of the wall and the associating ribbing after the wings are together.

In both methods, it's helpful to thin down the kit plastic in the exposed part of the well so that the scale depth of the opening is correct. This is especially true in the smaller scales and less critical for 1/24 as the scale thickness of the plastic is less significant in the larger scales.

It's great that you seem to be willing to scratch this stuff - part of the fun in my opinion. However, if you cave and decide it's too much of a hassle, you might find some after-market resin inserts but they might be pricey
 
I agree with Andy above. Unfortunately the old Airfix models aren't too detailed at many areas. First of all I would suggest checking if there isn't any aftermarket, resin or photoetched sets for details offered for details you need. Just use the Google. If there isn't any of these you may be forced to make them from scratch. It isn't too difficult as it seems to be. The first step for a such working is to find references, I mean pictures , diagrams etc...that can show the details. The Internet is a great source and quite easy accessing. Another source can be books called monographys about the plane type you are interested in.

Here is a couple shots of my work on the Airfix 1/24 Bf-109E model and her wheel bays. More shots you may find going through my thread about the build here :

Airfix 1/24 scale Bf109E.....or a bed of thorns

ws5c-jpg.jpg


ws7b-jpg.jpg


ws7c2-jpg.jpg


ws7d2-jpg.jpg


ws8b-jpg.jpg


ws9a-jpg.jpg


ws9c1-jpg.jpg


ws9d1-jpg.jpg


ws9f2-jpg.jpg


ws9f4-jpg.jpg


ws9f7a-jpg.jpg


ws9g-jpg.jpg


ws9g1-jpg.jpg


mask1-jpg.jpg


mask1a-jpg.jpg


wb1-jpg.jpg


cam7-jpg.jpg
 
Last edited:
The Airfix Mustang kit dates back to around 1971 or early 1972, originally released as a P-51D, with a retail price of £2.50 !!
For the time, it was exceptionally detailed, and one of a series of 1/24th scale kits which, at that time, had never been known before.
There were some simplifications, such as the wheel wells, and as has been mentioned, it was more than acceptable by the standards of the day.
There were a few small inaccuracies, the most major being the main landing gear legs, which have been moulded with the oleos at full extension, presumably as the real aircraft used as a pattern at the time, was either on jacks, or suspended, allowing the oleos to drop.
To give a more authentic 'sit' to the model, these should be shortened accordingly, otherwise the model will look very 'nose high'.
 
I am looking for any advice on how to box in the wheel well and add some detail. I get stuck because I cannot figure out how to make a template of the area when both top and bottom wings are put together. Or how to figure out the contour of the wing so I can cut the styrene.

Any help or pictures would be much appreciated. ...

Oh sorry I have missed that anyhow. So... you had stack both halves of the wing together before you attached the wheel bay interior. Now it can be a little bit tricky to make these wells from scratch but possible of course. Would you be so kind and post a couple of pictures of these? I need to see how these look like at the stage. Then we can work out the way of making the details.
 
OK. here is a tool for getting contours. We call it a shape stencil here in Poland. Using that you can find any shape contour. However it may be expensive to buy.

shape stencil.jpg
shape stencil-1.jpg
 
Last edited:
Called a contour or profile gauge in the UK, and average price is around £4 to £6, often much cheaper on-line.
 
Thank you all for the reply's.

Wurger- The wings are not glued together yet. I didn't want to glue until I had boxed in the wheel well.

The contour gauge is a really good idea. I am going to get one today and try it out. Now with that I guess I should get the contour of the top half of the wing then the bottom and find the mating center so when the 2 halves are joined the top and bottom halves will mate together.

I will try all this on the weekend and post pictures of the progress.

Once again, Thanks you all for the responses.

Joe
 
Wurger- The wings are not glued together yet. I didn't want to glue until I had boxed in the wheel well.

Oh .. that's good info. It is easier to scratchbuild details while wing halves aren't put together yet. If you have other troubles please feel free to ask.
Looking forward to your pics.
 
Well I went yesterday to Home Depot and picked up one of the contour gauges and tried to use it. I was not that easy to use. The pins are not that easy to slide and caused the bottom of the wing flex. It seems that the plastic is really flexible and has allot of give in it.

I am thinking maybe find a way to loosen the pins so it does not change the dihedral of the wing.

Here are a few pics of the wing.

0121162021 (Medium).jpg
0121162021a (Medium).jpg
0121162022a (Medium).jpg
0121162022b (Medium).jpg
shape stencil.jpg
 
OK. So you have to follow a quite, classic way for making the wheel bays. How does the part that comes in the middle of the bottom half of the wing look like? Also, what is the thickess of the styrene plates for the additional parts you have?
 
Last edited:
I agree with Andy above. Unfortunately the old Airfix models aren't too detailed at many areas. First of all I would suggest checking if there isn't any aftermarket, resin or photoetched sets for details offered for details you need. Just use the Google. If there isn't any of these you may be forced to make them from scratch. It isn't too difficult as it seems to be. The first step for a such working is to find references, I mean pictures , diagrams etc...that can show the details. The Internet is a great source and quite easy accessing. Another source can be books called monographys about the plane type you are interested in.

Here is a couple shots of my work on the Airfix 1/24 Bf-109E model and her wheel bays. More shots you may find going through my thread about the build here :

Airfix 1/24 scale Bf109E.....or a bed of thorns

ws5c-jpg.jpg


ws7b-jpg.jpg


ws7c2-jpg.jpg


ws7d2-jpg.jpg


ws8b-jpg.jpg


ws9a-jpg.jpg


ws9c1-jpg.jpg


ws9d1-jpg.jpg


ws9f2-jpg.jpg


ws9f4-jpg.jpg


ws9f7a-jpg.jpg


ws9g-jpg.jpg


ws9g1-jpg.jpg


mask1-jpg.jpg


mask1a-jpg.jpg


wb1-jpg.jpg


cam7-jpg.jpg

That's some mighty manly modeling on the Emil there sir!!!! No resin no PE Just good hard work. Shep would be proud.
 
Here's an update on my progress. I met a guy on another forum who did the same thing as what I am trying to do and gave some pointers. The most important one is "Make patterns for the next one.", so I am. Once I get a fit I trace on paper then after I am done I will then draw it into CAD.

Thanks all for the help on this.

I have also attached some pictures of his work. These are not mine, I wish LOL.

12647197_1680001968955750_2329058568436219651_n.jpg
12669617_1679672098988737_8194547051328948907_n.jpg
12647197_1680001968955750_2329058568436219651_n.jpg
12669617_1679672098988737_8194547051328948907_n.jpg
0202161918 (Small).jpg
0202161929 (Small).jpg
0202161929a (Small).jpg
0202161949 (Small).jpg
0202161949a (Small).jpg
0202161952 (Small).jpg
0202161952a (Small).jpg
 

Attachments

  • 0202161952b (Small).jpg
    0202161952b (Small).jpg
    50.6 KB · Views: 126

Users who are viewing this thread

Back