Navigation
Install the app
How to install the app on iOS
Follow along with the video below to see how to install our site as a web app on your home screen.
Note: This feature may not be available in some browsers.
More options
You are using an out of date browser. It may not display this or other websites correctly.
You should upgrade or use an alternative browser.
You should upgrade or use an alternative browser.
Jumping into Modeling
Ad: This forum contains affiliate links to products on Amazon and eBay. More information in Terms and rules
More options
Who Replied?at6
1st Sergeant
Just take your time and enjoy the build.
Good work!
- Thread starter
- #104
Thanks, guys!
I have had some more progress. Used my hobby knife to separate the nosecone so that I could recover the window and machine gun that had fallen in. Will glue them and the cone back on after painting. Having trouble getting the proper water to paint ratio with the silver, ends up either too runny or too dry. Not overly concerned about that though, if I can't get it right I can always fall back onto OD over NG as I've checked again and do have decals for that as well.
Other progress:
-Installed left landing light
-Added walkway markings to left wing (mixed results, will polish later)
-Started the work of covering some of the wing panels in humbrol aluminium to mimic the darker panels that NMF aircraft sometimes have (still WIP)
Stay tuned!
- Thread starter
- #105
Hi all, thought I'd showcase the status of the B-17 since I haven't in a while. The wings are not actually attached, but hey it looks a lot better with them on. This model is on hold for the foreseeable future as I've got other kits I'd rather work on.
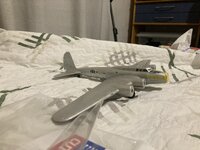
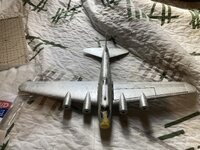
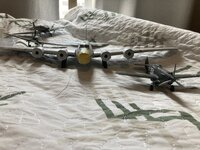
And in actual modeling news, I have decided to add wing flaps to my B-26 after seeing Bustedwing
's modification to his Ki-45. Original idea was to fully cut them out of the bottom half of the wing and then use plasticard to help position them like the real aircraft's split-slotted flaps. The inboard flaps however proved very difficult to fully remove, so I opted to just angle them instead (which probably would have been the better approach in the first place. This does mean the flap positions are somewhat inaccurate as there should be a gap between the flap and wing, but that's as good as I can make it. Plasticard was too annoying to use so I neglected the struts. In the process of cutting the flaps I also cut my thumb (I should really wear gloves), broke the left landing gear strut, the right wheel, the turret mount (letting the turret fall into the fuselage) and one of the waist guns. I was also trying to replace some of the lead block weights in the nacelles with leadshot, so really I spent all day working on this plane. I have fixed everything I've broken, and that was a lot of work. The landing gear in particular required bracing with a metal fork I cut from a paper clip. I'm mostly happy with the model's current state, though there's still work to be done.
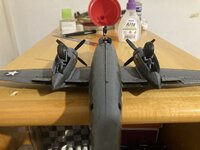
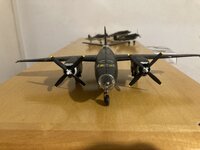
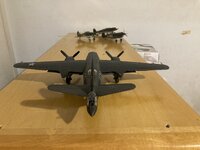
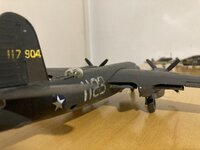
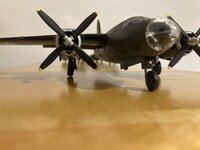
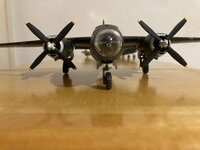
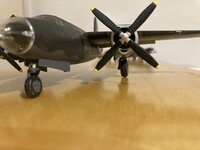
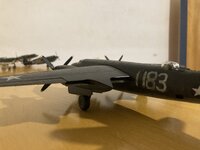
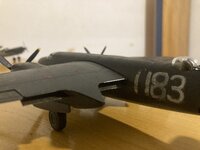
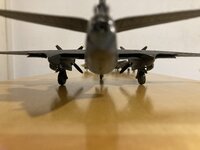
Changes made:
-Wing flaps added (roughly in takeoff position),
-Replaced the old horizontal turret mount that required opening the fuselage to attach with a new stronger vertical mount,
-Removed the waist guns (too annoying to glue the broken gun back together),
-Added pitot tube to the right wing (kit didn't come with one),
-Replaced 2 out of the 5 lead block weights with piles of leadshot glued with PVA.
Changes required:
-Paint the wing flaps,
-Touch up paint overall (unlikely),
-Add more glue to the leadshot because a blob of them sometimes hangs from the bottom of the left nacelle.
Next project should be the group build B-25, but might be the P-36 kit I've bought as I'd like to test out some new tools before using them on the B-25.


And in actual modeling news, I have decided to add wing flaps to my B-26 after seeing


Changes made:
-Wing flaps added (roughly in takeoff position),
-Replaced the old horizontal turret mount that required opening the fuselage to attach with a new stronger vertical mount,
-Removed the waist guns (too annoying to glue the broken gun back together),
-Added pitot tube to the right wing (kit didn't come with one),
-Replaced 2 out of the 5 lead block weights with piles of leadshot glued with PVA.
Changes required:
-Paint the wing flaps,
-Touch up paint overall (unlikely),
-Add more glue to the leadshot because a blob of them sometimes hangs from the bottom of the left nacelle.
Next project should be the group build B-25, but might be the P-36 kit I've bought as I'd like to test out some new tools before using them on the B-25.
fubar57
General
A braver man than I. Love the painted plane numbers
- Thread starter
- #108
Thank you! I do now need to touch up the fuselage numbers on the right side, as all the handling required to cut the flaps has rubbed off part of the 8 on that side. Or maybe I'll leave it as is and chalk it up to weathering, like the rest of the plane's finish.A braver man than I. Love the painted plane numbers
- Thread starter
- #109
Today's update:
1. Tried out the Flory Models weathering/panel line wash on my old Hurricane. It beaded up a bit, so I might fix that later (you can just add water to rehydrate it). The manufacturer said to mix in dish soap if it's beading up (not inside the bottle), so I might give that I try when it's weathering time for the B-25. Interested to hear y'all's thoughts as this is my first ever weathering attempt (the B-26 and P-40 being only accidentally weathered by the fact that I used airbrush paints with a paintbrush). Took care to try to make some streaks around the exhaust stacks and oil cooler, but they're not really noticeable on the former.
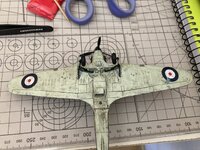
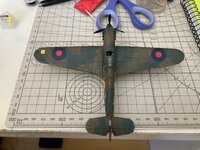
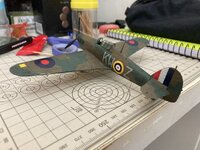
2. Added more glue to the nacelle weights and left the airplane on its nose for the whole day so that the glue dried properly and attached all of the leadshot to the forward wall.
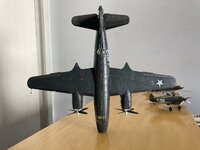
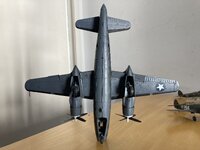
3. Drilled out the hole for the B-26's nose gun and attached it. I never attached this gun because the kit came with the hole in the wrong place, happy to finally have this sorted. This means that now the only big inaccuracies in my model are the lack of the antenna mast on the top of the fuselage (broke off inside the original box and was lost to the carpet, might scratch-build one) and the lack of the navigator's hatch/astrodome. I don't currently have the skills to scratchbuild the latter so that's unlikely to be changed.
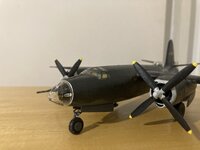
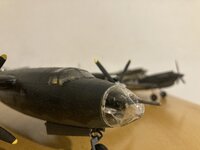
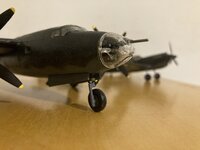
I have considered buying another set of Squadron B-26/B-26A tail canopies now that I have both the correct tools to cut it out of the mold and plasticard to properly model the fillets the canopies are missing, so that I can finally have my favorite version of the B-26, but I decided against it. This kit's been through too much already and hey the B-26B-2 is still a rare sight. I think I'll just wait to see if any good B-26/B-26A models ever come out (looking at you, Airfix, you've done it before with the B-25B). If there's still nothing in a decade then maybe I'll modify this one or buy another of the snap-tite B-26B-2s that turn up on ebay every now and then.
1. Tried out the Flory Models weathering/panel line wash on my old Hurricane. It beaded up a bit, so I might fix that later (you can just add water to rehydrate it). The manufacturer said to mix in dish soap if it's beading up (not inside the bottle), so I might give that I try when it's weathering time for the B-25. Interested to hear y'all's thoughts as this is my first ever weathering attempt (the B-26 and P-40 being only accidentally weathered by the fact that I used airbrush paints with a paintbrush). Took care to try to make some streaks around the exhaust stacks and oil cooler, but they're not really noticeable on the former.


2. Added more glue to the nacelle weights and left the airplane on its nose for the whole day so that the glue dried properly and attached all of the leadshot to the forward wall.


3. Drilled out the hole for the B-26's nose gun and attached it. I never attached this gun because the kit came with the hole in the wrong place, happy to finally have this sorted. This means that now the only big inaccuracies in my model are the lack of the antenna mast on the top of the fuselage (broke off inside the original box and was lost to the carpet, might scratch-build one) and the lack of the navigator's hatch/astrodome. I don't currently have the skills to scratchbuild the latter so that's unlikely to be changed.


I have considered buying another set of Squadron B-26/B-26A tail canopies now that I have both the correct tools to cut it out of the mold and plasticard to properly model the fillets the canopies are missing, so that I can finally have my favorite version of the B-26, but I decided against it. This kit's been through too much already and hey the B-26B-2 is still a rare sight. I think I'll just wait to see if any good B-26/B-26A models ever come out (looking at you, Airfix, you've done it before with the B-25B). If there's still nothing in a decade then maybe I'll modify this one or buy another of the snap-tite B-26B-2s that turn up on ebay every now and then.
Vic Balshaw
Major General
I have hear that dish washing soap is a good leveler, helps to even the flow so I believe, it is worth a try. Good bit of weathering though and smart thinking with the B-26. 
Bustedwing
Tech Sergeant
Nice work ! I always think having the flaps deployed adds a bit of dynamics to a model posed on the ground.Hi all, thought I'd showcase the status of the B-17 since I haven't in a while. The wings are not actually attached, but hey it looks a lot better with them on. This model is on hold for the foreseeable future as I've got other kits I'd rather work on.
View attachment 681815View attachment 681818View attachment 681819
And in actual modeling news, I have decided to add wing flaps to my B-26 after seeingBustedwing 's modification to his Ki-45. Original idea was to fully cut them out of the bottom half of the wing and then use plasticard to help position them like the real aircraft's split-slotted flaps. The inboard flaps however proved very difficult to fully remove, so I opted to just angle them instead (which probably would have been the better approach in the first place. This does mean the flap positions are somewhat inaccurate as there should be a gap between the flap and wing, but that's as good as I can make it. Plasticard was too annoying to use so I neglected the struts. In the process of cutting the flaps I also cut my thumb (I should really wear gloves), broke the left landing gear strut, the right wheel, the turret mount (letting the turret fall into the fuselage) and one of the waist guns. I was also trying to replace some of the lead block weights in the nacelles with leadshot, so really I spent all day working on this plane. I have fixed everything I've broken, and that was a lot of work. The landing gear in particular required bracing with a metal fork I cut from a paper clip. I'm mostly happy with the model's current state, though there's still work to be done.
View attachment 681816View attachment 681817View attachment 681808View attachment 681810View attachment 681813View attachment 681814View attachment 681811View attachment 681809View attachment 681807View attachment 681812
Changes made:
-Wing flaps added (roughly in takeoff position),
-Replaced the old horizontal turret mount that required opening the fuselage to attach with a new stronger vertical mount,
-Removed the waist guns (too annoying to glue the broken gun back together),
-Added pitot tube to the right wing (kit didn't come with one),
-Replaced 2 out of the 5 lead block weights with piles of leadshot glued with PVA.
Changes required:
-Paint the wing flaps,
-Touch up paint overall (unlikely),
-Add more glue to the leadshot because a blob of them sometimes hangs from the bottom of the left nacelle.
Next project should be the group build B-25, but might be the P-36 kit I've bought as I'd like to test out some new tools before using them on the B-25.
- Thread starter
- #113
Thank you. Will report back on the dish soap once I reach that stage on the Mitchell.I have hear that dish washing soap is a good leveler, helps to even the flow so I believe, it is worth a try. Good bit of weathering though and smart thinking with the B-26.
I agree! I like to have my models in a "ready for takeoff" stance whenever possible. Does mean I miss out on open bomb bays, doors and hatches, but I'd rather have the ready to go. I especially love the look of the short-wing B-26s' split slotted flaps, something about it just screams "speed" to me!Nice work ! I always think having the flaps deployed adds a bit of dynamics to a model posed on the ground.
Users who are viewing this thread
Total: 1 (members: 0, guests: 1)
