Lublin R XIII.D (yet to be decided) 1/48 scale Mirage Hobby

Ad: This forum contains affiliate links to products on Amazon and eBay. More information in Terms and rules

Would you be able to send me these rigging links too, I've tried several methods but none look "just right" :D

And thank you
:)
Igor
 
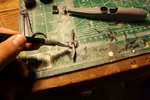
I'd have to look again, didn't see them on first glance

On the page at the bottom in the table are shown all colours you need for painting. As memo serves their names are written both Polish and English. Also their numbres are red-brown printed. The same numbers you will find in all pages of the kit instruction with thin lines pointing parts that have to be painted with them.

209573.jpg
 
Appreciate it! Today I've removed some pieces and cleaned them up a bit. Will work on cockpit tonight/tomorrow
 
Some work.

The engine was suppose to have a hole in it, per the directions. I use drill bit and a knife to get the hole there.

Then dry fit.

Those are the pieces I have to work with in the cockpit. Needs some sprucing up.
 

Attachments

  • IMG_2870.JPG
    IMG_2870.JPG
    56.5 KB · Views: 83
  • IMG_2871.JPG
    IMG_2871.JPG
    106 KB · Views: 85
  • IMG_2872.JPG
    IMG_2872.JPG
    120.1 KB · Views: 83
  • IMG_2873.JPG
    IMG_2873.JPG
    110 KB · Views: 86
  • IMG_2874.JPG
    IMG_2874.JPG
    124.2 KB · Views: 90
  • IMG_2875.JPG
    IMG_2875.JPG
    109 KB · Views: 93
  • IMG_2876.JPG
    IMG_2876.JPG
    110.6 KB · Views: 89
Harry, if you aren't going to improve the cockpit interior you can try to make it as shown here .... the picture source : Modelarstwo z pasj

A005.gif


But the interior would look much better if it was made from scratch...

A014.gif


A018.gif


DSCF0013.gif


Anyway, a few details added to the interior ( not these seen above ) might make it better too... source and pictures taken by Kamil Feliks Sztarbala.

IMG_9806.JPG


IMG_9807.JPG
 
Yeah I was possibly thinking of just stripping the inside of it and going from scratch.

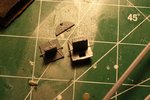
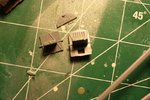
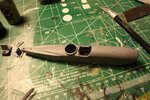
What do you think? Stretch sprue for some of the interior?
 
Okay I have a question, you see those cone(ish) shaped things on the engine? Are those suppose to be hollowed out or is that how the engine looked? If you don't understand what Im talking about I can get on MS paint later and point them out
 

Attachments

  • Lublin.jpeg
    Lublin.jpeg
    124.2 KB · Views: 100
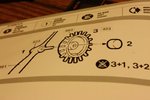
Those are cooling slots. I don't know whether or not your craft had closing shutters. The Russian I-16 had them, as far as I can remember.
 
Ahhh already supplies me with the Vallejo number!

Test fitting fuselage
 

Attachments

  • IMG_2878.JPG
    IMG_2878.JPG
    101.2 KB · Views: 112
  • IMG_2877.JPG
    IMG_2877.JPG
    110.7 KB · Views: 108
  • IMG_2879.JPG
    IMG_2879.JPG
    94.1 KB · Views: 100
Yep.. these holes were cooling slots ( similar to those of the I-16) because the mesh wasn't the engine part actually. ALso these radial sticking out rods weren't part of the mesh. These were the engine valve lifters. How to make these apertures open.... with thin drill bits of dimeters fitting to these areas at top and bottom of the hole. Then removing the central plastic remains with a scalpel blade.

Here you are the example with corrections to the part.. source : http://pwm.org.pl/viewtopic.php?f=12&t=18050

silnik1.gif


sil1.gif


sil2.gif
 
Last edited:
You should wait till the GB, this is such a interesting build :D
 

Users who are viewing this thread

Back