- Thread starter
- #21
SANCER
Senior Master Sergeant
It is a very kind comment from you Rogi  , I also look forward to your company in the process and hope to be to your liking.
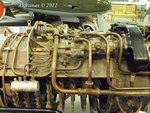
Optimizing the time I devoted to review, select and list all the parts that I think are in black color to paint with the airbrush and therefore have joined with glue all these pieces form a given set of the same color. The wheel wall, the gun compartment, turbine uncovered. etc.
I leaned with some rubber bands to get the correct position of the pieces ...


The detail and complexity of the small pieces that make up the turbine, has been a great challenge and I think I came out unscathed !!


 11 are parts those that are mounted on only one of the halves that make up a turbine .
I have a number of photographs (some of them provided by my good friend Wojtek), with which I intend to do my best to give different shades of a turbine in service, even to add other components with scratch and wiring seen in the real photos.
The tube that you can be seen in the following picture (the one with 3 points of contact, a straight section and two curved), well, to make it coincide with those 3 points of contact, the structure of it was "a bit off" the area that should occupy within the turbine, once covered by the outer sheet . Should bend the part only by the tubular portion reaches 3 points (how?
 ) ... The best solution I could think of was to use a hair dryer and medium speed and medium heat, direct it to that area and soften the piece without affecting all other parts. For a shorter space of time I used the maximum speed and temperature and I realized that I could handle the part and bring it closer to the structure in the manner originally due to stay. It made me quite formidable and learned something new for me.
I know I did not invent the "black thread", but it will be an option to straighten, divert or accommodate some pieces already pasted in our model 

And it was not that bad !!

These four photographs of the turbine I took them after having straightened that tube out of proportion. I did not think document my feat !!
This is another small step, I think I have everything ready to apply black gloss to all parts, then apply different metallic shades of Alclad II as appropriate, others remain in black ...
... I leave the last photos of the wheel well and all the parts ready to move to the paint department.
See you soon boys.


Un abrazo Y HASTA PRONTO!!
SANCER
, I also look forward to your company in the process and hope to be to your liking.Optimizing the time I devoted to review, select and list all the parts that I think are in black color to paint with the airbrush and therefore have joined with glue all these pieces form a given set of the same color. The wheel wall, the gun compartment, turbine uncovered. etc.
I leaned with some rubber bands to get the correct position of the pieces ...
The detail and complexity of the small pieces that make up the turbine, has been a great challenge and I think I came out unscathed !!
I have a number of photographs (some of them provided by my good friend Wojtek), with which I intend to do my best to give different shades of a turbine in service, even to add other components with scratch and wiring seen in the real photos.
The tube that you can be seen in the following picture (the one with 3 points of contact, a straight section and two curved), well, to make it coincide with those 3 points of contact, the structure of it was "a bit off" the area that should occupy within the turbine, once covered by the outer sheet
) ... The best solution I could think of was to use a hair dryer and medium speed and medium heat, direct it to that area and soften the piece without affecting all other parts. For a shorter space of time I used the maximum speed and temperature and I realized that I could handle the part and bring it closer to the structure in the manner originally due to stay. It made me quite formidable and learned something new for me.I know I did not invent the "black thread"
, but it will be an option to straighten, divert or accommodate some pieces already pasted in our model And it was not that bad !!
These four photographs of the turbine I took them after having straightened that tube out of proportion. I did not think document my feat !!
This is another small step, I think I have everything ready to apply black gloss to all parts, then apply different metallic shades of Alclad II as appropriate, others remain in black ...
... I leave the last photos of the wheel well and all the parts ready to move to the paint department.
See you soon boys.
Un abrazo Y HASTA PRONTO!!
SANCER
Last edited:


 ... a first detail that I encountered is that I should join first the 2 turbine parts and disappear the binding with a little sanding and putty if necessary. For what I should first paint these cones, then join the two halves, sanding and polishing the junction, adding external parts that comprise it and then start painting ... and I would have avoided this union so notorious ...
](/forum/images/smilies/eusa_wall.gif "Brick wall ](*,)")
