Night Fighter Nut
Master Sergeant
Greetings all, I've been mulling this over for awhile and figured I would start this thread since I couldn't find any other listed at the moment. What I want to do is make available different methods for painting or working on control panels. Hopefully this will help those who want to have a nice looking control panel but are unsure how to do it.
To begin with, here are a couple of my methods for painting instrument panels. I'll post some photos later once my camera has had time to charge up.
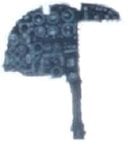
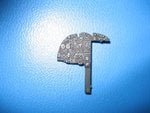
1. Some models have control panels with raised lines instead of just a flat surface. For these I paint the entire panel white using common spray paint you can get from a hardware store. Actually any white spray paint will do airbrush or otherwise. I let it dry for three days to make sure the paint cures completely before painting over it. After three days, I will spray paint black over it. You could spray any color the panel is suppose to be but for this I'm using black. Let the paint dry for a few hours, then with a very fine grit sand paper or emery clothe sand over the raised areas. What will happen is the black paint will come off showing the white on the raised detail underneath. All your dial surfaces, those tricky micro lines and all, will come out nicely. Then with a very sharp exacto blade or needle draw in the little lines and hands inside your dials. All the scratches will be white on a black surface. You can even draw the lines that separate one cluster of instruments from another.
2. For flat panels with no raised details I know of a few of methods for painting these. You can do the white spray paint like above with the second coat in whatever color you choose. Then with a small drill template and a sharp needle, you can draw in the details.
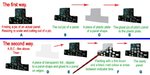
3. If the panel is already painted and say you don't have an airbrush or spray paint. You can make dials and indicators by first painting white dots on the panel that are approximately the size for the dials you want. Let those dots dry and make smaller black dots on top and center of the white dots. This will make those nice round white circles and black faces for those instruments. Now if you really want to get creative, while those black dots are very wet, you can put a little white paint on the tip of a needle and poke around the wet black dot. This will make some lines in the black paint but this doesn't always come out looking stellar. Still it will look a lot better than trying to paint all that detail with a brush.
4. Another method is cutting holes in card material that is approximately the size of the gauges you want and in the shape of the control panel for your model. Then you draw this shape over another card shaped exactly like your panel and draw the circles on this using the first panel with holes as your template. Then you can cut pictures of dials and gauges, or just draw them, and glue them over the circles you drew on the second panel. Finally you will sandwich these together with the pictures showing through the holes you cut. Then just dot these with future or some acrylic varnish to give the appearance of glass over your dials.
Hope this will help others. I welcome other ideas. Again, I'll put up pictures as I am able to make them to show the effects of these methods.
")
To begin with, here are a couple of my methods for painting instrument panels. I'll post some photos later once my camera has had time to charge up.
1. Some models have control panels with raised lines instead of just a flat surface. For these I paint the entire panel white using common spray paint you can get from a hardware store. Actually any white spray paint will do airbrush or otherwise. I let it dry for three days to make sure the paint cures completely before painting over it. After three days, I will spray paint black over it. You could spray any color the panel is suppose to be but for this I'm using black. Let the paint dry for a few hours, then with a very fine grit sand paper or emery clothe sand over the raised areas. What will happen is the black paint will come off showing the white on the raised detail underneath. All your dial surfaces, those tricky micro lines and all, will come out nicely. Then with a very sharp exacto blade or needle draw in the little lines and hands inside your dials. All the scratches will be white on a black surface. You can even draw the lines that separate one cluster of instruments from another.
2. For flat panels with no raised details I know of a few of methods for painting these. You can do the white spray paint like above with the second coat in whatever color you choose. Then with a small drill template and a sharp needle, you can draw in the details.
3. If the panel is already painted and say you don't have an airbrush or spray paint. You can make dials and indicators by first painting white dots on the panel that are approximately the size for the dials you want. Let those dots dry and make smaller black dots on top and center of the white dots. This will make those nice round white circles and black faces for those instruments. Now if you really want to get creative, while those black dots are very wet, you can put a little white paint on the tip of a needle and poke around the wet black dot. This will make some lines in the black paint but this doesn't always come out looking stellar. Still it will look a lot better than trying to paint all that detail with a brush.
4. Another method is cutting holes in card material that is approximately the size of the gauges you want and in the shape of the control panel for your model. Then you draw this shape over another card shaped exactly like your panel and draw the circles on this using the first panel with holes as your template. Then you can cut pictures of dials and gauges, or just draw them, and glue them over the circles you drew on the second panel. Finally you will sandwich these together with the pictures showing through the holes you cut. Then just dot these with future or some acrylic varnish to give the appearance of glass over your dials.
Hope this will help others. I welcome other ideas. Again, I'll put up pictures as I am able to make them to show the effects of these methods.