Revell 1/32 Typhoon Paint Order

Ad: This forum contains affiliate links to products on Amazon and eBay. More information in Terms and rules

prem895

Staff Sergeant
1,172
55
Oct 7, 2012
Toronto/Beijing
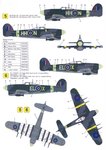
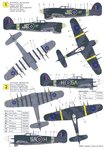
I have been building this kit on and off for the last year or so, but now it is time to lay down some paint. My question is. What is the order in which I paint it? Do I paint the bottom sky 1st then tape it off for the invasion stripes,the paint that area white,then cover the white area then shoot the black. I think I will be doing the EL-X scheme. As far as the yellow goes that is anyones guess. All advise is most appreciated
 

Attachments

  • Tech32021a.jpg
    Tech32021a.jpg
    80.6 KB · Views: 182
  • Tech32021e.jpg
    Tech32021e.jpg
    83.4 KB · Views: 156
  • Tech32021c.jpg
    Tech32021c.jpg
    97.2 KB · Views: 173
First of all ... not the Sky on undersides but the Medium Sea Grey.... also not the D-day strips but the standard quick ID markings for Typhoons introduced on the 5th December 1942 and being using until the 7th February 1945.

To answer your question... I would suggest painting these areas for the ID strips with the white firstly. By the areas I mean the ones with the outer two black strips too .Also you may apply the white at the areas for the yellow strips at the wing tops and the leading edges and the area for the Sky S type band at the tail. However the white on wing tops, leading edges and tail isn't necessary. But it may give a nice primer for the Yellow and Sky colours. Then masking the entire areas for the underwing strips. And then applying the Yellow and the Sky colours. Masking the Yellow strips, leading edges and the Sky band.
The next step is to apply the Medium Sea Grey on undersides overall. When dry, masking it on the fuselage sides and the radiator. Then applying the Ocean Grey either overall tops or at areas for its spots. Masking these blotches and painting of the Dark Green colour. The next step... removing of all masks and masking for colouring of the black strips.. the final step applying the gloss varnish for decals.
 
Thanks Air Marshall, I did mean MSG not sky. I understand and will try my best to do it up right. It is not like I have more of this one in the stash. Looking forward to the new 1/24 Airfix
 
Now the invasion stripes should be White .75"= 19.050mm and the black at .375"=9.5250mm so would it look ok if I were to paint them 20mm and 10mm. It seems so close that I think you would not even tell
 
These aren't the invasion strips... these were quick ID ones for Typhoons had introduced long before the D-day came. A black strip was of 30,5 cm what is 12.01 inches. For the 1/32 scale it should be 0,953cm ~1cm - 0.38". The white one was of 45,7cm - 17.99" what is for 1/32 - 1,4cm - 0.56".
 
For some reason I always call them invasion stripes even though that was still a year or so away.So 14mm and 10mm will work just fine then
 
I don't disagree with the order given above.
I did a PCM Tempest, with distinctive markings, aka invasion stripes recently. Here's my painting order, after priming.

1 Yellow on leading edges......and mask

2 White on area of invasion stripes.....and mask

3 Black on invasion stripes... and mask

4 Sky band and mask

5 MSG on undersides......and mask

6 OG on upper surfaces......and mask

Just about the entire model is masked now! This has prevented any kind of overspray as the successive colours are applied.

7 DG on upper surfaces.

Remove all the masking before applying your washes, weathering (minimal in my case) and varnishes to reveal....

IMG_0673_zps05a2788f.gif


IMG_0676_zpse8b35922.gif


IMG_0678_zpscd22ee31.gif


Cheers

Steve
 

Users who are viewing this thread

Back