Takom 1:35 scale AH-64D Apache Long Bow Attack Helicopter

Ad: This forum contains affiliate links to products on Amazon and eBay. More information in Terms and rules

Thanks guys! But… it's the grab handles that give the model the level of detail we'll all seeking… right? That's especially true with model trains.

Put the gloss coat on the whole fuze, one side at a time. I'm using allclad Water-based gloss coat (Aqua Clear?). I also detail painted the enormously detailed ResKit chain gun. I don't know how they're printing the electrical wiring and such. I'm pretty well-versed in 3D printing now and still don't attempt that level of fine detail.


AH-64D Chain Gun 2.jpg
AH-64D Chain Gun Paint 1.jpg


I'm going to paint and attach the ammo feed track separately. There are a number of tiny decals that came with it, which is why I gloss-coated this along with the main model. Once it's a decaled I will dull-coat it. It will be the last thing attached because it's just waiting to be whacked sticking out like it does.

I'm going to start decaling the whole deal today.
 
Getting near the end. All the decals are on. What a mess! I was using Mr Decal Softener and Mr Decal Setter as suggested by the build review I had. The Takom decals were so stiff that MicroScale products didn't work very well. These two new solutions worked… oh boy how they worked! They set the decals and also removed the AllClad Aqua Clear clear coat and the color coat beneath it, making the model almost a wreck. I should have tested this stuff on something before doing it on the model. 20/20 hindsight.

AH-64D Decal Damage 1.jpg


AH-64D Decal Damage 3.jpg


I touched up the O.D. as best I could, but it doesn't look very good. Hopefully, a nice dull-coat will cover a lot of sins. I also used some Tamiya black panel accent color on seams and doors. While handling I broke one of the few plastic foot rungs.

AH-64D Another Foot Rung Down.jpg


And quickly replaced it will metal. DOH! Don't know why I ever attempted to use the plastic in the first place. The one below this one is still plastic. Anyone want to make a wager about how long it will last?

AH-64D Foot Rung Replaced.jpg


I got the Chain Gun mounted and haven't broken it yet… The Reskit model is superb!

AH-64D Chain Gun On.jpg


And the I got the wheels installed. I have some marker lights to install and the another set of very fragile antenna that go one each engine pod. When the tape is removed I have to add the windshield wipers, the underwing stores and white decal weather stripping that goes around the windows. The are Takom decals and I hope they work.

AH-64D On Its Wheels.jpg


I got the clear domes on the hellfire missiles after using Molotow chrome on the sensor that sits below. When the canopy glue cures I will take pictures of them. I sure hope the flat coat hides a lot of the garbage on this model. It really annoys me that you work a lot of hours get a tricky kit together and then get a disaster at the finishing stage.
 

Attachments

  • AH-64D Decal Damage 2.jpg
    AH-64D Decal Damage 2.jpg
    833.2 KB · Views: 4
The dullcoat (Tamiya clear gloss and Tamiya Flat Base) worked to hide a passel of defects. I got the underwing stores installed and did some touchup painting. Broke off two of the remaining plastic foot rungs. Sounds like a broken record. I purposefully held off putting them on until the last minute. I should have waited longer… like after it was out of the workshop. I attempted to using an old-school ruling pen (from my drafting set I bought when in college 60 years ago, to hand rule the fine white weather striping around the non-opening cockpit windows. Came out a little rough and I'll clean it up on Monday. I didn't want to atttempt to use those lousy decals included in the kit for this purpose. All in all, it's coming out as a respectable model… definitely not a show winner—miles away from that—but my friend is happy with it.

AH-64D Port Side Unmasked.jpg
AH-64D Strbd SIde Unmasked.jpg


Here's a closer look at the transparent noses on the Hellfires...

AH-64D Hellfire Noses.jpg


And the targeting optics on the nose. I found out after building this that my color choice of the telescopes inside were different colors. Too late… that ship had left the dock.

AH-64D Targeting Sys unmasked.jpg


I knocked off one of the missile sets from it sway braces to the pylon. I put it back and it's drying over the weekend. Next week it will be finished. We're delivering it on a visit back East over the 2nd week in December.
 
You are all too kinds. There are many defects… But well hidden.

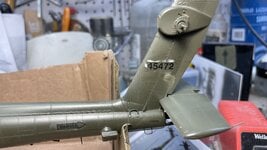
I replaced the plastic large antenna that graces the tail with a metal assembly without even trying the plastic one. I didn't even give it a second thought. I just measured the plastic one and built a metal one. I epoxied into the airframe. It's chances for survival are much better than plastic that had a very tiny mounting pin to holld it. I still have to paint it. I was also putting on the very fine windshield wipers. I accidentally cut one of the parts of the front windscreen and thought it was on the top. After I corrected my mistake I proceeded to break it, then lose it. Instead of attempting to build one out of brass, I'm going to draw the parts and 3D print them.The printer can handle it. Should be interesting. Stand by.


AH-64D Metal Tail Antenna.png
 
The end is nigh! One more day and this will be done. I drew and 3D printed a windshield wiper for the front window. It's draining now on the printer and I'll install it during the next session. It's very delicate so I printed 12 of them thinking that I be able to cut at least one of them from the supports without wrecking it. I attached what appear to be ram air turbines that hang off the engine housing. This was another case of very fine styrene moldings breaking in the sprue before even getting a chance to remove it. The solution: more tiny drilling and wiring. During the assembly process one of them broke in the middle of the shaft and that too got the wiring trick.

To print tiny parts I draw them on a stick and draw my own supports. The supports function in the slicer is light a sledge hammer to small stuff like this. They printed succssfully on the new printer. There's still the challenge of getting them off the stick without breaking.

AH-64D Windshield Wiper Screen Shot.png


Here's the ram air things broken on the sprue.

AH-64D More troubles.jpg


And here's the parts repaired including the additional fracture in the center of the shaft. 0.015" phos-bronze wire is used to make the joint.

AH-64D Thingys repaired.jpg


Here they are on the model along with the engine door supports. I was going to make those out of metal too, but they didn't break and I got them installed okay, so I set aside the scratch-build plan. They both need to be painted… tomorrow.

AH-64D Last parts on.jpg


I attached the remaining subassemblies including the main rotor hub, Long Bow antenna and tail rotor. I decided to install them now and not bring them as pieces to be installed on site. I will protect the model so nothing will happen to them (Famous last words).

AH-64D Almost done 1.jpg


AH-64D Almost done 2.jpg


And then there was none. I went through all the remaining sprues and any parts still remaining are either for different AH-64 versions, options for this model or parts that were replaced or ignored. It's good to see this...

AH-64D And then there was none.jpg


With the addition of the missing wiper, painting both wipers and the parts insalled today, the model will be DONE.
 
Well… that was a strange thing. I accidentally hit the power button on my MacBook Pro instead of Delete. It brought up two different log-in screens. I picked the wrong one and got a version of my computer that goes back a couple of years. I couldn't figure out how to get my "normal" instance back. After fussing I realized that if I click on my image at the log-in screen, it brings up the two choices and I picked the good one. Meanwhile, I lost the entire post I'd written, which I'm now re-writing. I don't mind writing all the posts I produce, but I had doing them over!

I'm declaring the Apache ready for delivery. The print of the new wiper assembly was completely successful and the new printer with it's 12K LCD screen, better UV lighting and Titl Vat tech all combine to produce parts of smaller cross-section than I thought was possible.

AH-64D New Wiper.jpg


All the rest of yesterday's work was painted, and that's done too. All that's left is attaching the main rotor blades and that will wait until it arrives at its destination. It was a tough model… great detail… but it made you pay the price. I think I've finally learned to not use ANY kit handgrabs and will substitute them for metal from the get-go.

AH-64D Finished 2.jpg


AH-64D Finished 4.jpg


After back painting and using a toothpick to remove any errant paint from the glazing, the handpainted window stripping is passable, and frankly, probably was more successful than attempting to use those awful Takom decals.
AH-64D Finished 3.jpg
AH-64D Finished 1.jpg


It sure is a menacing looking machine and I think that was intentional.

Next plastic kit in the hopper is a Trumpeter 1:32 scale Lockheed F-135B STOVL Lightening II. I plan on buiiding it with the engine installed and another engine on a display stand. I don't know which engine will be the one I attempt to super-detail for the exterior display: the kit's or a 3D printed one I plan on creating. But this model is a little while a way from building. I have a ton of work to do on the Engine Room and do want to add one more custom building on my large model railroad. My #1 grandson also indicated he may want to build the F-35 and I may let him.
 

Users who are viewing this thread

Back