Israeli AH-64A Peten from Academy 1/35 Kit.

Ad: This forum contains affiliate links to products on Amazon and eBay. More information in Terms and rules

al49

Tech Sergeant
1,552
337
Dec 16, 2009
Milan, Italy
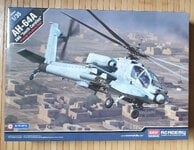
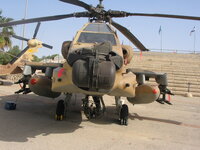
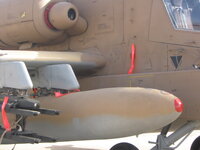
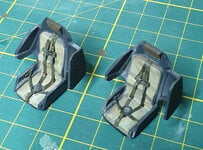
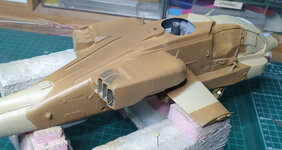
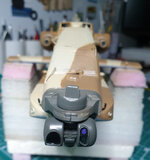
Very recently Takom has issued very nice and update kits of the AH-64 family of helicopters, but when I started my project the only product I found was the one from Academy.
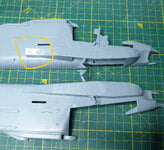
First reaction after opening the box was: that's big! 45 cm in lenght!
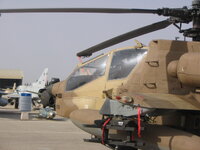
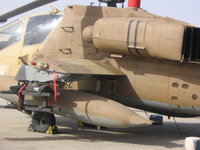
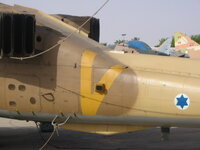
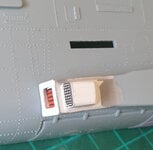
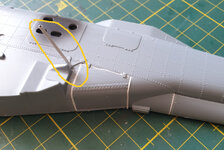
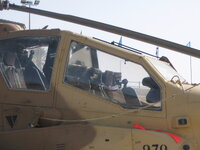
But the main challenge here was that Israeli machines have been deeply modified almost everywere.
To follow.
 

Attachments

  • 20220513_175643.jpg
    20220513_175643.jpg
    709.4 KB · Views: 17
  • 20220513_175808.jpg
    20220513_175808.jpg
    540 KB · Views: 16
  • AH-64A_01.jpg
    AH-64A_01.jpg
    179.8 KB · Views: 14
  • AH-64A_03.jpg
    AH-64A_03.jpg
    198.7 KB · Views: 15
  • AH-64A_07.jpg
    AH-64A_07.jpg
    154.1 KB · Views: 14
  • AH-64A_32.jpg
    AH-64A_32.jpg
    282.1 KB · Views: 15
So I started to scratch-build! Unable to find any sort of drawing, I had to base my work on photos with and a lot of guess!
I hope you like it! More to follow.
 

Attachments

  • 20220605_180722.jpg
    20220605_180722.jpg
    469.7 KB · Views: 12
  • 20220605_180630.jpg
    20220605_180630.jpg
    504.3 KB · Views: 12
  • 20220604_161217.jpg
    20220604_161217.jpg
    814.9 KB · Views: 13
  • 20220529_152620.jpg
    20220529_152620.jpg
    532.1 KB · Views: 12
  • 20220529_152456.jpg
    20220529_152456.jpg
    484.1 KB · Views: 11
  • 20220524_200603.jpg
    20220524_200603.jpg
    581.5 KB · Views: 10
  • 20220612_152301.jpg
    20220612_152301.jpg
    571.5 KB · Views: 12
Hi, many thanks for your comments!
One more steps concerns an other big challenge (at least for me): how to make new a uxiliary tanks that aren't included in the kit.
Again, based on pictures, I made a drawing and from it I tackled this job.
First I provided a wooden rod of suitable diameter and started turning it on my little lathe.
 

Attachments

  • AH-64A_27.jpg
    AH-64A_27.jpg
    155.6 KB · Views: 13
  • 20220716_173759.jpg
    20220716_173759.jpg
    1 MB · Views: 12
  • 20220717_212249.jpg
    20220717_212249.jpg
    260.3 KB · Views: 12
When I feeled satisfied with my job, I covered it with liquid putty and, once dry, I sanded it smooth.
My master was ready, but there was a problem: this tank is nearly 65 mm in lenght and I thought it was too long for a single print, therefore I I cut my master in two an I made two silicon moulds, one for the front half the other for the rear that finally were glued together.
 

Attachments

  • 20220722_154605.jpg
    20220722_154605.jpg
    1.3 MB · Views: 13
  • 20220726_150832.jpg
    20220726_150832.jpg
    443.9 KB · Views: 11
  • 20220728_101200.jpg
    20220728_101200.jpg
    689.5 KB · Views: 12
  • 20220922_204949.jpg
    20220922_204949.jpg
    611 KB · Views: 12
Sorted out, at least for the time being, the issue regarding drop tanks, I spent some time on the office.
Dials are from decals while safety belts are home made.
All those pictures have been taken aprox one year ago.
More to follow soon.
 

Attachments

  • 20221002_161408.jpg
    20221002_161408.jpg
    579.2 KB · Views: 17
  • 20221001_203345.jpg
    20221001_203345.jpg
    824.9 KB · Views: 17
  • 20221001_173717.jpg
    20221001_173717.jpg
    707.7 KB · Views: 17
  • 20220821_095913.jpg
    20220821_095913.jpg
    518.2 KB · Views: 15
  • 20220821_095852.jpg
    20220821_095852.jpg
    482.1 KB · Views: 17
Hello! One more step forward was a new challenge: cut the transparent cabin plastic to separate right end windows with the goal to leave them open.
I used a rotary tool, hold by a support and my free hands, as steady as I could.
Result came out not too bad, witha few little rework to be done at the end.
White matt areas on transparent are putty used to fill 1 mm holes intended to insert door handles; these will be replaced with much thinner copper wire.
 

Attachments

  • 20220920_170437.jpg
    20220920_170437.jpg
    839.6 KB · Views: 13
  • 20220911_124809 taglio.jpg
    20220911_124809 taglio.jpg
    524 KB · Views: 12
  • 20220911_124819 taglio.jpg
    20220911_124819 taglio.jpg
    616.8 KB · Views: 13
  • 20220920_161307.jpg
    20220920_161307.jpg
    429.9 KB · Views: 14
  • 20220920_165147.jpg
    20220920_165147.jpg
    489.4 KB · Views: 12
  • 20220920_165701.jpg
    20220920_165701.jpg
    736.9 KB · Views: 14
Next was to overcome one of kit shortcomings: there were no rivets all around windows and this wasn't correct!
I solved using 3d decals and, again, a lot of patience.
 

Attachments

  • 20221002_162731.jpg
    20221002_162731.jpg
    798.4 KB · Views: 13
  • 20221004_185224.jpg
    20221004_185224.jpg
    644.9 KB · Views: 14
  • 20221030_190958.jpg
    20221030_190958.jpg
    720.5 KB · Views: 15
  • 20221030_191007.jpg
    20221030_191007.jpg
    652.3 KB · Views: 13
  • AH-64A_24.jpg
    AH-64A_24.jpg
    167.8 KB · Views: 12
  • AH-64A_33.jpg
    AH-64A_33.jpg
    196.5 KB · Views: 12
Hi everybody, let me continue, after a ten days pausa due to various reasons. One of above pictures shows a cable cutter on the cockpit roof. This has been a little project as well. Started first on the internet to search for good pictures to refer to. Based on what I found, I started drawing several options that I cut in plasicard with my plotter.
 

Attachments

  • Immagine1.jpg
    Immagine1.jpg
    60.1 KB · Views: 10
  • LG Cable Cutter 1.jpg
    LG Cable Cutter 1.jpg
    29.9 KB · Views: 10
  • Roof Cable Cutter.jpg
    Roof Cable Cutter.jpg
    28.2 KB · Views: 10
  • 20221008_183505.jpg
    20221008_183505.jpg
    442.9 KB · Views: 8
  • 20221009_183902.jpg
    20221009_183902.jpg
    348 KB · Views: 10
  • 20221020_110348.jpg
    20221020_110348.jpg
    604.7 KB · Views: 10
Next all these cable-cutters, plus various antennas and other details were glued in their respective position.
 

Attachments

  • 20221029_140402.jpg
    20221029_140402.jpg
    197.2 KB · Views: 11
  • 20221030_190934.jpg
    20221030_190934.jpg
    445.8 KB · Views: 12
  • 20221030_190945.jpg
    20221030_190945.jpg
    544.1 KB · Views: 11
  • 20221030_191007.jpg
    20221030_191007.jpg
    652.3 KB · Views: 12
  • 20221023_182542.jpg
    20221023_182542.jpg
    616.9 KB · Views: 10
  • 20221029_140352.jpg
    20221029_140352.jpg
    541.7 KB · Views: 10
Unfortunately I lost all pictures taken during priming session as well as first base color, so I show what followed next:
 

Attachments

  • 20230103_202634.jpg
    20230103_202634.jpg
    438.8 KB · Views: 10
  • 20230103_202725.jpg
    20230103_202725.jpg
    518.5 KB · Views: 13
  • 20230114_173623.jpg
    20230114_173623.jpg
    605.7 KB · Views: 11
  • 20230114_173631.jpg
    20230114_173631.jpg
    489 KB · Views: 11
  • 20230114_173700.jpg
    20230114_173700.jpg
    546.8 KB · Views: 10
  • 20230117_190125.jpg
    20230117_190125.jpg
    600.5 KB · Views: 9

Users who are viewing this thread

Back