Navigation
Install the app
How to install the app on iOS
Follow along with the video below to see how to install our site as a web app on your home screen.
Note: This feature may not be available in some browsers.
More options
You are using an out of date browser. It may not display this or other websites correctly.
You should upgrade or use an alternative browser.
You should upgrade or use an alternative browser.
Academy Model "Cutty Sark" in 350 scale... with crew.
- Thread starter Night Fighter Nut
- Start date
Ad: This forum contains affiliate links to products on Amazon and eBay. More information in Terms and rules
More options
Who Replied?- Thread starter
- #22
Night Fighter Nut
Master Sergeant
With his pony pal Pokey.
You should have seen the reaction when Wojtek first told us where he got his string.
You should have seen the reaction when Wojtek first told us where he got his string.
- Thread starter
- #23
Night Fighter Nut
Master Sergeant
Oddly enough no. She brought wool from Australia to England.Does she come with a load of tea?
Snautzer01
Marshal
- 46,292
- Mar 26, 2007
He wears a string. ? Well I never...Wojtek first told us where he got his string.
SaparotRob
Unter Gemeine Geschwader Murmeltier XIII
Not even once?
Nicely done so far!
- Thread starter
- #28
Night Fighter Nut
Master Sergeant
Ok, time to get back to work. It has been an interesting month. First our water main broke and that repair cost a couple of pretty pennies. Then our AC went out the following week and I ended up changing out the entire system, going from two units to one. A few more pretty pennies. Decided to shave my beard off over the weekend and the first day back work, the manager for the section I'm in quits and is escorted out of the building and on the same day, the other senior person I work with gets seriously ill and remains out for three weeks. It ends up being just me and an intern running an entire manufacturing center. Oh and we are currently understaffed. A full work center usually has about 20 employees, we had 5 or 6 max and several orders started coming in along with other orders to expedite prior orders that we delayed due to lack of operators. Things are just now starting to get better. So now I'm trying to get back to the ship. I may grow my beard back out again, then threaten to shave it off if senior management decides to do something stupid.
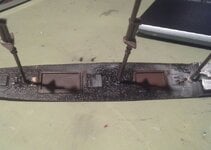
Anyway... Here are a couple of pictures to show where I am and a brief explanation.

In the first picture I show that I shaved off all the winches and half round items from the deck and fill in any voids I create. The drilled holes are still there. I also shaved off the two sets of stairs that the real ship didn't have. They had ladders instead so I need to make that using a 350 scale figure to determine the needed size.

I drilled holes in the mast to help with the rat lines and other major rigging. I still need to drill holes in other parts of the deck but I have some more research to do first before I do.
There are a couple things I think about while I'm working on a particular subject. First is just how detailed do I want to get. Then second is how do I make what I don't have or isn't correct. The thing about scratch building is not be afraid to do something. That only limits you. Experiment constantly because who knows? I might just discover a technique that solves either mine or someone else's problem.
A discovery I made while working on the bomber. If you bend a copper wire into whatever shape you want, it will unbend unless you solder it, but if you bend a copper wire into a shape and flatten it, it will retain that shape. So if I want to make something like a wheel for a winch, I just find a pin to get the diameter of the wheel I want and coil the wire around the pin. Then I slid the loop off the pin and flatten it with smooth jaw pliers. A little light sanding and I'm done. Quicker than photo etch...
I've got a lot of experimenting to do... Something else I had to do before moving on is deciding on the ships configuration. There are not enough photos of what I want and there are too many different versions of the same ship depending on the ships history. I took some time but I finally settled on a museum quality model that is very well detailed and has enough photos for me to figure out what to do with this ship.
Hopefully I will get much more done this weekend.
Thanks for following.
Anyway... Here are a couple of pictures to show where I am and a brief explanation.
In the first picture I show that I shaved off all the winches and half round items from the deck and fill in any voids I create. The drilled holes are still there. I also shaved off the two sets of stairs that the real ship didn't have. They had ladders instead so I need to make that using a 350 scale figure to determine the needed size.
I drilled holes in the mast to help with the rat lines and other major rigging. I still need to drill holes in other parts of the deck but I have some more research to do first before I do.
There are a couple things I think about while I'm working on a particular subject. First is just how detailed do I want to get. Then second is how do I make what I don't have or isn't correct. The thing about scratch building is not be afraid to do something. That only limits you. Experiment constantly because who knows? I might just discover a technique that solves either mine or someone else's problem.
A discovery I made while working on the bomber. If you bend a copper wire into whatever shape you want, it will unbend unless you solder it, but if you bend a copper wire into a shape and flatten it, it will retain that shape. So if I want to make something like a wheel for a winch, I just find a pin to get the diameter of the wheel I want and coil the wire around the pin. Then I slid the loop off the pin and flatten it with smooth jaw pliers. A little light sanding and I'm done. Quicker than photo etch...
I've got a lot of experimenting to do... Something else I had to do before moving on is deciding on the ships configuration. There are not enough photos of what I want and there are too many different versions of the same ship depending on the ships history. I took some time but I finally settled on a museum quality model that is very well detailed and has enough photos for me to figure out what to do with this ship.
Hopefully I will get much more done this weekend.
Thanks for following.
Attachments
Vic Balshaw
Major General
Slow and methodical. 
Good work so far!
- Thread starter
- #32
Night Fighter Nut
Master Sergeant
Well I have good news and bad news.
First the bad news. I spent some time researching this ship and the first thing I figured out is this is not the Cutty Sark. I feel bummed about it. There is no figure head and the railing around the deck is all wrong. Even the deck layout is all wrong with some places, not even close. This is going to require some major surgery.
The good news is I'm not going to quit this. it just makes it more challenging. I will be posting some photos soon. Now for some history into the ship.
First the ship was a composite. It had iron framework and wooden covering, one of only eight of that design. Apparently, she did do a little with tea shipments but she arrived late in the trade so the majority of her cargo was wool.
The name or the figure head was, "Nanny the Witch". Cutty Sark translates to short shirt but of course Nanny the Witch had a log shirt. Cutty Sark also had 11 miles or rope in her rigging. More to follow.
- Thread starter
- #33
Night Fighter Nut
Master Sergeant
Ok, where to begin.
First I did some airbrushing and fit testing to see how things came together.

At first I accepted that there were going to be some size issues, I just needed to see first what went together and how it looked overall.

I determined that the deck didn't fit too well so I sanded the sides until it dropped in like it was suppose to. I also saw that there wasn't much support for the deck so I added supports for improved fitting and to strengthen attachment later.

Looking at the cabin with the one boat on top, I didn't like how it looked so I tried to improve its appearance by cutting it off and building it up with styrine.


I filled in the hole and smoothed it out.

I wasn't sure if I could try planking but I had to try. I used a wire brush and pulled in one direction to get the lines. I kind of worked. I'll add a wash later to see how it comes out.

Remember the stairs? I sanded them off and now I wanted to add the ladders. For this I trimmed from extra screen material I had on hand and attached where the ladder should go. It seemed to fit ok.

Here is that boat cabin again... after improvements.


For the rat lines I wanted to start with what I had and work on something from there.

More to follow as I study the ratlines on the actual ship.
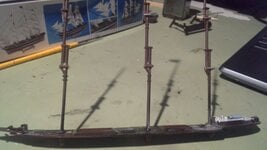
Now here is where I am as of today.


This is the area that depressed me the most. I could stand that there was no figurehead. The model came with one set of stairs but the actual ship had two. The railing around the fore and aft of the ship are thin like pipes, where as on the model they are monstrosities. I had thinned them out but I now believe I will need to cut them off entirely and make something from stretched sprue or maybe in combination with wire. We'll see. Very little is glued down at this point so many options are open. if you have an idea, let me know.
Thanks for following.
First I did some airbrushing and fit testing to see how things came together.
At first I accepted that there were going to be some size issues, I just needed to see first what went together and how it looked overall.
I determined that the deck didn't fit too well so I sanded the sides until it dropped in like it was suppose to. I also saw that there wasn't much support for the deck so I added supports for improved fitting and to strengthen attachment later.
Looking at the cabin with the one boat on top, I didn't like how it looked so I tried to improve its appearance by cutting it off and building it up with styrine.
I filled in the hole and smoothed it out.
I wasn't sure if I could try planking but I had to try. I used a wire brush and pulled in one direction to get the lines. I kind of worked. I'll add a wash later to see how it comes out.
Remember the stairs? I sanded them off and now I wanted to add the ladders. For this I trimmed from extra screen material I had on hand and attached where the ladder should go. It seemed to fit ok.
Here is that boat cabin again... after improvements.
For the rat lines I wanted to start with what I had and work on something from there.
More to follow as I study the ratlines on the actual ship.
Now here is where I am as of today.
This is the area that depressed me the most. I could stand that there was no figurehead. The model came with one set of stairs but the actual ship had two. The railing around the fore and aft of the ship are thin like pipes, where as on the model they are monstrosities. I had thinned them out but I now believe I will need to cut them off entirely and make something from stretched sprue or maybe in combination with wire. We'll see. Very little is glued down at this point so many options are open. if you have an idea, let me know.
Thanks for following.
- Thread starter
- #34
Night Fighter Nut
Master Sergeant
I did forget to mention, I came up with an idea with attaching lines around the masts. I put a ring around the base of each mast of styrene. The thinnest EZ line I have attaches easily if I add a few nicks into this styrene. Will show this later when I get to that point.
Vic Balshaw
Major General
I have been thinking about your little problem re the rails that you thinking of duplicating so they look more appropriate in size. How about for the posts you use tooth brush bristles, I have found they are quite fine but also quite rigid and if placed in a small macro drilled hole, they should look quite effective. As for the railings, fine copper electric wire held on the post with a dab of glue, the wire also being flexible enough to work round corners without support. As for anchor chain, if your in need of some, I have some that I'd happily stick in an envelope and send it to you.
- Thread starter
- #37
Night Fighter Nut
Master Sergeant
Thanks Vic, I like that idea, but I will need to put that in later as experience with fiddly bits tells me that now is not the time unless I feel inclined to repeat reattachment frequently.
Nice work so far!
- Thread starter
- #39
Night Fighter Nut
Master Sergeant
So this is what my chain looks like at this point.
.jpg")
From a little distace it looks ok. What do you guys think?
From a little distace it looks ok. What do you guys think?
Vic Balshaw
Major General
In the scale your working in I recon this would be okay but with the models I have made with anchor chains, the chain has always been smooth twisted links, see pic (red arrow) which is a necklace chain or the one I have on offer (which still stands) has right angle chain links (blue arrow).

Users who are viewing this thread
Total: 1 (members: 0, guests: 1)