Tamiya P-47D Paint (1 Viewer)

Ad: This forum contains affiliate links to products on Amazon and eBay. More information in Terms and rules

sokolich

Recruit
6
0
Apr 26, 2010
Hi Everyone!
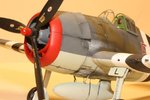
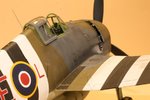
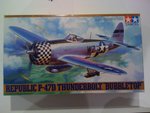
Great forum! By browsing your forum, you made me go out and buy a model to build. It has been a while but would like to get back into it. I purchased a Tamiya P-47D 1/48 scale and am going to paint it in "aluminum". Keep in mind that I don't have an airbrush yet, but hopefully will soon.
I have found most of the answers to my questions in your forum but need some clarification on a couple of things:
1) If I would want to pre-shade the panel lines, will I absolutely need an airbrush? Is there a way to achieve this look without an airbrush using some other materials? Is the final look worth it?
2) After painting the aircraft, is it best to put a gloss clearcoat down then apply the decals?
3) After the decals are applied, should a flat clear coat be applied to the whole aircraft to seal it?
4) I read the tutorial on weathering, chips, exhaust, etc. Any advice?

Again, thanks for a great forum!!
Scott :D
 
Hi Scott and welcome to the zoo.

The answers to some of your quesitons will be based on opinions, no right or wrong. So here are my opinions:

1) Personally, I think preshading has its place for certain schemes where heavy wear is to be represented but I would not use the technique myself for natural metal finish (NMF) representation. If you do chose to do it though, I have only seen it done with an airbrush but I suppose it would be possible to do it with a hairy stick (brush). You'd want to feather the edges out though so drybrushing the edges might work oruse a Q-Tip. Airbrush would be best though.

2) It's almost a given these days to gloss coat before applying decals. This alolows the decals to adhere better and lessens the cahnce of "silvering". If you're using something like Alclad metallizer - never used the stuff myself - I'm not sure what the protocol is before applying decals. Maybe someone else will chime in on that one

3) Dullcoat after applying the decals does seal them and also returns the paint work to a more realistic flat finish for painted aircraft. Coating over the decals also results in a more uniform finish between paint and decal. Again for a NMF, this will depend on the final look you want to acheive. You can also seal the decals with another gloss coat if you want a shinier finished look. I personally like my models to look like they're in a war and not in an airshow so I tend toward the duller, worn look.

4) As I said, I like the weathered look but the key is to be very subtle with this because it's easy to overdo it. For exhaust, dust, and dirt stains, I tend to use chalk pastels as these not only look realistic but you can slowly build the effect from almost invisible to the desired intensity. In cockpits and wheel wells, I like to use a very thin wash of black/brown oils to make highlights stand out and simulate dirt and grease. Carefully done, this technique makes for great oil stains as well.

Good luck and looking forward to seeing your stuff! Here are a couple of samples:
 

Attachments

  • 100412 11 oclock lo.jpg
    100412 11 oclock lo.jpg
    92 KB · Views: 103
  • 100412 5 oclock lo.jpg
    100412 5 oclock lo.jpg
    87.1 KB · Views: 102
Hi Crimea_River!
Thanks for the response!
I think I like the idea of not using pre-shading on the "aluminum" finish. Makes sense to me too.
As for as the gloss coat and dull coat goes, what do you suggest? My hobby store has a large selection of the Tamiya acrylics and enamels. You mentioned Alclad. Are the clear's similar to what is pained on autos?
Also, using the chalk pastels seems easy enough and I would think a little "forgiving" if a mistake is made.

I will give it a shot and post the pics!
Here is the picture of the box!

Thanks again for all of the help and advice!!
Very nice Hellcat!!

Scott:D
 

Attachments

  • IMG_0027.JPG
    IMG_0027.JPG
    274.2 KB · Views: 119
Hi Scott. It looks like Andy (Crimea River) has sorted things for you, and he's said what I would have probably suggested. If you're aiming for a 'natural metal' finish, have a look at the 'Bare Metal Made Easy' guide I posted some time ago, in the 'Painting question' section here. I think it's still hidden somewhere around Page 6 !
It's aimed at brush-painting a bare metal finish, and might give you some ideas. One thing which can't be stressed enough though, regardless of which method is used to achieve the NMF - the model's surface must be absolutely free of any blemishes, from scratches and marks, filler, and especially rough joints or burrs. Any metallic finish will make imperfections stand out like a dog's dangly bits with flames around them !
Cheers,
Terry.
 
Thanks Terry! I will take a look at the post, Bare Metal Made Easy.
All of you have so much information to share and advise on!
I appreciate the help!I will post pics of the finished Jug.
Scott :)
 
Hi Sokolich,

I a a novice member of this forum so my knowledge of modeling and finishes is marginal. Although, I have experimented with Buffable metalizer from Model Master and it just looks awesome. The trick is to be sure (As Terry has mentioned) that the surface is mint and free of blemishes, something that is done by sanding the plastic with a very fine grit (600 and up) Tamiya coarse compound rubbed with a soft rag also works very well for this purpose, but no matter what is used, the plastic has to look almost mirror like. The metalizer has to be applied with an airbrush and little or no thinner. It dries in about 20 minutes and then you have to buff it up with a soft and clean rag or even a dremel with a loose cotton insert, but this last option needs mastering or you end up burning the surface. To create different shades, you can use different colours of buffable metalizers, and some modelers paint each panel with variations of metalizer colors to simulate alloys differences. My very last suggestion is that you refrain from using any kind of clear or dull coat,even the special lacquer coat that model master recomends for its metalizers because it will invariably dull up the metal shine. I know that the trade is that you can not touch the surface or it will get stained very easly and you'll have to paint over.

I am attaching an example of a propeller that I painted recently to illustrate the results.

My two cents.
 

Attachments

  • propeller.jpg
    propeller.jpg
    48 KB · Views: 112
Last edited:
Hi Scott. Regarding the clear coat, one of the most popular is Future floor polish which goes by different names depending on where you llive. It's also great for dipping clear parts to get extra sparkle and prevent fogging with CA glues. Go here for more: The Complete Future

As for the flat coat, I've been using Testors Dullcoat but there are others.
 
Hi Andy!
I have seen that floor polish in the grocery stores here in St. Louis. Do you just spray it with the air brush?

Scott
 

Users who are viewing this thread

Back