1/48 A-20G Havoc

Ad: This forum contains affiliate links to products on Amazon and eBay. More information in Terms and rules

El Camino? As in the car? If so, what year, what model, and what engine? Also....sorry for the massive distance between the quote and where my reply is.

On a more related note, AWESOME A-20G!!!!!!!!!!!!!!!!!!!!!

Thank you MacArther. The El Camino is a 86' with a 305 bore 40 over. If your interested send me a PM.:)
 
Have you got the correct decal paper Aaron? There are different papers for ink jet and laser printers. There are also solid white and clear sheets designed to be used as normal decals, without printing, where designs can be drawn and painted if required.
 
Ah! Now I understand. Yes, the printer will not print onto the paint, which is the reason I mentioned earlier about doing the painting afterwards, not realising there were 100 small bombs to paint!
One way to do it then, although tedious, would be to paint strips of white (for the background) onto the model, add the red(?) decals, clear coat, then, when dry, mask and paint the camouflage colour in between each bomb, Could even be done free hand if the masking is tricky.
 
I had it backwards in my explanation . The box art shows the mission board properly, but the decal is opposite of the box art. I am looking for some white decal paper at the moment in between putting the other decals on. If I'm not able to get the white paper, I'll try the paint stripes
 
AND WE HAVE SUCCESS!!!!!!!:headbang: Letting the decal ink dry and then I'll LIGHTLY cover it in decal bonder and let that dry. Hopefully the decals will be finished tomorrow.
 
Good to hear Aaron !
Given that the printing is OK, then leave it a minimum of 15 minutes, until the ink is dry, then spray with a clear gloss. Allow this to dry/harden, for at least 1-3 hours, but preferably, for example, overnight, to be sure that the clear oat has fully cured.
Then, use as normal decals - but be aware that perhaps more attention may be required , watching the water/soaking time, and the application. They tend to be more sensitive, compared to commercial decals, and can curl an fold easily.
Hope this helps.
 
Thank you Terry, I remember now, someone else was saying something about this. I appreciate this very much sir.:notworthy: 
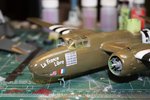
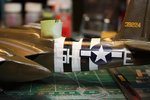
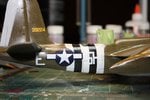
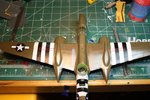
I will apply it tomorrow and take a photo of the model before applying the dull coat. I applied a light coat of decal bonder to protect the ink from the water also. It looks just like clear to me. Monday I will give it a dull coat and start weathering it Wed. I have a prior engagement on Tue.:)
 
Well, it's on there. It's not the best in the world but it's on there, I'm content as long as the Micro Sol does it's job. I'll post some shots in the morning after they've settled out.
 
Last edited:
And we are a few steps closer yet.
 

Attachments

  • IMG_4983 A-20G resized 20.jpg
    IMG_4983 A-20G resized 20.jpg
    78.1 KB · Views: 111
  • IMG_4984 A-20G Havoc resized 20.jpg
    IMG_4984 A-20G Havoc resized 20.jpg
    74.2 KB · Views: 109
  • IMG_4985 A-20G Havoc.jpg
    IMG_4985 A-20G Havoc.jpg
    74.1 KB · Views: 124
  • IMG_4986 A-20G Havoc.jpg
    IMG_4986 A-20G Havoc.jpg
    96.7 KB · Views: 121
Last edited:

Users who are viewing this thread

Back