Nicely done so far Grant!
Navigation
Install the app
How to install the app on iOS
Follow along with the video below to see how to install our site as a web app on your home screen.
Note: This feature may not be available in some browsers.
More options
You are using an out of date browser. It may not display this or other websites correctly.
You should upgrade or use an alternative browser.
You should upgrade or use an alternative browser.
1/48 Hobby Craft Boeing P-26A (1 Viewer)
- Thread starter Grant Barr
- Start date
Ad: This forum contains affiliate links to products on Amazon and eBay. More information in Terms and rules
More options
Who Replied?fubar57
General
Beauty
- Thread starter
- #43
Grant Barr
Senior Airman
I've been a bit slow to update but I have been busy.
I finished prepping the undercarriage spats and got them ready to shoot with a layer of gloss black undercoat. I did not want to just set up to paint four parts, so I had a quick look at what's left and realised I could get the prop ready for paint.
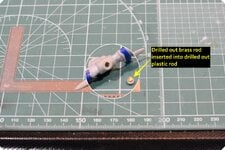
The prop is molded is a bit thick and lacks a bunch of hub detail evident in photos. I got busy working out how to improve the thickness of the prop blades and detailing the hub a bit more. Blades were easy - just sanded them back a bit, being careful not to impact on the shape and length. The hub was a different matter. I have some good detail shots of the hub showing concentric shafts which I assume are part of the locking mechanism for the prop onto the final drive shaft. I really wanted to focus on these as they really do feature when you look at the front of the real thing. However, early on I realised I was not going to add the fine level of detail I wanted, so I settled for a bit more of a "representation" - shot below.
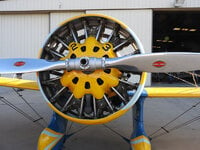 (Real a/c source: Large Scale Models - Walkarounds)
Basically I shortened the molded hub length and drilled a hole the same diameter as the inner shaft (lock?). This shaft I ended up doing in brass rod, which I drilled out to make it look like a tube and then inserted this brass rod into a slightly larger styrene rod I also drilled out (hope that makes sense!!!). It's pretty tiny but I've tried to magnify the hub insert. Like I said, its a representation rather than an accurate copy...
The other change I've made to the hub is to represent the sleeve into which the blades are mounted. The stock molding does not represent this at all. To show something here I masked off at the right point on the blade with some electrical tape (being a bit thicker than masking tape) and added a couple of layers of liquid filler. Once this has cured fully I'll pull off the tape and smooth it out so it looks like the sleeves.
While I had the drills out I also decided to hollow out one of the flight instruments which mounts on the starboard fuselage just forward of the cockpit. It has a venturi shape so my assumption is it measures something to do with airflow or speed (pretty sure someone knows what it does - my cutaway diagrams just call it an "instrument venturi"). Shots below.
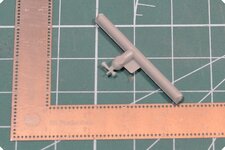
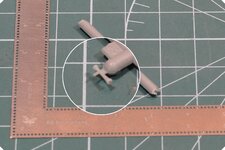
It's bl**dy tiny and I went cross-eyed doing it - but I'm pleased with how it looks now.
Hope to lay down some undercoat this evening all being well.
Thanks again for looking in and the advice/encouragement along the way.
I finished prepping the undercarriage spats and got them ready to shoot with a layer of gloss black undercoat. I did not want to just set up to paint four parts, so I had a quick look at what's left and realised I could get the prop ready for paint.
The prop is molded is a bit thick and lacks a bunch of hub detail evident in photos. I got busy working out how to improve the thickness of the prop blades and detailing the hub a bit more. Blades were easy - just sanded them back a bit, being careful not to impact on the shape and length. The hub was a different matter. I have some good detail shots of the hub showing concentric shafts which I assume are part of the locking mechanism for the prop onto the final drive shaft. I really wanted to focus on these as they really do feature when you look at the front of the real thing. However, early on I realised I was not going to add the fine level of detail I wanted, so I settled for a bit more of a "representation" - shot below.

 (Real a/c source: Large Scale Models - Walkarounds)
Basically I shortened the molded hub length and drilled a hole the same diameter as the inner shaft (lock?). This shaft I ended up doing in brass rod, which I drilled out to make it look like a tube and then inserted this brass rod into a slightly larger styrene rod I also drilled out (hope that makes sense!!!). It's pretty tiny but I've tried to magnify the hub insert. Like I said, its a representation rather than an accurate copy...
The other change I've made to the hub is to represent the sleeve into which the blades are mounted. The stock molding does not represent this at all. To show something here I masked off at the right point on the blade with some electrical tape (being a bit thicker than masking tape) and added a couple of layers of liquid filler. Once this has cured fully I'll pull off the tape and smooth it out so it looks like the sleeves.
While I had the drills out I also decided to hollow out one of the flight instruments which mounts on the starboard fuselage just forward of the cockpit. It has a venturi shape so my assumption is it measures something to do with airflow or speed (pretty sure someone knows what it does - my cutaway diagrams just call it an "instrument venturi"). Shots below.


It's bl**dy tiny and I went cross-eyed doing it - but I'm pleased with how it looks now.
Hope to lay down some undercoat this evening all being well.
Thanks again for looking in and the advice/encouragement along the way.
Lovely work so far Grant!
SaparotRob
Unter Gemeine Geschwader Murmeltier XIII
Looking forward to the final paint job!
- Thread starter
- #47
Grant Barr
Senior Airman
Thanks gents.
Quick update before I call it a night. Undercarriage spats have now been painted inside and glued together as shown below.
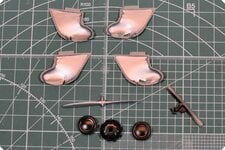
I've also done the prop in silver and the wheel hubs/instrument venturi are done in gloss black undercoat.
When I glued the spats together the mold misalignment issue reared its ugly head again. You can just see in the photo below the section of the spats I have not yet fixed. The two halves were badly aligned except for the wheel cut outs at the bottom - they were almost perfect. So instead of aligning the spat halves and fixing the wheel cut outs, I went the other way and just trimmed back the poorly aligned seams on the outside of the spats. The bit you see in the photo below is the part I haven't yet fixed.
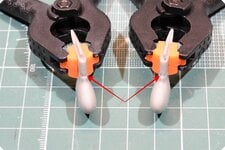
I briefly tested the wheel fit and, wheel alignment issues aside, I think it's going to work out pretty well. Where I do see some challenges is in fitting the spats to the wing underside. Test fits indicate that the chord and length of the spat joint on the wing panel is not quite the same as the spat itself. I'll potter around with this problem for a bit and see what I can come up with as a solution.
Thanks again for looking in on this project.
Quick update before I call it a night. Undercarriage spats have now been painted inside and glued together as shown below.

I've also done the prop in silver and the wheel hubs/instrument venturi are done in gloss black undercoat.
When I glued the spats together the mold misalignment issue reared its ugly head again. You can just see in the photo below the section of the spats I have not yet fixed. The two halves were badly aligned except for the wheel cut outs at the bottom - they were almost perfect. So instead of aligning the spat halves and fixing the wheel cut outs, I went the other way and just trimmed back the poorly aligned seams on the outside of the spats. The bit you see in the photo below is the part I haven't yet fixed.

I briefly tested the wheel fit and, wheel alignment issues aside, I think it's going to work out pretty well. Where I do see some challenges is in fitting the spats to the wing underside. Test fits indicate that the chord and length of the spat joint on the wing panel is not quite the same as the spat itself. I'll potter around with this problem for a bit and see what I can come up with as a solution.
Thanks again for looking in on this project.
Good work so far!
Crimea_River
Marshal
Doing great work there Grant.
- Thread starter
- #51
Grant Barr
Senior Airman
Thanks again guys. Quick update as I am trying to get this model finished so I can move onto the next one.
The past couple of days have been spent re-scribing the panel lines. I suspect the moulds were pretty old by the time my kit was produced - the issues with alignment and the fact that a good proportion of the mould lines and finer details are very faint I think is a strong sign of this. None-the-less I am just re-scribing the panel lines to make the whole kit look a bit more "fresh" once painted. I haven't taken any photos as no-one really wants to look at strips of tape on a model and part re-scribed lines. So far I have done the bottom side of both wings and rear stabilisers, the top side of one wing and some small lines on the fuselage nose. Lots and lots of lines to go - probably a couple more hours to go. Hoping to get this done by Friday night!
I have also resolved the issue with the alignment of the u/c spats into position. I have added strips of styrene to the mounting tab to make sure it fits properly both laterally and longitudinally. The bit yet to be resolved is how best to trim back the wing moulded top of the spat to match the bottom part. The spat itself is a bit thinner in chord width than the wing moulded top. I think it will be easier to trim the top than to "build up" the bottom - time will tell.
Anyhooooo - that's about all I have atm. Better get back to work...
- Thread starter
- #52
Grant Barr
Senior Airman
I got pretty bored with scribing panel lines so to change things up a bit I decided to have a go at creating the rolled metal seam that runs down the length of the front of the u/c spats. I think they might turn out alright once they dry and I get the tape off to blend them a bit more.
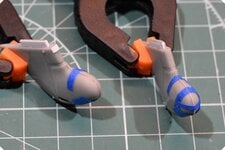
The shims I created to help true-up the fit to the wings are visible here and you may notice a small piece of white styrene on the spat to the left. It is a poor fit lengthwise and this piece will be trimmed down and shaped to make the leading edge of the spat line up with the moulded piece on the wing. Fingers crossed I get the shape right for that bit.
That's all for now, cheers.
Nicely done so far!
- Thread starter
- #55
Grant Barr
Senior Airman
Have not updated this build for a while, but I have not been idle.
The touch up for all panel lines is pretty much done now. I've had more than a few slip ups with the scriber as the black lines where they were corrected with superglue as the filler. I think once the final surface sanding is done they should look really great .
.
I've added the rudder and elevators, as shown below. The rudder has a very slight kick and the elevators are drooped as I have seen in a number of period source photos.
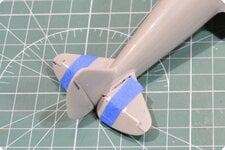
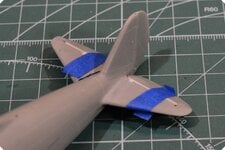
The tailwheel insert has also been installed. It's not the cleanest fit and its almost impossible to find photos of the early P-26A's where you can clearly see how the insert looks IRL. Nearly every period photo I have has the tailwheel in too much shadow to make out any decent detail. All the surviving aircraft are the later version with the extended smaller tailwheel so they are not much use as references. I can live with it as it is.
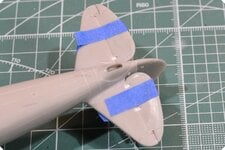
Finally I have also attached the undercarriage spats. I think I mentioned earlier that the fit is not great. The biggest issue is with the RHS spat where the profile of the spat leg is narrower than the profile of the attachment point on the wing. I resorted to adding some Milliput filler, topped off with Mr Surfacer 500 to help give a smoother finish. The panel at the top front of the spat also needed to be filled out some more. The shots below show the filler and the enhanced spat panel added and will just need a bit of re-profiling done with files/sandpaper to make them correct.
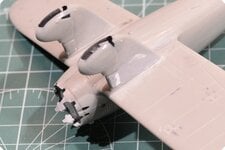
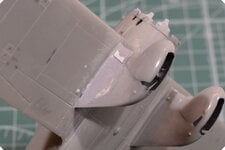
You can also see here where my fat fingers have managed to break off the small engine fairing panels I made earlier in the build. Lesson learned - don't add fragile sticky-outy bits until after you've done any required major remodelling!! The good news is that I have a whole bunch of spares - I made more than I needed originally as I was not exactly sure how they might work out. Once I've finalised the heavier mod work I'll redo the fairing panels - no biggie!!
I'm really keen to get onto the painting for this kit. It will be a real treat to do a non-camo finish and the decals I have should make the paint scheme really pop.
I do have one question to pose on painting. I am tossing up what colour to use as an undercoat. I have gloss black, white and grey undercoats in the Vallejo range (the final colours will also be Vallejo). Given the blue/yellow scheme I was leaning toward black thinking it will give more depth to the colours. Does anybody have advice based on their experiences?
Thanks again for looking in and the offers of encouragement - it all helps to keep me motivated to finish it!!
Cheers!
The touch up for all panel lines is pretty much done now. I've had more than a few slip ups with the scriber as the black lines where they were corrected with superglue as the filler. I think once the final surface sanding is done they should look really great
I've added the rudder and elevators, as shown below. The rudder has a very slight kick and the elevators are drooped as I have seen in a number of period source photos.


The tailwheel insert has also been installed. It's not the cleanest fit and its almost impossible to find photos of the early P-26A's where you can clearly see how the insert looks IRL. Nearly every period photo I have has the tailwheel in too much shadow to make out any decent detail. All the surviving aircraft are the later version with the extended smaller tailwheel so they are not much use as references. I can live with it as it is.

Finally I have also attached the undercarriage spats. I think I mentioned earlier that the fit is not great. The biggest issue is with the RHS spat where the profile of the spat leg is narrower than the profile of the attachment point on the wing. I resorted to adding some Milliput filler, topped off with Mr Surfacer 500 to help give a smoother finish. The panel at the top front of the spat also needed to be filled out some more. The shots below show the filler and the enhanced spat panel added and will just need a bit of re-profiling done with files/sandpaper to make them correct.


You can also see here where my fat fingers have managed to break off the small engine fairing panels I made earlier in the build. Lesson learned - don't add fragile sticky-outy bits until after you've done any required major remodelling!! The good news is that I have a whole bunch of spares - I made more than I needed originally as I was not exactly sure how they might work out. Once I've finalised the heavier mod work I'll redo the fairing panels - no biggie!!
I'm really keen to get onto the painting for this kit. It will be a real treat to do a non-camo finish and the decals I have should make the paint scheme really pop.
I do have one question to pose on painting. I am tossing up what colour to use as an undercoat. I have gloss black, white and grey undercoats in the Vallejo range (the final colours will also be Vallejo). Given the blue/yellow scheme I was leaning toward black thinking it will give more depth to the colours. Does anybody have advice based on their experiences?
Thanks again for looking in and the offers of encouragement - it all helps to keep me motivated to finish it!!
Cheers!
fubar57
General
Coming along nicely. This is the best photo of the tail wheel I can find so far

fubar57
General
PM sent

Looks good so far!
Crimea_River
Marshal
Good work Grant. Not sure I'd go with a black undercoat for yellow. White or light grey would be my pick.
Users who are viewing this thread
Total: 2 (members: 0, guests: 2)
