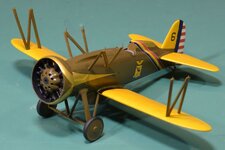
1/48 Classic Airframes Boeing P-12E (2 Viewers)

Ad: This forum contains affiliate links to products on Amazon and eBay. More information in Terms and rules
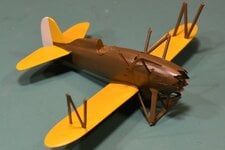
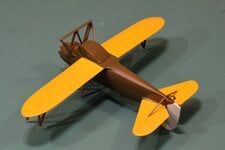
As promised - another update. Always happy when I have a productive day!

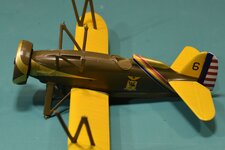
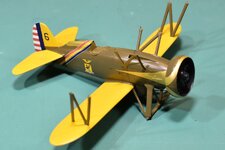
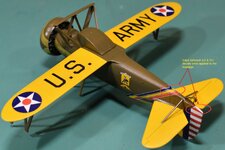
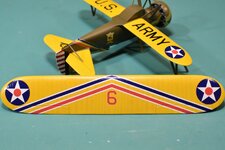
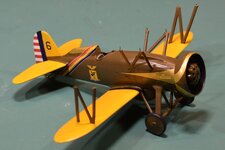
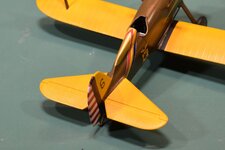
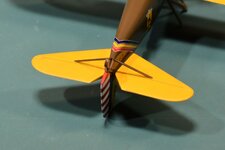
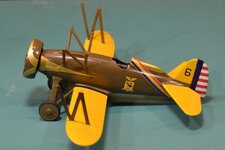
Final colour has been added and a gloss clear coat laid down. Sadly, I've not taken any photos during the painting process – I got all carried away as the colour went on and neglected to pick up the camera. Probably no big deal here - we've all seen paint as it's applied or masking tape covering half the aircraft...

As you can see in these shots, I have managed to get a decent coverage with the yellow (always a challenge with such a translucent colour) but without destroying the pre-shade in the wing rib valleys. That detail is probably too hard to see in these shots, but I can assure you the difference in shade is quite visible.
097_P-12E Painted & Gloss Coated.JPG 098_P-12E Underside Painted & Gloss Coated.JPG
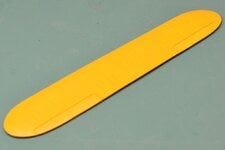
099_P-12E Top Wing Painted & Gloss Coated.JPG 100_P-12E Engine Panels Painted & Gloss Coated.JPG

I was unsure how the Olive colour would look once applied. It could be a little dark perhaps, but I am pleased with both the coverage and tone achieved.

I think I have finally cracked how to get a decent gloss finish with the Vallejo Polyurethane I've been using. It needs to have a thinner to paint ratio of at least 2.5:1 with a couple of drops of retarder to stop the clear from drying in the air before it hits the model. I found that it also helps when spraying to move a little bit slower and allow the surface to look a little "shiny/wet" before moving on to the next section. It's a fine balance but I hope you can see from the photos that there is actually a decent sheen without the "graininess" that I have been getting on previous efforts.

My next coat of gloss clear will be applied using a 3:1 ratio to see how that goes, but that won't happen until after applying the beautiful decals from Model Alliance. The more I look at them, the more I like them.

That's about as far as I got this evening. Hoping to get yet more done tomorrow, although we have a weather forecast of 40 deg Celsius and working out in the garage could be a bit challenging in those conditions. We'll see how it goes.

Thanks again for the feedback. Looking forward to finishing this one now, although with rigging and various other fiddly small bits still to go I might not be done as soon as I hope. 🤷‍♂️
 
Found some time for the next progress update.

Decals have been applied, touched up and sealed under a clear coat.

I have to say that I am very impressed with the decals from Model Alliance/Cartograph. They are very thin but reasonably robust, so much so that you can move them around a bit once applied to the surface, but there is a point where they will just stick, and no amount of persuasion will move them.

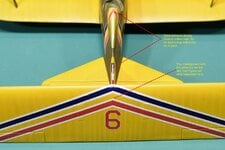
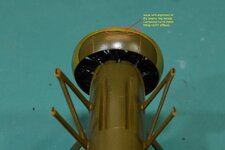
The next couple of shots show the decals as applied to the top wing and the engine cowl ring. The fuselage and rudder decals posed the usual challenges of not quite matching up. You can see the small gaps at the back of the rudder and on top of the fuselage emergency raft hump. This and almost all other alignment issues with the decals resulted from the issued noted above. This is especially true where the decals needed to conform to a compound curve (think the engine cowl). For a minute or two after application there is a chance to move them into place, but it seems that once they decide to bed down, they are there for good!!! I did try MicroSol/Set to see if I could get them to shift – all to no avail.
101_P-12E Decals Top Wing Rudder & Fuselage Top.JPG 102_P-12E Decals Top Townend Ring.JPG

If you look at the decal on the engine ring closely you may just be able to see where the decals crinkled up as they shrank onto the surface. Given how much excess decal there seemed to be on initial application I am completely amazed at how well they did settle. To be honest I expected them to have some shocking wrinkles or folds in them – they turned out much better than I thought.

The following photos are more shots of the decals applied but before any touch-ups or clear coats applied. Again, the areas where compound or tight curves exist I thought would be basket cases, but they actually look alright. If you zoom in closely on the first shot, you can see a wrinkle/fold in the gold decal over the end of the life raft hump. That curvature is incredibly tight so to get it looking that good is a win as far as I am concerned. On the photo of the underside, you can again see the alignment issues with the decals that are applied to both sides.
103_P-12E Decals LH Fuselage.JPG 104_P-12E Decals RH Fuselage.JPG 105_P-12E Decals Fuselage Underside.JPG

The next six shots are all taken after the touch-ups have been completed and a clear coat applied to seal it all in. The engine and wheels are just dry fits at this point as there is still too much work to be done where the risk of knocking them all off exists. I think it is now starting to look like an aircraft and not just a lump of vaguely airplane shaped plastic.
106_P-12E Sealed Decals Top Wing.JPG 107_P-12E Touched Up Sealed Decals RHS Fuselage.JPG 108_P-12E Touched Up Sealed Decals Rudder & Fuselage Top.JPG
109_P-12E Touched Up Sealed Decals Rudder & Fuselage Bottom.JPG 110_P-12E Touched Up Sealed Decals LHS.JPG 111_P-12E Touched Up Sealed Decals Front LHS.JPG

With that I think we are basically up to date with my progress on this kit. I have some stuff that will likely curtail how much time I have in the next couple of weeks, so I may not get to start on the rigging for a little while. I was trying my hardest to get this one finished, but timing has not been in my favour of late :facepalm:.

As always, thanks to everyone who drops by for comments/reactions. Looking forward to getting this one finished and into the display cabinet.
 
This next build is an old(?) Classic Airframes kit of the Boeing P-12E. Unless you have an old Aurora kit, this is basically the only game in town when it comes to 1/48 scale versions of this aircraft. I did build the Matchbox 1/72 scale kit of this aircraft back when Adam was a boy, but my eyes and fingers just can't cope at the smaller scales these days. Minicraft/Hasegawa do have one in 1/32, but I don't have enough space for the big scale stuff.

As you would expect with a short-run kit (and as the makers helpfully state on their instructions), there will be lots of cleaning up of parts, dry fitting and scratching up enhancements/replacements/fixes along the way. After looking closely at the sprue trees, I think that the clean-up and fitting work will form most of the time I spend putting this one together.

So, what do I get for my hard-earned cash?
View attachment 805675
The excellent box art is from the late Don Greer and pictures an aircraft from the same squadron as that I built with the Matchbox kit so many years ago.
View attachment 805674 View attachment 805673 View attachment 805672
The instructions are basic, with guidance on the placement of parts a bit "arbitrary". Thankfully I have been able to source quite a good number of old photos (mostly from the Boeing website) which provide excellent real-world detail on what goes where on the aircraft.
View attachment 805671 View attachment 805670 View attachment 805669 View attachment 805668 View attachment 805667
As for the parts themselves, if you zoom in a bit on the sprues, you will see that the moldings are a bit "blurry" around the edges and there are a lot of mold seams and flash to be dealt with. The other thing I really noticed was the massive mold fill point "lugs" on the inside of the wings, fuselage, and engine cowl. Will need to get the trusty Dremel out to deal with those.

Also worth noting is the inclusion of a comment in the instructions in step 5, where the top wings are installed, advising that the outboard struts and the cabane struts are molded too long and need to be shortened by up to 6mm (for the outboard struts – less for cabane). This does seem to be perhaps a bit excessive, but I have sourced some 1/48 scale line drawings to help me with fixing this issue. However, I am still worried about how this will impact the angle of the diagonal brace between the forward and rearward struts. Will need to think this one through a bit before proceeding – measure twice / cut once!

More to come - will be slowly progressing this kit over the next few months. Thanks for stopping by!
Regarding old and out of production kits:

I was a serious modeler back in the day but had lost track. Then a few years ago IPMS held its national convention here in Phoenix. Many attendees sought old kits for their collections. Was semi surprised to learn that some (many?) keep unassembled kits in large-to-huge numbers. I commented to one chap, "Well, I guess there are still people who think that closets are made for clothes and hat boxes!"
 
Well after many days of not getting to the workbench, I finally found some time to do more to the P-12E.

Now that the paint is on and the decals are sealed in, I have been trying to focus what little time I have available on the small parts.

Unfortunately, these small parts are either not well molded or require quite a lot of clean up. The windscreen as supplied is a vac-form part which really looks the part. The only downside was the requirement to cut out a slot to allow the gunsight to be fitted into place. Not a huge deal, just quite fiddly.
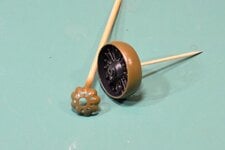
114_P-12E Sticky Outy Bits Corrections and Scratching.JPG 113_P-12E Windscreen and Gunsight Clean Up.JPG 112_P-12E Windscreen and Gunsight Dry Fit.JPG

The prop and exhaust pipe both required some re-work. The propellor shaft was too small in diameter and out of round. I cut it off and replaced it with some stock styrene rod of appropriate size. Similarly, the exhaust collector pipe on the LHS was way too small for the engine pipes to reach the exhaust ports on the engine heads. I inserted a piece of styrene rod to extend the distance between the header pipes allowing them to fit properly. Finally, the airspeed venturi as molded on the sprue was basically a misshapen blob of grey plastic. Again, I used some stock styrene rod and shaped it to match both photos and drawings as well as drilling it out to add some realism.

Not shown in the photos is the engine has now been attached to the fuselage and the wheels have also been glued into place.

Another task done, but one I have not taken any photos of is the application of some dirt and grime in the panel lines and in various places around the gun troughs and engine covers. I did this with a very light touch – as already noted photos of these aircraft show them quite well maintained and cleaned.

One major task looming is the fitting of the top wing. I did manage to do a dry fit run the other night and found to my dismay that the top wing has a nasty twist whereby the RHS end of the wing is low at the leading edge and high on the trailing edge. Not sure how I missed this earlier, but it has thrown a bit of a spanner in the works!

I am trying to remove this twist with a homemade jig to pull the wing in the opposite direction. Really not sure if this will work but am prepared to let the wing sit in the jig as long as possible to fix it. Time will tell.

I think that's about all for tonight. Getting closer to completion now. Thanks for dropping by!
 

Users who are viewing this thread

Back