Nice work so far!
Navigation
Install the app
How to install the app on iOS
Follow along with the video below to see how to install our site as a web app on your home screen.
Note: This feature may not be available in some browsers.
More options
You are using an out of date browser. It may not display this or other websites correctly.
You should upgrade or use an alternative browser.
You should upgrade or use an alternative browser.
1/48 Hobby Craft Boeing P-26A
- Thread starter Grant Barr
- Start date
Ad: This forum contains affiliate links to products on Amazon and eBay. More information in Terms and rules
More options
Who Replied?- Thread starter
- #122
Grant Barr
Senior Airman
Thanks for the feedback Andy (
 Crimea_River
), I did think that painting white over the decals was ambitious, plus my hands just would not be steady enough to do this properly even if I had a perfect paint match... lesson learned.
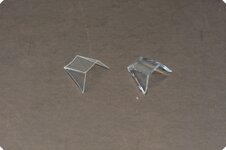
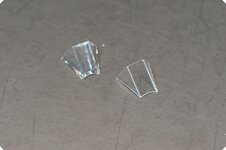
I'm still waiting on the replacement decals but I have not been totally idle on this project. I've fabricated a more "scale" pitot tube from brass tube and some sections of the original (did not take photos of this bit) and I have also managed to create a new windscreen from 0.13mm clear acetate sheet. Because the screen on this bird is best described as rudimentary it was pretty easy to create a template to cut from clear sheet, score the folds and push it into shape - the results are shown below with the kit part shown for comparison.
I've got some other bits and pieces that I will sort out over the next day or two, but until the new decals turn up I am coming to a standstill.
Thanks for looking in!
I'm still waiting on the replacement decals but I have not been totally idle on this project. I've fabricated a more "scale" pitot tube from brass tube and some sections of the original (did not take photos of this bit) and I have also managed to create a new windscreen from 0.13mm clear acetate sheet. Because the screen on this bird is best described as rudimentary it was pretty easy to create a template to cut from clear sheet, score the folds and push it into shape - the results are shown below with the kit part shown for comparison.


I've got some other bits and pieces that I will sort out over the next day or two, but until the new decals turn up I am coming to a standstill.
Thanks for looking in!
Vic Balshaw
Major General
Nice work on the replacement windscreen, lovely snug fit. 
Good work so far!
- Thread starter
- #126
Grant Barr
Senior Airman
Time for an update on my P-26! The USPS and Australia Post carrier pigeons finally delivered my replacement decals. The good news being they arrived in good order - undamaged is always a good thing...
Unlike last time around I sat down and planned out - on paper - what the main steps were to get these decals in place. It turns out I needed quite a few more steps than I originally thought to make sure I did not pull these ones away if masking was required (and it was). I also took the precautionary step of doing a high resolution scan of the decal sheet and printed it to scale on some frisket paper. This way I had some home made masks should everything turn pear shaped again. Luckily the following post shows the masks were unnecessary (at least up to now).
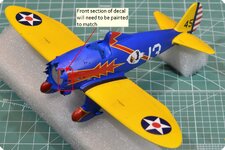
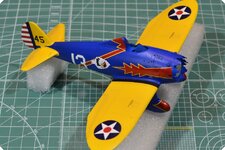
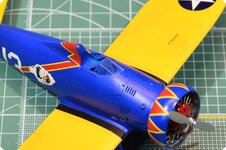
Same as last time, once the fuselage flashes were positioned properly the extension panels up into the engine required a paint retouch so the flash did not end abruptly just before the rear of the engine cowl (when viewed from the sides). This time I made sure to lay down a clear coat layer over the decals!
Extending the red/yellow flash colours was quite simple from the perspective of masking it all off - the real challenge would be where the paint needed to blend back into the decal. Luckily I still had plenty of the red colour I mixed earlier to do the wheel spats and engine cowl & I was reasonably confident with how the paint match would blend.
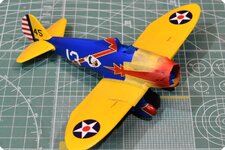
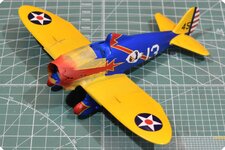
Putting aside the slight difference in sheen (flat paint v's gloss decals) I am pretty damn happy. Once I put another clear coat down I don't think the blend from the decal to the paint will be visible at all.
The first of these shots shows the red extension without the yellow, with the following two shots showing the yellow once the pin-stripe extension was done. It's not perfect but I am pretty happy with it and once a clear coat goes over it should look pretty good.
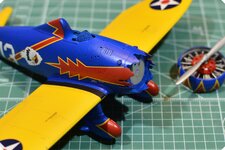
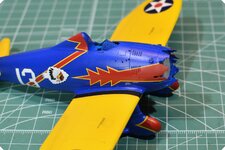
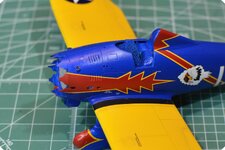
Finally - I was really keen to see how the decals would look adjacent to the engine cowl and spats. The second shot shows how the red flash looks extending up into the engine. Gotta say I am chuffed with how it turned out. It's been quite fiddly, but I think the end result has been worth it.
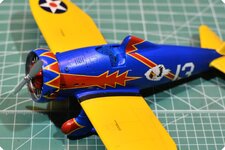
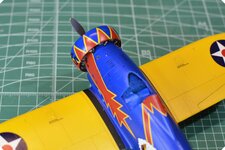
So the next steps will be to replace all the small stencils I lost in the earlier issue, give it a clear coat, do a really fine sand back of that clear coat, and then lay down a final clear coat. You may have noticed that my clear coats have been a bit "grainy" and I have not been fully satisfied with how it has been spraying from the brush. I spent a bit of time today experimenting with various thinning ratios for the polyurethane and have (I think) now settled on a mix ratio and air pressure setting that gives me a much smoother, and therefore shinier, finish. The next couple of days will bear out my theory.
Really looking forward to getting the rigging done, the final sticky-outy bits in place and calling this one as done.
Thanks again for checking out my project. Cheers!
Unlike last time around I sat down and planned out - on paper - what the main steps were to get these decals in place. It turns out I needed quite a few more steps than I originally thought to make sure I did not pull these ones away if masking was required (and it was). I also took the precautionary step of doing a high resolution scan of the decal sheet and printed it to scale on some frisket paper. This way I had some home made masks should everything turn pear shaped again. Luckily the following post shows the masks were unnecessary (at least up to now).


Same as last time, once the fuselage flashes were positioned properly the extension panels up into the engine required a paint retouch so the flash did not end abruptly just before the rear of the engine cowl (when viewed from the sides). This time I made sure to lay down a clear coat layer over the decals!
Extending the red/yellow flash colours was quite simple from the perspective of masking it all off - the real challenge would be where the paint needed to blend back into the decal. Luckily I still had plenty of the red colour I mixed earlier to do the wheel spats and engine cowl & I was reasonably confident with how the paint match would blend.


Putting aside the slight difference in sheen (flat paint v's gloss decals) I am pretty damn happy. Once I put another clear coat down I don't think the blend from the decal to the paint will be visible at all.
The first of these shots shows the red extension without the yellow, with the following two shots showing the yellow once the pin-stripe extension was done. It's not perfect but I am pretty happy with it and once a clear coat goes over it should look pretty good.


Finally - I was really keen to see how the decals would look adjacent to the engine cowl and spats. The second shot shows how the red flash looks extending up into the engine. Gotta say I am chuffed with how it turned out. It's been quite fiddly, but I think the end result has been worth it.


So the next steps will be to replace all the small stencils I lost in the earlier issue, give it a clear coat, do a really fine sand back of that clear coat, and then lay down a final clear coat. You may have noticed that my clear coats have been a bit "grainy" and I have not been fully satisfied with how it has been spraying from the brush. I spent a bit of time today experimenting with various thinning ratios for the polyurethane and have (I think) now settled on a mix ratio and air pressure setting that gives me a much smoother, and therefore shinier, finish. The next couple of days will bear out my theory.
Really looking forward to getting the rigging done, the final sticky-outy bits in place and calling this one as done.
Thanks again for checking out my project. Cheers!
SaparotRob
Unter Gemeine Geschwader Murmeltier XIII
Beautiful job. Very eye catching.
Vic Balshaw
Major General
Impressive. 
fubar57
General
Beauty
Crimea_River
Marshal
Perfect paint match and nicely done. Hoping the clear coats go well. I can't seem to get prefect glosses either.
- Thread starter
- #132
Grant Barr
Senior Airman
Thanks gents, glad you like the project.
I've not been idle since the last post. As I mentioned I planned on getting a better gloss clear coat laid down, which I managed to do early in the week. The outcome is better than it was, with the "graininess" now gone, but the finish is more of a "sheen" than a "shine". It's close, but not quite as shiny as I had hoped - the experimentation with clear gloss polyU will continue with the next model.
The next step on the plan was to get the exhaust outlets fitted to the engine. The two shots below have the majority of the outlets in place and the engine mocked up with the fuselage and the routed exhausts fitted to see how it will all fit together. The instructions around fitting the exhausts were not the clearest and I wanted to make sure it all looked right.
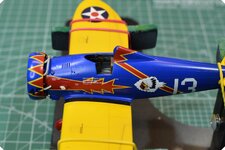
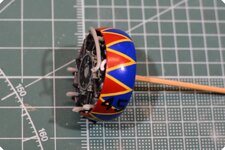
In the first shot the exhaust outlet coming out of the fuselage has been shortened by about 1.5mm as the part was just way too long - I think it looks much closer to reality now. In the second shot for the number 2 cylinder you can see a white pipe rather than grey. I ended up fashioning my own outlet from 1mm rod stock as the kit part was just not fitting properly within the confines of the cowl and the collector pipe for cylinders 1 & 9. In the file of period photos I've accumulated it appears there were many variations on a theme when it came to the exhaust outlets - not many aircraft had the exact same configuration. I've based my fabricated one as closely as possible to a photo of a 94th PS machine. You can also see what I mean about the gloss having a sheen rather than shine - it's really smooth but just not highly glossy...
The next two shots show the engine cowl now fitted to the fuselage and the exhausts painted, it's starting to look like an aircraft now. I've indicated in each shot the missing pipework which routes from the engine through the fuselage to the outlets a little further back.
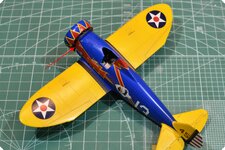
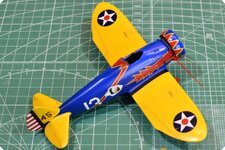
I'll be fitting these missing pieces in the next day or so. I am also about to make a start on the rigging wires. At this stage I am still planning on using very fine stretched sprue. I've never actually rigged a model before and because the photos indicate the wires are quite a heavy gauge I'm hoping it will all look OK.
As always, thanks for looking in. Feeling like I'm on the home stretch now.
I've not been idle since the last post. As I mentioned I planned on getting a better gloss clear coat laid down, which I managed to do early in the week. The outcome is better than it was, with the "graininess" now gone, but the finish is more of a "sheen" than a "shine". It's close, but not quite as shiny as I had hoped - the experimentation with clear gloss polyU will continue with the next model.
The next step on the plan was to get the exhaust outlets fitted to the engine. The two shots below have the majority of the outlets in place and the engine mocked up with the fuselage and the routed exhausts fitted to see how it will all fit together. The instructions around fitting the exhausts were not the clearest and I wanted to make sure it all looked right.


In the first shot the exhaust outlet coming out of the fuselage has been shortened by about 1.5mm as the part was just way too long - I think it looks much closer to reality now. In the second shot for the number 2 cylinder you can see a white pipe rather than grey. I ended up fashioning my own outlet from 1mm rod stock as the kit part was just not fitting properly within the confines of the cowl and the collector pipe for cylinders 1 & 9. In the file of period photos I've accumulated it appears there were many variations on a theme when it came to the exhaust outlets - not many aircraft had the exact same configuration. I've based my fabricated one as closely as possible to a photo of a 94th PS machine. You can also see what I mean about the gloss having a sheen rather than shine - it's really smooth but just not highly glossy...
The next two shots show the engine cowl now fitted to the fuselage and the exhausts painted, it's starting to look like an aircraft now. I've indicated in each shot the missing pipework which routes from the engine through the fuselage to the outlets a little further back.


I'll be fitting these missing pieces in the next day or so. I am also about to make a start on the rigging wires. At this stage I am still planning on using very fine stretched sprue. I've never actually rigged a model before and because the photos indicate the wires are quite a heavy gauge I'm hoping it will all look OK.
As always, thanks for looking in. Feeling like I'm on the home stretch now.

Vic Balshaw
Major General
Good work on the exhausts. 
Crimea_River
Marshal
Fabulous model Grant. I can offer no advice on how to achieve a high gloss finish because I've never done so myself. If you know someone who is good at building car models, those guys are masters of it. I think they use many coats and polishing compounds to achieve their effects, though I could be wrong.
Good luck with the rigging. Use of stretched sprue should work well and it's easily removed and replaced if you stuff it up. I'd say the only thing that you need to watch is that the sprue can vary in thickness which might be noticeable. Also, I've found that CLEAR sprues seem to be stronger and stiffer so may be the best option. OTH, I know of guys who use that flexible vinyl stuff as supplied by Tamiya for their "Poly-caps" and some tracks on (older?) tank models. These sprues a more stretchy and less prone to breakage.
Good luck with the rigging. Use of stretched sprue should work well and it's easily removed and replaced if you stuff it up. I'd say the only thing that you need to watch is that the sprue can vary in thickness which might be noticeable. Also, I've found that CLEAR sprues seem to be stronger and stiffer so may be the best option. OTH, I know of guys who use that flexible vinyl stuff as supplied by Tamiya for their "Poly-caps" and some tracks on (older?) tank models. These sprues a more stretchy and less prone to breakage.
Nice work so far!
- Thread starter
- #137
Grant Barr
Senior Airman
So - she's finished.
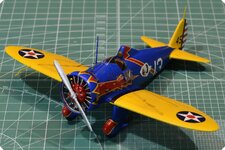
Lots of work involved in getting the rigging done and the last of the sticky-outy bits stuck on.
Thanks to Andy for the feedback on rigging with stretched sprue. I did give it a really good shot - started in between the undercarriage spats and once I had a good look at the outcome I decided it just did not look right. The sprue just looked a bit too heavy (it was pretty even in thickness - my technique with stretching the heated sprue has improved immensely with a whole bunch of practice), it didn't quite look right to me. I removed it all and decided to redo it with EzyLine. This is probably a bit too thin - but I still think it looks better than the sprue.
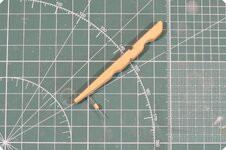
One of the downsides of deciding to use the elastic line was that I had to drill out the holes in the spat fairings to insert the ends. Due to the angle I was forced to improvise a drilling rig that allowed me to get some pressure and direction for the drill whilst being able to still spin the drill with my big fat fingers. Below is what I ended up with - using my smallest drill bit (0.3mm) and fitting it into a cut-off piece of cocktail stick (allowed me enough grip to spin the drill) and then holding it in place with the end of a clothes peg half drilled through. Looks a bit rough and ready - but it worked and I got the 12 holes drilled into the spat fairings reasonably well.
I ended up scratching together some of the last bits and pieces for this bird. The rigging braces were just some of the sprue that I cut to length and glued to the threads (I did consider drilling holes in the sprue and threading them on - but that was getting just a tad ridiculous...). Likewise I replaced the aerial staff on the vertical stabiliser with one cut from some styrene card, the pitot tube was constructed from a combination of brass tube and the end piece from the kit part and finally the sighting tube was replaced by some 0.6mm OD tube and the original kit mounts were used with the tops cut and drilled out to allow the tube to be slid into place. I was all very small and fiddly work, but I do like how it turned out.
Overall I am pretty pleased with the way this kit has turned out. I tried a whole bunch of new techniques on this project - painting compound curve surfaces in lieu of decals, fitting aircraft rigging and scratch building some of the more detailed parts. I've added all the final photos below and I will try to remember to post a new thread over in the finished builds section in the next day or so.
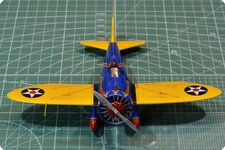
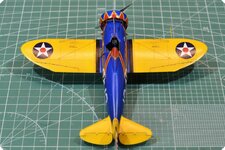
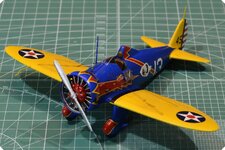
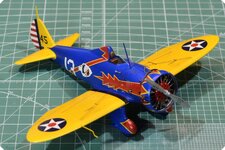
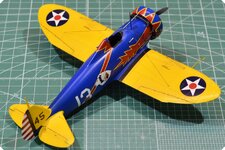
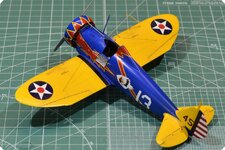
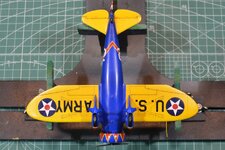
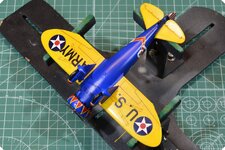
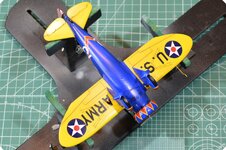
Many thanks once again to everyone who has popped in to look around and for all the advice and encouragement along the way. It only took me ten months to complete just this one model, but given I had a house rebuild and a 120km relocation in amongst that period I can live with it!! Now - where is that next kit I wanted to do???

Lots of work involved in getting the rigging done and the last of the sticky-outy bits stuck on.
Thanks to Andy for the feedback on rigging with stretched sprue. I did give it a really good shot - started in between the undercarriage spats and once I had a good look at the outcome I decided it just did not look right. The sprue just looked a bit too heavy (it was pretty even in thickness - my technique with stretching the heated sprue has improved immensely with a whole bunch of practice), it didn't quite look right to me. I removed it all and decided to redo it with EzyLine. This is probably a bit too thin - but I still think it looks better than the sprue.
One of the downsides of deciding to use the elastic line was that I had to drill out the holes in the spat fairings to insert the ends. Due to the angle I was forced to improvise a drilling rig that allowed me to get some pressure and direction for the drill whilst being able to still spin the drill with my big fat fingers. Below is what I ended up with - using my smallest drill bit (0.3mm) and fitting it into a cut-off piece of cocktail stick (allowed me enough grip to spin the drill) and then holding it in place with the end of a clothes peg half drilled through. Looks a bit rough and ready - but it worked and I got the 12 holes drilled into the spat fairings reasonably well.

I ended up scratching together some of the last bits and pieces for this bird. The rigging braces were just some of the sprue that I cut to length and glued to the threads (I did consider drilling holes in the sprue and threading them on - but that was getting just a tad ridiculous...). Likewise I replaced the aerial staff on the vertical stabiliser with one cut from some styrene card, the pitot tube was constructed from a combination of brass tube and the end piece from the kit part and finally the sighting tube was replaced by some 0.6mm OD tube and the original kit mounts were used with the tops cut and drilled out to allow the tube to be slid into place. I was all very small and fiddly work, but I do like how it turned out.
Overall I am pretty pleased with the way this kit has turned out. I tried a whole bunch of new techniques on this project - painting compound curve surfaces in lieu of decals, fitting aircraft rigging and scratch building some of the more detailed parts. I've added all the final photos below and I will try to remember to post a new thread over in the finished builds section in the next day or so.


Many thanks once again to everyone who has popped in to look around and for all the advice and encouragement along the way. It only took me ten months to complete just this one model, but given I had a house rebuild and a 120km relocation in amongst that period I can live with it!! Now - where is that next kit I wanted to do???
SaparotRob
Unter Gemeine Geschwader Murmeltier XIII
Incredible work. Amazing.
fubar57
General
Fantastic!!!!
Users who are viewing this thread
Total: 1 (members: 0, guests: 1)
