Loiner
Senior Airman
I was going to stretch this out, but have ended up doing it all really quickly (for me), so here it is from beginning to end.
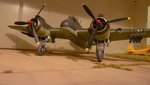
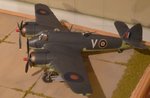
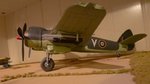
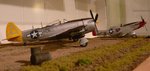
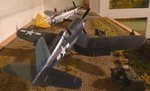
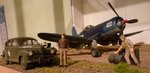
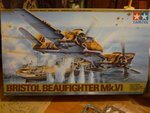
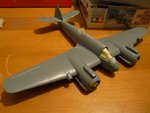
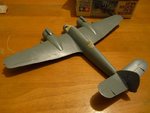
The kit had the option of night fighter version (VIf) or Coastal Command version (VIc). I learned after much research that most of the night fighters were gone by late 1944 (replaced by NF Mosquitos), so as I wanted a late war Beau, went for the action packed Coastal Command version.
The colour scheme was either the extra dark sea grey and dark slate grey camo upper with sky under, or the later extra dark sea grey all over upper with sky under, which looked much cooler i.m.o. and was used from '44 to after the war.
While doing the research, I happened to be in Hendon in London so popped into the RAF museum for the first time ever, and what did they have there .. a Coastal Command Beau' in extra dark sea grey over sky! One of those amazing coincidences in life.

c/o airliners.net
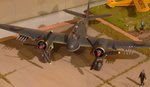
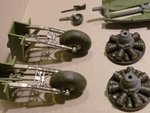
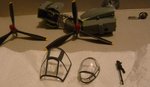
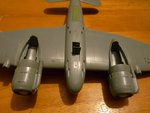
One item needing particular research was the material of the leading edge of the cowls, which many modellers portray in a bronze or copper colour, some in steel. My findings were that mostly the Bristol radial egine exhaust rings cowls were made from brass (although some were in steel), and quickly discoloured due to the heat as they were hollow exhaust collector rings.
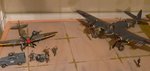
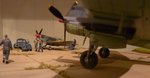
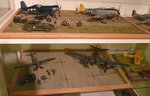
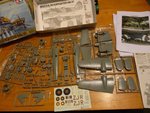
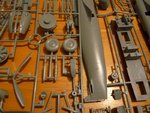
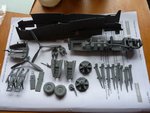
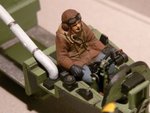
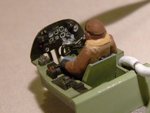
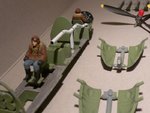
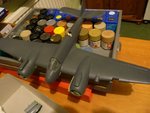
Anyway, the kit went together like a dream (as all my Tamiya kits have), good inside detail, very little filling to do, just the usual seem along the fuselage join and the wing joints, which came out really well after treatment. The cockpit and pilot didn't get an enormous amount of attention as they were going to be sealed in, so the finest details wouldn't be seen, but got a genarally good but quick going over. The masking and painting went well, the only difficulty was the decals played up a bit, which I normally don't have any problem with.
All in all, I would say that despite being the largest aricraft I've built, it probably went the smoothest and easiest.
Anyway, enough rambling, the build photos ...
The kit had the option of night fighter version (VIf) or Coastal Command version (VIc). I learned after much research that most of the night fighters were gone by late 1944 (replaced by NF Mosquitos), so as I wanted a late war Beau, went for the action packed Coastal Command version.
The colour scheme was either the extra dark sea grey and dark slate grey camo upper with sky under, or the later extra dark sea grey all over upper with sky under, which looked much cooler i.m.o. and was used from '44 to after the war.
While doing the research, I happened to be in Hendon in London so popped into the RAF museum for the first time ever, and what did they have there .. a Coastal Command Beau' in extra dark sea grey over sky! One of those amazing coincidences in life.
c/o airliners.net
One item needing particular research was the material of the leading edge of the cowls, which many modellers portray in a bronze or copper colour, some in steel. My findings were that mostly the Bristol radial egine exhaust rings cowls were made from brass (although some were in steel), and quickly discoloured due to the heat as they were hollow exhaust collector rings.
Anyway, the kit went together like a dream (as all my Tamiya kits have), good inside detail, very little filling to do, just the usual seem along the fuselage join and the wing joints, which came out really well after treatment. The cockpit and pilot didn't get an enormous amount of attention as they were going to be sealed in, so the finest details wouldn't be seen, but got a genarally good but quick going over. The masking and painting went well, the only difficulty was the decals played up a bit, which I normally don't have any problem with.
All in all, I would say that despite being the largest aricraft I've built, it probably went the smoothest and easiest.
Anyway, enough rambling, the build photos ...
Attachments
-
 P1000777.JPG90 KB · Views: 240
 -
 P1000775.JPG100.1 KB · Views: 233
 -
 P1000776.JPG97.2 KB · Views: 231
 -
 P1000778.JPG86.8 KB · Views: 245
 -
 P1000779.JPG51.7 KB · Views: 240
 -
 P1000784.JPG68.4 KB · Views: 239
 -
 P1000783.JPG55.4 KB · Views: 243
 -
 P1000782.JPG45.1 KB · Views: 248
 -
 P1000781.JPG38.4 KB · Views: 248
 -
 P1000780.JPG69.9 KB · Views: 234
 -
 P1000789.JPG36.6 KB · Views: 240
 -
 P1000788.JPG79.6 KB · Views: 249
 -
 P1000787.JPG74.4 KB · Views: 245
 -
 P1000786.JPG65.7 KB · Views: 230
 -
 P1000785.JPG67 KB · Views: 239
Last edited: