fastmongrel
1st Sergeant
Not many people have heard of the Koolhoven FK58 but its a plane that has always interested me that could have been better known with a bit of luck and more time to perform. Koolhoven F.K.58 - Wikipedia.
 IMG_20200405_210057974 by Stuart, on Flickr
I have had this kit for a while its a short run kit made in the Czech Republic but designed in France. Like a lot of short run kits the instructions arent brilliant and this kit has few locating pegs or grooves for parts so for example the seat position is a guess and I hope I dont need to get the Razor saw out to move it. I think its going to be a case of glue then hope.
 IMG_20200405_210109330 by Stuart, on Flickr
I am modelling the flaps open so I have cut the flaps from the bottom wing section.
 IMG_20200405_210120475 by Stuart, on Flickr
 IMG_20200405_210128368 by Stuart, on Flickr
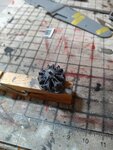
The resin Hispano Suiza 14 cylinder radial is nicely moulded I have primed it and when the primer is dry I will add pushrod tubes from 0.45mm brass wire.
 IMG_20200405_210135680 by Stuart, on Flickr
I have had this kit for a while its a short run kit made in the Czech Republic but designed in France. Like a lot of short run kits the instructions arent brilliant and this kit has few locating pegs or grooves for parts so for example the seat position is a guess and I hope I dont need to get the Razor saw out to move it. I think its going to be a case of glue then hope.
I am modelling the flaps open so I have cut the flaps from the bottom wing section.
The resin Hispano Suiza 14 cylinder radial is nicely moulded I have primed it and when the primer is dry I will add pushrod tubes from 0.45mm brass wire.
Last edited: