1/72 Mig 3 "Red 02" of the 120th IAP of Moscow Air Defence, Completed (Almost) (1 Viewer)

Ad: This forum contains affiliate links to products on Amazon and eBay. More information in Terms and rules

dirkpitt289

Master Sergeant
2,286
20
Jul 16, 2009
South Plainfield New Jersey
Hi Everyone

Some of you may have seen my thread for this build, well here is a recap along with the finished photos.

I have been wrestling with getting back into modeling for some time now. The last time I built was as a wee tot and I'm now in my 40's with a family. Finding time to sit an model has been my biggest challenge. This is my second build since returning to modeling.

The Subject

Red02Originalphoto.jpg


The History

During the snow period, many MiG-3 were painted white, both at the factory and on the field.
The white cote had a different look depending by the mean of application (spray or brush), of the layer thickness, the wearing, the care etc. On many examples, it appeared as a very light grey instead that pure white. The white paint extends often on propeller spinner and blades, and even on the exhaust stacks. While summer camouflaged MiG-3s wore usually numbers on the fuselage side, in front of the stars, white MiG-3s wore them on the stabilizer, or don't have them at all. Very few exceptions to this rule were seen.

This aircraft was often interpreted as having red wing outer panels, silver engine cowling, red spinner and black number. The wings, of early type, are a replacement from another aircraft due to the originals being heavily damaged in combat.
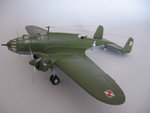
red02.jpg


Red02Top.jpg


The Model

IMG_0962.gif


IMG_0964.jpg


I started with the Encore 1/72 scale kit. This is not an easy kit to work with. It requires a lot of filling and even more sanding. Not to mention it is lacking in detail.

This build was plagued with problems from the beginning. It suffered its landing gear being broken off by mysterious means, torn off rear stabilizer while removing masking tape, a broken wing, and this was my first attempt at working with resin. Another issue I had was the landing gear doors. They give you these really tiny flat peices and expect you to bend them. I broke the doors on this kit and my spair kit. In the end I just scratch build flat doors. :rolleyes:

As much as I liked this subject in the end I couldn't wait for it to be finished. In my first build I made a German captured P-51 and when it was completed it was had a very shiny finish. Not wanting to repeate the same mistake I learned of a product called "Flat Finish" by polly Scale. I applied as I was instructed but now the plane looks chalky and some of the decals were affected.

This was also my first attempt at attaching a radio wire. While I was happy that it went on better then I thought it would I'm not happy with the look. Its just some black thread from a sewing kit and doesn't look right. Maybe later on I will replace the thread with fishing line or something. The more I look at it the more it bothers me. I have not figured out how to weather so for right now this is the end of the road for this bird.


2630CF18.jpg


30DF44B3.jpg


9C561439.jpg


E1AF370C.jpg


35FEBCE6.jpg


132D0CFA.jpg


Thanks for taking the time to look at my work.
 
Last edited:
It looks good :) Don't put yourself down!

And maybe for the wire, try what Wurger suggested to me. Getting some nylon tights and pulling a thread out.

But aye is grand, I know how big some of the gaps were so you've done an ace job with that.

Also, is it just me or is the canopy supplied with this model a bit too 'teardrop' in shape compared to the actual plane?
 
Last edited:
That's true , it is not easy to assemble a modle of a such small plane like the MiG-3 was.I agree with you that thre effect is quite far away from you could get. First of all the engine cowling is of incvorrect colour.If you look close up at the pic of the machine you wil notice that its tonality was something like " dark white " but not dark grey. I think that the white tonality was caused by heating of the engine.Or , what seems to be much probably , by painting the silver covering with the white paint.If you look at the "Red 12" standing behind the "Red 02" you can spot that the Red12 engine cowling was of silver colour.What is more the radiator's cover seems to be of incorrect shape as well.But I'm not sure how much because your pic is too small.

Anyway the model can be an example of a good job.:)
 
Last edited:
Pusskyfly

I agree with you the canopy is not the correct shape at all.

Wurgar

It appears gray now and that is due to the flat cote I applied. Originally this was a mix of aluminium and white. I admit it wasn't what I wanted but was to lazy to strip it off and redo it. According to the documentation and multiple pictures the engine cowling was white on some and silver on others. In this instance the color difference is to drastic for my taste.
 
Now I understand. The mixture of aluminium and white wasn't a good solution.It is the worst feature of silever or aluminium paints.When you apply it on a model and then you spray it with flat cote they change their colours.Also if you add the silver or aluminium to a white paint you will get the came effect like adding a drop of a black one.Just for the future, it is better use two colours or one colour and a flat cote.The most important is to use two different kinds of paints.I mean , the engine cowling should have been painted with the silver or aluminium Humbrol/Revell oil enamels then the white water acrylic paint or an acrylic flat cote on that.In that way you will avoid changing of the silver or aluminium colours into the dark grey.
Simply enamels and acrylic paints don't react each other because of the difference in their bases and thinners.
 
Well its been driving me crazy all day. I can't stand all the issues I have on this bird. Its going back on the table for some rework. I'm going to replace the antenna wire and redo the cowling. I think those changes will make it more acceptable in m eyes.

Thanks for all your input
 
Oh... you have gotten me wrong I'm affraid.Your work is really nice .Simply you made a few mistakes you avoided if you would asked Wayne Little or Airframes for instance.Now I don't suggest redoing the engine cowling.The antenna wire should be easy to replace.What are you going to use for that?

BTW Could you take a better pic of the radiator under the fuselage and upload it here?

Wurger

Don't get me wrong, nothing you said was taken the wrong way or am I offended. All you did was comment on the issues that were already haunting me. If you saw the thread for the build you will see I was disappointed from the start with the cowl color. I just felt I had spent to much time on this and it was time to move on so I rushed it to completion. Now that its sitting on my desk where I can see it its calling out to me to be fixed. :p

What are you looking for with the radiator?

At this point I don't know what to use for the antenna wire. I tried stretching spree at first but it kept breaking. Maybe some fishing line? Someone suggested thread from a nylon stocking but the GF doesn't have any and even if she did I'm not so sure she would take kindly to me cutting them apart for a few lousy threads. :lol:
 
So OK. :D

I would like to see a few close up pictures of the radiator cover.You know from sides , up and front.Is that possible to take these?

For the antenna wire -- I don't suggest the fising line.Unless you can buy very thin black one , otherwise you will have to paint it what always makes it looking too thick. All my antenna wires have been made using a thread from black or graphit tights.If your GF doesn't have any it is no problem ...go to any shop where these can be bought.One pair is enough for a lot of models.

Here are examples of the kind of antenna wire.All models are of 1/72 scale.
 

Attachments

  • Spitfire_MkIIa.jpg
    Spitfire_MkIIa.jpg
    27.9 KB · Views: 229
  • IMG_0082.jpg
    IMG_0082.jpg
    24.3 KB · Views: 235
  • Hellcat.jpg
    Hellcat.jpg
    35.9 KB · Views: 213
Last edited:
Good work overall, but I understand how you feel if not happy with particular areas. i don't know enough about Russian aircraft of the period to comment, but for a first model after so many years, it looks good to me!
If you can't get thread from tights, and the sprue is breaking, then use 'Invisible' mending thread. Attach this at one end, using a toothpick or simialr to place a tiny spot of superglue. When dry , pull tight, and attch the other end the same way, leaving a long 'tail'. When dry, snip off the excess with nail clippers, and cut any remeianing with a scalpel, at the find end. Painting can be done in an appropriate colour, by using a fine brush, only just loaded with paint, and lightly running across the top of the 'wire'. This will give colour, without thickening the line.
Hope this helps.
Terry.

Thanks Airframes, I'll give that a try.
 
I'll chime in here........
for what it is worth Dirk, that is a really good first effort and in 1/72nd scale to boot!!!!
Nothing wrong with that mate, it's pricked your interest back into model building and you have built and completed a model.
Two right outcomes as far as I am concerned.
Keep them coming and nice work on the little Mig.
Cheers
jim
 
Looks pretty good even with all of the problems.Now pick up any model car and build it.You won't have to worry about a specific paint job, just enjoy the build.That is why I also do model cars.I can finish them any way I want and there is no keeping to a drawing or template.This provides me with a change of pace that lets me enjoy the hobby that much more.
Ed
 
Last night I brought the Mig back into the Hanger for some rework. I beleive its now as good as its going to get.. The only thing hanging me up is attaching the second antenna from the tail down to the fusalage. Any suggestions would be welcome.

If everything else goes ok Pictures will be posted tomorrow.
 

Users who are viewing this thread

Back