1/72nd scale 'Dan Air' Dakota. (1 Viewer)

Ad: This forum contains affiliate links to products on Amazon and eBay. More information in Terms and rules

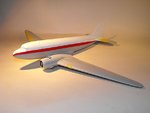
Cheers mate. Just trying to do the red cheat lines along the fuselage. Got a brand new tin of Humbrol enamel, and guess what?
Yep, the ***ing stuff is like gum in the bottom of the tin and, even after an hour of stirring, it runs like bl**dy water!
Got one brushed coat on, and it's virtually transparent, and still not even near dry after three hours !!
 
Finally got a reasonable coverage of red for the cheat lines, which will be adjusted around the cockpit and nose once the matt black anti-glare panel has been painted. A slight 'tweak' is also needed near the port tailplane, which will be done once the red has totally hardened.
Next step is the de-icer boots, followed by the metallic finish.
 

Attachments

  • Dak build 022.jpg
    Dak build 022.jpg
    35.1 KB · Views: 71
Thank you my friend.
The red lines have now been tidied up, and the black de-icer boots painted. Once these have fully dried, they will be masked, along with the engines and wheel wells, and the first stage of the bare metal finish applied. All being well, I hope to get this done some time tomorrow. Meanwhile, the art work for the decals has been made, ready for printing, and the 'blank' for the display base cut.
 
Here's the progress to date, after a total of approximately 31 hours work so far.
PIC 1. The top decking, red stripes, fin and rudder, and the de-icer boots have been masked, along with the engines and wheel wells.
PIC 2. The first stage of creating a natural-looking bare metal finish on the main wings and tailplanes. These have been rubbed with SNJ Silver polishing powder, the excess blown off, then lightly buffed. This creates a metallic film to which the paint then bonds.
PICS 3 to 5. The main wings, with the exception of the underside centre section, have been sprayed with Humbrol Silver enamel, Number 11, as have the tail planes. This used to be very bright, and was good for creating a chrome effect on oleos etc, but since the 'change over' to Hornby, it's now not so shiny which, in this instance, has proved helpful.
The model will now be left for 24 hours to allow the paint to fully harden (I hope!), before spraying the fuselage in Aluminium, to provide contrast and hopefully replicate the 'used' look of the original. Then it'll be time to shade selected panels, before polishing with the SNJ powder again, once the paint has fully cured.
Thanks for your interest, and I hope to post more pics tomorrow.
 

Attachments

  • Dak build 023.jpg
    Dak build 023.jpg
    62.9 KB · Views: 86
  • Dak build 025.jpg
    Dak build 025.jpg
    79 KB · Views: 64
  • Dak build 027.jpg
    Dak build 027.jpg
    43.7 KB · Views: 74
  • Dak build 029.jpg
    Dak build 029.jpg
    43.5 KB · Views: 73
  • Dak build 031.jpg
    Dak build 031.jpg
    39.4 KB · Views: 75
Never heard of this polishing powder method, but it sure looks good! I've been experimenting with Alclad, but have been avoiding major NMF projects and Alclad (even though it look extremely good if used well) for that matter because the stuff smells absolutely horrible, and I end up with the whole house smelling of it for three days. Where might I obtain these polishing powders? I'd like to try it as well I must say. What variaties are available? How does it hold up with masking/handling etc. etc.

I've got some Model Master metalizers, but these are very delicate, and to me they don't seem exactly suitable to spray an entire a/c
 
Last edited:
Thanks Jelmer and Wojtek.
Not sure where you'd get SNJ in the Netherlands, but Hannant's used to stock it. I've had this jar for over 20 years, as it only needs a very small amount - and it's messy - so not sure if it's readily available outside the USA (it is at Squadron).
As for masking etc, I use it contrary to its normal use, after accidentally discovering how it works well on the raw plastic, as opposed to on the dedicated SNJ Spray Metal products. There's a full description of the technique in the 'Bare Metal Made easy' guide I posted some time ago, somewhere in the 'painting Questions' threads, I think Page 6.
 
[...] There's a full description of the technique in the 'Bare Metal Made easy' guide I posted some time ago, somewhere in the 'painting Questions' threads, I think Page 6.

I'll certainly look that up, thanks for the heads up!
 
Thanks Andy. The paint is bog standard silver (at the moment), so nothing special. It's the use of the powder in the 'wrong order' which gives the basis for further work. Adding various 'metallic' paints to each other, and blending with 'solid' colours, such as white and grey and, to an extent black, gives endless possibilities.
 

Users who are viewing this thread

Back