1/72nd scale 'Dan Air' Dakota.

Ad: This forum contains affiliate links to products on Amazon and eBay. More information in Terms and rules

Airframes

Benevolens Magister
62,428
11,573
Aug 24, 2008
Cheshire, UK
This is another commission build for a friend. Her father used to work for Dan Air, and she wants to give this to him as a Birthday present on September 19 - so a bit of a rush job!
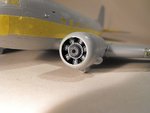
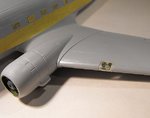
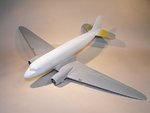
Using the Italeri C-47 kit, I'll be building this as G-AMSU, the first aircraft the airline acquired in 1953, being an ex-RAF C-47B which had previously served with Meredith Airways. This is 'close to home' for me, as I used to do some 'running around' for the airline, during school holidays in the 1960s, and have fond memories of the Daks at Newcastle Airport, having had a ride in sister ship G-AMPP.
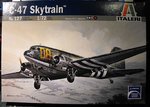
PIC 1. The kit box.
PIC 2. The cockpit, floor section and bulkheads have been assembled. Not much to do here as very little can be seen through the cockpit windows, and b*gg*r all through the cabin windows!
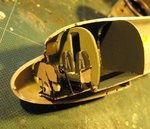
PIC 3. Cockpit area after basic painting, and the windows cemented in, and masked on the outside. With this type of window, inserted from the inside, I find it best to do the masking at this stage, as the transparencies can be supported on the inside whilst fixing the tape, reducing the possibility of the windows falling out !
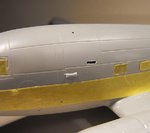
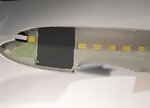
PIC 4. Cargo and 'para' doors cemented in place.
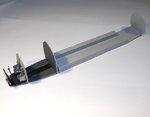
PIC 5. Internal parts cemented into the starboard fuselage half.
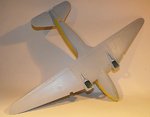
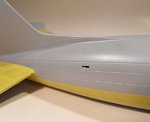
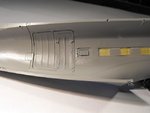
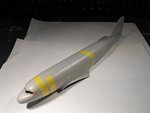
PIC 6. Fuselage joined and windscreen fitted, but not yet masked.
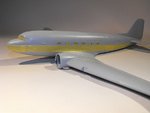
There's not really much to show during the construction stages, and as the interior can't be seen, most work will concentrate on the paint finish and markings, the latter using home-made decals.
I'll post another up-date soon, once there's something to show.
 

Attachments

  • Dak build 002.jpg
    Dak build 002.jpg
    32.4 KB · Views: 212
  • Dak build 005.jpg
    Dak build 005.jpg
    33.1 KB · Views: 209
  • Dak build 004.jpg
    Dak build 004.jpg
    41.9 KB · Views: 196
  • Dak build 006.jpg
    Dak build 006.jpg
    74.9 KB · Views: 204
  • Dak build 007.jpg
    Dak build 007.jpg
    35.9 KB · Views: 203
  • Can Jan 497.jpg
    Can Jan 497.jpg
    94.9 KB · Views: 217
The 'Dak' is almost ready for paint, with the wings and tail planes on, the windscreen masked, and the colour demarcation line masked to prevent over spray into the lower area, which will be bare metal. All joints and seams have been sanded and smoothed, and just need a quick polish.
Work is under way on the engines and nacelles, and once these are installed, the first stage of painting will commence, starting with the white top decking.
 

Attachments

  • Dak build 009.jpg
    Dak build 009.jpg
    32 KB · Views: 205
  • Dak build 010.jpg
    Dak build 010.jpg
    40.3 KB · Views: 195
  • Dak build 011.jpg
    Dak build 011.jpg
    33.7 KB · Views: 196
Sept 19?! Maybe you should subcontract the job to Bob or Cory!

Looks good so far and it seems you're well ahead of schedule although paint and decals might be the things you'll need to spend the most time on.
 
Thanks chaps. Not much to do with a OOB build, but yes, the painting will take some time, and the decals will be home-made.
Evan, the last one of these I built, about 30 years ago, was in Olive plastic, and the colour pics on the box, showing the sprues, are in Olive also. Nice surprise to see it in this nice-to work-with light grey.
 
Thanks very much to all. Work is progressing on the engines, and planning the painting sequence - more pics soon.
 
Now done a total of around 20 hours work on the model, and the first paint is on.
PIC 1. The engines have been painted and assembled, without adding any 'extras', and fitted into the cowlings, which are now cemented onto the nacelles.
PIC 2. Landing lamp houses and lamps painted, and lenses fitted, awaiting masking later.
PIC 3. Cockpit escape hatch engraved and holes drilled for antenna posts.
PIC 4. The small window in what had been the radio compartment has been cut out, and the venturi forward of this drilled out.
PIC 5. A similar window has been cut in the area of the toilet compartment. Both of these will be glazed with Micro 'Kristal Klear' after painting the model.
PIC 6. A small notch has been cut and drilled into the tip of the fin, to accept a scratch-built antenna post later, and the ribs on the rudder sanded back slightly.
PIC 7. The top decking and fin and rudder have been sprayed with four coats of matt white enamel, to act as a primer and base coat, and will have a couple of coats of gloss white enamel added later.
All being well, I hope to get the gloss white done tomorrow and, when this is totally dry, the red 'cheat line' will be added along the side, over the cabin windows.
Next stage will be to replicate the original 'Dan-Air' bare metal finish, not polished and shiny, and probably a left-over from RAF service.( Later in their career, these Daks received a mid-grey finish to the lower fuselage , leaving the wings in bare metal.)
Thanks again for your interest, and I'll post another up-date when the next stages are complete.
 

Attachments

  • Dak build 012.jpg
    Dak build 012.jpg
    37.7 KB · Views: 188
  • Dak build 014.jpg
    Dak build 014.jpg
    39.3 KB · Views: 183
  • Dak build 013.jpg
    Dak build 013.jpg
    39.7 KB · Views: 169
  • Dak build 015.jpg
    Dak build 015.jpg
    40.9 KB · Views: 190
  • Dak build 016.jpg
    Dak build 016.jpg
    34.6 KB · Views: 185
  • Dak build 017.jpg
    Dak build 017.jpg
    25 KB · Views: 184
  • Dak build 020.jpg
    Dak build 020.jpg
    34.2 KB · Views: 188
Thanks Andy and Wojtek.
Andy, still pondering on which way to do the metal, as it was rather 'shop soiled' in those days! Got some ideas, but the fuselage and wings were totally different, and not 'shiny' like more 'modern' aircraft. I reckon I have the answer, but will try it out on my 'hack' model first. Just got to finish the gloss top decking and red bands first. Might have some progress pics tomorrow.
 

Users who are viewing this thread

Back