Sorry I don't have any pictures. Actually I do, but I haven't got around to downloading them which is no great loss, believe me. Let me first say that this kit is an excellent one. You'll also find it forgiving of errors as the black paint scheme hides them pretty well. Instead of giving a blow by blow account of this build, I'm going to concentrate on the problems I had, in the hope that this will help anyone who might be tackling this kit.
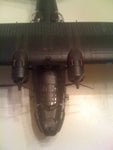
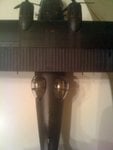
The only real problem with the interior is in the rear gunner's compartment - the part of the fuselage covered by the 2 prominent blisters on the waist. There are 2 semi-circular walkways that push into each other, enough so that they prevent the fuselage halves from closing properly. I don't believe I misplaced them, but it certainly took me a long time to figure out that they were the problem. In the meantime I managed to sand just about every other part of the model in the vicinity of the waist, resulting in an ugly and unecessary gap at the bottom of the fuselage once it was closed. Don't make my mistake - attack the small area where the 2 walkway pieces abut each other and leave everything else alone and you'll solve the problem in no time. The only other issue with the interior was the nose turret, which has a very tight fit. I masked this piece before I placed it in the fuselage half, finding out at the end that the piece of masking at the back of the turret couldn't be removed. I should have left this part of the turret unmasked as it's covered up anyway and is not visible.
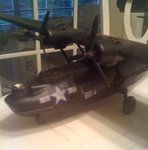
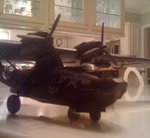
I made a total mess of one of the three landing gear struts. The right side turned out fine, but the left side managed to shift while it was drying to the point where it was so badly bent I had to cut the pieces apart and glue them together again. The results of this second attempt were even worse. I don't know how this happened as I used a square with a level was as careful as I could be. It was so bad that the aircraft sat at a very noticable slant. To compensate for this I sanded the tire WAY down and then used putty to try to make it look as though the tire was flat (deflated). I effed up badly on this one, folks.
There's plenty of room in the radio operator's compartment for weight, which is badly needed. I took some clay and pressed a bunch of copper BBs into it. I then realized that this ugly hot pink colored clay would be visible through 3 different transparencies. I proceeded to cut out a series of sheet plastic squares, drilled a small hole in the center of them and glued a piece of copper wire into them, finally inserting them into the clay and then painting them black. After all that work I thought I had a brilliant solution. Only I didn't know that after I closed the fuselage halves the clay would break free and roll back and forth, making my perfectly placed baffles useless. With no way to fix things I simply have to hope that no one notices. Needless to say I won't be entering this model into any competitions.
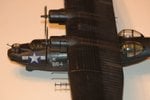
Overall this kit goes together like a dream. The only problem is that the surface detail consists of an infite number of tiny indented rivets, which are very difficult to restore after you've sanded the joints. I glued all the many antenna pieces before painting, and by some miracle I only managed to break off one of them. Be aware that the main antenna on the underside of each wing should be attached pointing slightly outward, in the direction of the wing tips. I glued mine on facing straight ahead, which looks like it would be right but is actually wrong.
Thinking that black would be an easy color to weather I drybrushed the model with increasingly lighter shades of grey, only to find the model looking like it had had an accident in a flour factory. I toned the weathering down with a light coat of black and went back to making exhaust stains with pastel chalk, which worked out all right.
Although you're given a choice of 2 versions - early or late - there are only decals for the late war aircraft. However I believe you could get away with simply using the stars and nothing else on the earlier version, as these aircraft seem to have had "low visibility" (meaning very few) markings for their night operations.
The model on the box top has blue tinted landing light covers, which I imitated by painting the inside of those clear pieces Tamyia clear blue. I don't know if it's accurate for the earlier version, but I found it to be a nice touch.
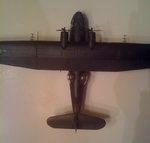
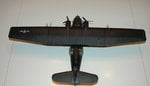
I hope anyone reading this can profit from my mistakes. This is a nice kit and the only one I know of in 1/72 scale of the "Black Cat" Catalina.
Happy Modeling,
-Ed
The only real problem with the interior is in the rear gunner's compartment - the part of the fuselage covered by the 2 prominent blisters on the waist. There are 2 semi-circular walkways that push into each other, enough so that they prevent the fuselage halves from closing properly. I don't believe I misplaced them, but it certainly took me a long time to figure out that they were the problem. In the meantime I managed to sand just about every other part of the model in the vicinity of the waist, resulting in an ugly and unecessary gap at the bottom of the fuselage once it was closed. Don't make my mistake - attack the small area where the 2 walkway pieces abut each other and leave everything else alone and you'll solve the problem in no time. The only other issue with the interior was the nose turret, which has a very tight fit. I masked this piece before I placed it in the fuselage half, finding out at the end that the piece of masking at the back of the turret couldn't be removed. I should have left this part of the turret unmasked as it's covered up anyway and is not visible.
I made a total mess of one of the three landing gear struts. The right side turned out fine, but the left side managed to shift while it was drying to the point where it was so badly bent I had to cut the pieces apart and glue them together again. The results of this second attempt were even worse. I don't know how this happened as I used a square with a level was as careful as I could be. It was so bad that the aircraft sat at a very noticable slant. To compensate for this I sanded the tire WAY down and then used putty to try to make it look as though the tire was flat (deflated). I effed up badly on this one, folks.
There's plenty of room in the radio operator's compartment for weight, which is badly needed. I took some clay and pressed a bunch of copper BBs into it. I then realized that this ugly hot pink colored clay would be visible through 3 different transparencies. I proceeded to cut out a series of sheet plastic squares, drilled a small hole in the center of them and glued a piece of copper wire into them, finally inserting them into the clay and then painting them black. After all that work I thought I had a brilliant solution. Only I didn't know that after I closed the fuselage halves the clay would break free and roll back and forth, making my perfectly placed baffles useless. With no way to fix things I simply have to hope that no one notices. Needless to say I won't be entering this model into any competitions.
Overall this kit goes together like a dream. The only problem is that the surface detail consists of an infite number of tiny indented rivets, which are very difficult to restore after you've sanded the joints. I glued all the many antenna pieces before painting, and by some miracle I only managed to break off one of them. Be aware that the main antenna on the underside of each wing should be attached pointing slightly outward, in the direction of the wing tips. I glued mine on facing straight ahead, which looks like it would be right but is actually wrong.
Thinking that black would be an easy color to weather I drybrushed the model with increasingly lighter shades of grey, only to find the model looking like it had had an accident in a flour factory. I toned the weathering down with a light coat of black and went back to making exhaust stains with pastel chalk, which worked out all right.
Although you're given a choice of 2 versions - early or late - there are only decals for the late war aircraft. However I believe you could get away with simply using the stars and nothing else on the earlier version, as these aircraft seem to have had "low visibility" (meaning very few) markings for their night operations.
The model on the box top has blue tinted landing light covers, which I imitated by painting the inside of those clear pieces Tamyia clear blue. I don't know if it's accurate for the earlier version, but I found it to be a nice touch.
I hope anyone reading this can profit from my mistakes. This is a nice kit and the only one I know of in 1/72 scale of the "Black Cat" Catalina.
Happy Modeling,
-Ed
Attachments
Last edited by a moderator:

