Actual Steps for completing a GB model

Ad: This forum contains affiliate links to products on Amazon and eBay. More information in Terms and rules

dneid

Staff Sergeant
1,378
293
Oct 31, 2012
Austin, TX
Hey, Guys,
I wanted to gain clarity on the process that the mods are used to when declaring a BG model finished. I see that there are posts labeled "**** Done: <GB Declaration>. Is this the accepted way to declare a model finished for a GB? If so, do the mods then "move" this to "*** Finshed: <GB Declaration>"? Or, should I post a "Finished: <GB Declaration>" as I did for the B-25?

I want to ensure I am doing things in a manner to minimize the load on the moderators.

Thanks,
Dale
 
Dale,

If your model is finished you have to create the thread with the required pictures of the final product. The title of a such thread is labeled with the "**** FINISHED: <GB Declaration>" form. The thread where you showing us the progress should be changed with the form... "**** DONE: <GB Declaration>" However you may fail trying to edit the title. And a Mod has to do it instrad of you. But the one for finished model you has to start with the correct title when creating it.
 
lol..... Wojtek and his Magic Wand.... I can see a Broadway musical spinning out of that.

So, my creating the "**** Finished: <GB Declaration>" as I did (with the appropriate pics) was correct?

Dale
 
You also need to be aware of the image requirements. ther are a minimum of six shot, and a maximum of ten can be posted. the six compulsory are forward, port side forward, port side rear, rear starboard side rear and starboard side forward.

For advice, i would offer that you photgraph in daylight, with the sun behind you and make sure you have a plain background, like a blanket or a sheet. There are guys here that do a far better job than me at photographing their models
 
I agree there. Members spend four months planning, preparing, and building the models for their GB entries, but, to judge by some of the 'Finished' thread photos, they only spend four seconds planning, preparing and taking the photos!
After the build itself, the final six photos are the most important part of any entry - it is these that are used for the final judging. The extra four are your chance to 'show off' by emphasising parts you really like, or by creating a realistic scene, for example.
If the final six photos are under exposed, un-sharp, or the model itself too small in the frame, or the image cluttered by pretty wallpaper, background mess or other distractions, then the preceeding four months have been virtually wasted.
If the judges can't see the quality of the model being judged, then this can, and will affect the judging.
It only takes a few minutes to set-up for the photos, and this can be done quite simply, on a table top, utilising a desk lamp, preferably a pare of desk lamps, with a suitable, plain, neutral-coloured backdrop, and a quick check on the 'White Balance' of the camera.
Available daylight can not be controlled or manipulated - artificial light can and, with modern, digital cameras, it's a relatively simple task to achieve good, clear, sharp, usable photos.
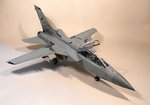
And if you don't believe me, then have a look at the Tornado pic below. This was shot against a backdrop of decorator's lining paper, draped over my computer monitor, lit by two, 40 Watt bulbs, one each in the desk lamps on my work bench, and using a simple 'bridge camera', hand held. And i didn't even get out of my seat to do it - so no special tricks, equipment or effort.
 

Attachments

  • Tornado GB 415.jpg
    Tornado GB 415.jpg
    88.6 KB · Views: 172
Hey, Terry,
You are so correct there and I am guilty as charged. I need to grab some more poster board and duct tape up a betting photo "environment". Also need to find my damned tripod and set it up as well.
 

Users who are viewing this thread

Back