Airfix 1/24 Spitfire undercarriage.

Ad: This forum contains affiliate links to products on Amazon and eBay. More information in Terms and rules

Hi to one and all.

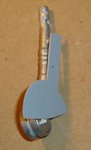
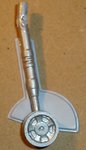
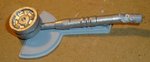
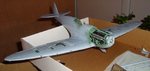
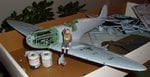
I've been trawling through the modelling section for some basic ideas on building the Airfix 1/24 Spitfire Vb. So far so good, I pretty much know where I'm heading (Zumbach). As this is the first model I've built in 20 years, I've decided to stick to the basics, any shading and/or weathering will be fairly simple and minimal as they were skills I didn't really worry about back in my teens! (Scratch building is way out of my league!) I have to say the kit (to me) has been a little painful to build and this was probably the reason I didn't finish it first time round!!!! (In certain areas the fit is dreadful) I've found my way around most issues. HOWEVER, I've managed to break the starboard wing undercarriage leg!!!!!!! The big problem is that it is still attached! The break is inside the wing!

Has anyone any suggestions on how to rectify the problem without destroying the wing? (I've got some basic ideas on what to do) And where can I get a spare undercarriage leg?

Hope someone can point me in the right direction.

Thanks.
 
Can you post a clear photo of the area, and the break? It may be possible to drill the parts, and 'pin' using a piece of wire from a paperclip.
If you contact Airfix, with the kit name and number, and part number, you should be able to get a replacement part, although fitting it might be a problem.
This kit is basically from the same moulds as the original Mk1 kit, first released around 1970, which probably explains some of the problems with fit of parts. I built their Bf109E a few years back, from the same era, and some of the parts were so 'softly' moulded, I decided to build it 'wheels up', as a belly-landed example, as the gear legs were virtually unusable !
 
I'm sure it can be pinned if I can get the leg out. Just worried about the damage I may cause as the plate that is designed to hold the leg in the upright position is holding the broken parts in place! I can feel a bit of a Dremel induced bodge coming on!! Worst case scenario is a wheels up crashed version, but was hoping to avoid that, especially as the other leg is fine!

I'll see what I can do about a picture. Uploading it on here will probably be my biggest problem! Lol.

Thanks.
 
Uploading id easy once you've tried it! Re-size your pics to no larger than 800 x 600 px first. click the 'Go Advanced' button at bottom right of the 'Quick Reply' box.
On the box that now shows, find and click on the 'Attachements' button.
A new box will open, allowing you to 'Select Images'.
Select the pic(s) you want from your computer files.
These will then appear as the file number/name in the box.
When complete, click on 'Upload Images'.
A blue bar will then start to move across the box and, when complete, the images will appear as 'thumbnails' in the box at the bottom of this new screen. If out or order, they can be 'dragged' into the required sequence using the mouse. When happy, click 'Done'.
Then just post the reply as normal - the pics should then be included in your reply.
 
No pictures yet, but I have managed to get the undercarriage leg out with no further damage to the Spitfire! (However, I have managed to break my knife!!!) Looks like I might just glue it back in place. Before removing the leg it was sitting at a strange angle and no amount of gentle coaxing could get it to sit anywhere near where it should be!
I will post some pics soon.
 
Some pics of the undercarriage leg, showing the break at what best can be described as the "hinge"! The other side of the hinge is also missing as I removed it! The actual length of the leg is un affected. I have since sat the leg in place (obviously un-glued!) and with the broken part out of the way, I can get the leg to sit in line with the leg on the other wing where as previously they would not line up. The Spit almost looked as though it were trying to walk (not good!).

The other 2 pics just show my basic progress to date.
 

Attachments

  • DSC01667ab.jpg
    DSC01667ab.jpg
    32.6 KB · Views: 137
  • DSC01668ab.jpg
    DSC01668ab.jpg
    39.7 KB · Views: 150
  • DSC01669ab.jpg
    DSC01669ab.jpg
    36.6 KB · Views: 144
  • DSC01670ab.jpg
    DSC01670ab.jpg
    36.2 KB · Views: 146
  • DSC01673ab.jpg
    DSC01673ab.jpg
    44.9 KB · Views: 145
Looks like the leg should fit and glue in place OK. As you probably know, the parts were originally designed to provide a retractable undercarriage, so having it 'fixed' won't be a problem, and will also allow a stringer joint and 'sit'.
Looking good on the rest so far, although some major alterations to the wing will be required for a MkVb.
 
Looking good on the rest so far, although some major alterations to the wing will be required for a MkVb.

I'm not going to do much more (if anything) in terms of rectifying or modifying the basic kit (I'll sort out my own mistakes though!!). For me personally, finishing the kit is my main goal, as I remember owning the kit as a teenager and not finishing it!

Now I've got the basics of posting on here, I'll upload some more photos later.
 

Users who are viewing this thread

Back