Navigation
Install the app
How to install the app on iOS
Follow along with the video below to see how to install our site as a web app on your home screen.
Note: This feature may not be available in some browsers.
More options
You are using an out of date browser. It may not display this or other websites correctly.
You should upgrade or use an alternative browser.
You should upgrade or use an alternative browser.
B-26 MARAUDER
- Thread starter Mr. Ed
- Start date
Ad: This forum contains affiliate links to products on Amazon and eBay. More information in Terms and rules
More options
Who Replied?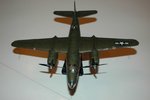
- Thread starter
- #2
- Thread starter
- #3
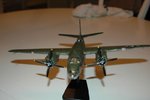
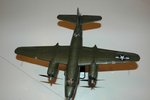
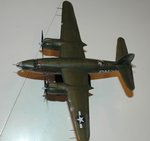
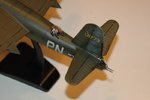
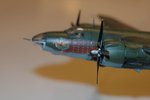
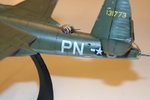
First of all, sorry about the massive size of the pictures. I haven't got that "resize" down to 6-800 pixels down yet. Second, let me tell you a thing or two about the kit, since I'm sure you're dying to know:
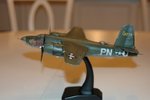
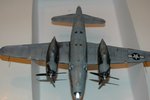
This is the Hasegawa 1/72 scale B-26 Marauder "Flak Bait". Hardly an original choice, but I'm pretty much a straight out of the box builder. However I did add figures from a Legend Productions resin kit, and I took the stand from my son's 1/100th B-17G snap together kit. I asked for his permission to do this and he didn't mind as he doesn't need the stand anyway.
You hardly need me to tell you that Hasegawa makes an excellent kit. I only have minor quibbles: There were 2 panel lines on the top of the fuselage that didn't align properly and the interior bulkheads had to be filed down pretty aggressively in order to get the fuselage halves to fit well. Other than that, it's pretty much a flawless kit. This helps make it look as though I did a flawless job of making it, which isn't quite true. If you'd like a catalogue of my errors I'll provide it upon request.
On a side note, I actually saw the real Flak Bait in person at the Smithsonian Air and Space Museum during the time I was working on this kit. One day I'll tackle the Monogram 1/48th scale Marauder.
Happy Modeling!
-Mr. Ed
theultimateend
Recruit
- 8
- May 10, 2010
Did you paint that yourself?
I love making miniatures (I took a stab at Warhammer figures a while back) but I'm atrocious at painting.
About the only thing I took away from building miniatures is that you should ventilate the area. I wasn't thinking, didn't smell anything, and ended up clearing both nostrils of ALL my nasal hair. True story. For a while (I don't recall how many weeks) I had to carry tissues constantly because I was dripping everywhere . But live and learn, that was hopefully my first and last darwin moment.
At any rate if you made that yourself I'm very impressed. It looks about as professionally done as they get honestly.
EDIT: You posted right before I posted so forgive me if you answered any of this :X
I love making miniatures (I took a stab at Warhammer figures a while back) but I'm atrocious at painting.
About the only thing I took away from building miniatures is that you should ventilate the area. I wasn't thinking, didn't smell anything, and ended up clearing both nostrils of ALL my nasal hair. True story. For a while (I don't recall how many weeks) I had to carry tissues constantly because I was dripping everywhere
. But live and learn, that was hopefully my first and last darwin moment.At any rate if you made that yourself I'm very impressed. It looks about as professionally done as they get honestly.
EDIT: You posted right before I posted so forgive me if you answered any of this :X
- Thread starter
- #5
theultimateend,
I did paint it myself, and it took me as much or more time than the construction. Your story about your poor nostrils was interesting to me because I do something that is exact opposite of safe painting proceedures. My "spray booth" is actually a small office area with no ventilation. Completely moronic of me, I know. What I do is quickly spray a light coat while holding my breath and then leave the room immediately. This model was painted using spray cans, which is even worse than airbrushing as with an airbrush I use acrylic paints that don't create much in the way of hazardous fumes. Please don't use me as a role model for safe spraying technique.
The masking was done with wall tack - you know, the stuff you can get at the corner drug store to hang up posters and whatnot. It actually works quite well. I'll tell you more about how I weathered the thing if you'd like - I used some techniques I learned around here. In my view, weathering is very important to making a model look realistic.
hawkeye2an
Staff Sergeant
Real nice work, It IS a well known subject, but you did an outstanding job on it.
Resized the images for you. Read this thread to see how it has been up for weeks on all the forums so you should of seen it by now: Aircraft of World War II - Warbird Forums - Announcements in Forum : Your Completed Kits or http://www.ww2aircraft.net/forum/announcements/image-sizing-guidelines-24388.html
Next time I won't resize the pictures and will just delete the thread and any other of your threads with large pictures until the pictures are the right size. All the information is in the threads above so read it and take it in.
That being said, nice model.
Next time I won't resize the pictures and will just delete the thread and any other of your threads with large pictures until the pictures are the right size. All the information is in the threads above so read it and take it in.
That being said, nice model.
- Thread starter
- #8
Migrant
Senior Airman
Nice work, Mr Ed. It's nice to see a B-26 model that's not weathered to oblivion; I know they did get really worn, but at some point in their service life they weren't. I like the subtle approach you've taken.
Catch22
Major
Looks great!
Crimea_River
Marshal
Always liked that bird. Well done!
Airframes
Benevolens Magister
The pics are a bit out of focus, but looks good from what I can see.
Nice work!...must finish my Flak Bait some day....
- Thread starter
- #14
Thanks all.
Migrant - I actually thought I overdid the weathering, especially on the underside , but the pictures I took make it look toned down. I also found that a lot of the weathering was reversed when I sprayed glosscoat in preparation for the decals. What I didn't do was chip the paint whole lot. Real life examples were often very chipped but I simply haven't developed a technique for doing this that I'm comfortable with and I was afraid of ruining the finish by experimenting.
Airframes: Taking pictures of my models has taught me a lesson. Photos can highlight certain things and hide other stuff. Looking at models in person can be quite a bit different than looking at pictures of them. My photo technique definitely needs work, but I'm going to have to learn how to resize them to 6x800 pixels first. When I first posted them they were gigantic.
- Thread starter
- #15
Thanks all.
Migrant - I actually thought I overdid the weathering, especially on the underside , but the pictures I took make it look toned down. I also found that a lot of the weathering was reversed when I sprayed glosscoat in preparation for the decals. What I didn't do was chip the paint whole lot. Real life examples were often very chipped but I simply haven't developed a technique for doing this that I'm comfortable with and I was afraid of ruining the finish by experimenting.
Airframes: Taking pictures of my models has taught me a lesson. Photos can highlight certain things and hide other stuff. Looking at models in person can be quite a bit different than looking at pictures of them. My photo technique definitely needs work, but I'm going to have to learn how to resize them to 6x800 pixels first. When I first posted them they were gigantic.
Migrant - I actually thought I overdid the weathering, especially on the underside , but the pictures I took make it look toned down. I also found that a lot of the weathering was reversed when I sprayed glosscoat in preparation for the decals. What I didn't do was chip the paint whole lot. Real life examples were often very chipped but I simply haven't developed a technique for doing this that I'm comfortable with and I was afraid of ruining the finish by experimenting.
Airframes: Taking pictures of my models has taught me a lesson. Photos can highlight certain things and hide other stuff. Looking at models in person can be quite a bit different than looking at pictures of them. My photo technique definitely needs work, but I'm going to have to learn how to resize them to 6x800 pixels first. When I first posted them they were gigantic.
otftch
Staff Sergeant
Very well done.
Ed
Ed
otftch
Staff Sergeant
Very nice.
Ed
Ed
mandoman
Airman 1st Class
Looks really nice, Mr. Ed (love that handle. Watch that ventilation problem.
. Watch that ventilation problem. Users who are viewing this thread
Total: 1 (members: 0, guests: 1)