Lovely work so far!
Navigation
Install the app
How to install the app on iOS
Follow along with the video below to see how to install our site as a web app on your home screen.
Note: This feature may not be available in some browsers.
More options
You are using an out of date browser. It may not display this or other websites correctly.
You should upgrade or use an alternative browser.
You should upgrade or use an alternative browser.
**** DONE: GB-37 1/72 Airfix Westland Scout (RAN) - Helicopters / Military a/c of BoB 1940
- Thread starter parsifal
- Start date
Ad: This forum contains affiliate links to products on Amazon and eBay. More information in Terms and rules
More options
Who Replied?Airframes
Benevolens Magister
Good work Michael.
Andy beat me to it regarding the 'Milliput'. It's possibly one of the best modelling accessories ever made, and can be used for filling gaps, moulding 'shapes' on models, and making items such as cushions, parachute packs, bags, cylinders or whatever you can think of.
It can be moulded, carfved, engraved, drilled and tapped, and provides an extremely smooth, hard finish.
Some modellers prefer the Milliput 'Fine' (white), although this is really intended for porcelain and chinaware repair, and I've found it can begin to 'flake' or crumble on delicate moulding.
I've used the 'standard' (yellow / grey) for around 40 years, and haven't yet found a product to compare.
- Thread starter
- #83
parsifal
Colonel
Ive been working steadily all week and making pretty good progress actually. but ive struck two conundrums
best if I show the problems with some walk around photos;
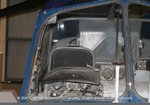
The first are what can be seen in the real thing in the nose views;

First up an ex RN scout, showing that there is essentially no IP on the port side. This is how the kit is configured as well as the AM PE additions. The kit has no dash for the port side and no port side control columns . That is not how the RAN museum display depicts their scout....

this is the RAN scout. straight away it should be obvious that there are dual control points and a dash that extends across the whole width of the cockpit
I'm not going to be able to recreate this with the resources I have

Now, the IPfrom the bow. There is a dash and a lot of gadgetry and pipework clearly visible through the windscreen . I should be able to scratch build this,but what a pain!!!! The biggest problem I have is the fast approaching deadline. this stuff will take a bit of time unfortunately...
...

this the RAN FAA museum copy again, showing that the port dide dash is there, and similar to the stbd side RN versions.
So I have to startfabricating the behind the dash detail as best I can, and also make a decision about the missing port side detailing I'm confronted with.
Don't ya just luv getting ambushed!!!!
best if I show the problems with some walk around photos;
The first are what can be seen in the real thing in the nose views;
First up an ex RN scout, showing that there is essentially no IP on the port side. This is how the kit is configured as well as the AM PE additions. The kit has no dash for the port side and no port side control columns . That is not how the RAN museum display depicts their scout....
this is the RAN scout. straight away it should be obvious that there are dual control points and a dash that extends across the whole width of the cockpit
I'm not going to be able to recreate this with the resources I have
Now, the IPfrom the bow. There is a dash and a lot of gadgetry and pipework clearly visible through the windscreen . I should be able to scratch build this,but what a pain!!!! The biggest problem I have is the fast approaching deadline. this stuff will take a bit of time unfortunately...
...
this the RAN FAA museum copy again, showing that the port dide dash is there, and similar to the stbd side RN versions.
So I have to startfabricating the behind the dash detail as best I can, and also make a decision about the missing port side detailing I'm confronted with.
Don't ya just luv getting ambushed!!!!
Attachments
- Thread starter
- #84
parsifal
Colonel
This is an interior shot from wotjek,clealry showing the second control column, but missing the port side dash assembly. looking closely at the IP detail I can see that it actually comes in two pieces. I'm thinking it might sometimes be removed for some reason....

Airframes
Benevolens Magister
I remember the Scout with the 'twin' instrument panel, and most photos show this. However, I've seen pics with just the starboard side panel, both with one set of controls, and two sets.
It possibly depends on the period and / or the role ?
It possibly depends on the period and / or the role ?
- Thread starter
- #86
parsifal
Colonel
I think you might be right Terry.
AnywayIve made some further progress, not much and I probably will need to did-assemble some element of the pit to straighten things up.

I have a couple of elements of the IP to finish just yet

I'll have to finish the top of the IP whilst it is fitted I think I have to work out some method for an anti glare dash and also finish the upper left side of the IP. at this stage I will leave the co-pilots position as is........but that might change if I can think of a viable solution. Rear cross member will need to be removed and made straight.

The rear firewall. I may have to re-attach the rear seat, as it is slightly out of kilter I can see.
AnywayIve made some further progress, not much and I probably will need to did-assemble some element of the pit to straighten things up.
I have a couple of elements of the IP to finish just yet
I'll have to finish the top of the IP whilst it is fitted I think I have to work out some method for an anti glare dash and also finish the upper left side of the IP. at this stage I will leave the co-pilots position as is........but that might change if I can think of a viable solution. Rear cross member will need to be removed and made straight.
The rear firewall. I may have to re-attach the rear seat, as it is slightly out of kilter I can see.
Crimea_River
Marshal
Good progress.
turbo
Staff Sergeant
- Thread starter
- #90
parsifal
Colonel
ive more or less completed my pit although the rear fire wall is not yet affixed. Had to did-assemble some parts basically to straighten everything up and just make it a more snug fit. The two pilots seats needed ro the straightened, aligned and make to be as close as possible to the centre console as I could.
Despite all of this when dry fitting the pit to the two fuselage halves, there just isnt enough width to get the pit into the fuselage. Ive determined that I need to put the two fuselage halves together, then slide in the pit decking and all the bits attached to it, then the firewall and then the roof clear part. The engine deck goes in behind the rear fire wall. But even with all the corrections to the pit, I just cannot get the pit into the width of the fuselage halves . its close, but no cigar.
On the other hand, I don't want to "spread" the upper half of the fuselage . if I do I will get a poor fit for the clear part cockpit cover. so to get the necessary width at the bottom Ive inserted a styrene spacer along the bottom edge. I will need further sand back this spacer so that it is flush for both the inner and outer skins.
This is a critical phase and I'm hoping rather than expecting it to work . Getting the decking in is hard enough without having this fit issue to worry about.
- Thread starter
- #91
parsifal
Colonel
Seems to be working....


.jpg")
roof and engine dry fit only.
roof and engine dry fit only.
")
Airframes
Benevolens Magister
Yep, looks like that's going to work.
fubar57
General
- Thread starter
- #95
parsifal
Colonel
didn't use much brute force really. The vice was used so that I could apply a uniform steady pressure for as much of the seam as possible. I seemed to work. The seam along the bottom is nice and even, no gaps or kinks. I had to be careful not to bruise or mark the plastic . got some help from the age of the model I think... the plastic used is very hard and rigid (and probably brittle) so gentleness was the name of the game
- Thread starter
- #96
parsifal
Colonel
edging closer now. near to finishing I think. ive attached the engines, the air filter thingys I scratch built earlier, the landing skids clearscreen . Had some problems and the model did suffer a bit because of those difficulties. still I'm pretty happy overall. Its decent.
I have the day off work tomorrow so there is a chance I might finish
I have the day off work tomorrow so there is a chance I might finish
Some progress shots:


Crimea_River
Marshal
Good work Michael.
fubar57
General
Agreed
- Thread starter
- #100
parsifal
Colonel
Another day and I continue to inch toward the finish. I have started the decaling process and am about half way through. The AM decals for the RAN are pretty good, but the sheet is tiny and the prints impossible to see on the white backing card that they come with. Makes cutting the decals to size difficult

Decal sheet face up sitting on a jar of paint

Decals applied port side
.
I have commenced painting the tail rotor, based on the display at the FAA museum. none of the decal sheets I have have any tail flashes for the tail rotor. I was always going to have to paint them Nothing too difficult really, except that the size of the tail rotor is minute.

Decal sheet face up sitting on a jar of paint
Decals applied port side
.
I have commenced painting the tail rotor, based on the display at the FAA museum. none of the decal sheets I have have any tail flashes for the tail rotor. I was always going to have to paint them Nothing too difficult really, except that the size of the tail rotor is minute.
Last edited:
Users who are viewing this thread
Total: 1 (members: 0, guests: 1)