Finnish Bf 109G-2 Hobby Boss 1/72

Ad: This forum contains affiliate links to products on Amazon and eBay. More information in Terms and rules

JonCOlsen

Airman 1st Class
197
14
Mar 14, 2015
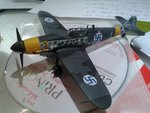
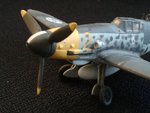
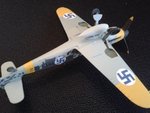
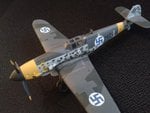
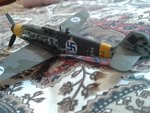
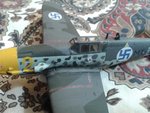
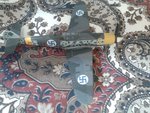
My model represents an Me 109G-2 in Finnish markings. It's from the 1/72 Hobby Boss Kit. While the details of this kit (especially in the cockpit) are rather basic, I found it easy to put together and well designed. My greatest difficulty was with getting the canopy to fit. The plane with these markings and paint scheme is known as "Yellow 2." It was flown by the famous Finnish Ace, Illmari Juutilainen.

For those who might not know, Juutilainen was the top scoring non-German fighter pilot of all time. He achieved 94 aerial combat victories. All of them against Soviet invaders. ;) Of his aerial victories, he achieved 58 while flying the Me 109G.

Please let me know what you think. I'm open to all comments and/or criticism. Enjoy! :)
 

Attachments

  • 14226_10153184178180990_1822379640416909998_n.jpg
    14226_10153184178180990_1822379640416909998_n.jpg
    74.9 KB · Views: 304
  • 2.jpg
    2.jpg
    59.2 KB · Views: 452
  • 3.jpg
    3.jpg
    79.1 KB · Views: 301
  • 4.jpg
    4.jpg
    92.3 KB · Views: 363
  • 7.jpg
    7.jpg
    88.3 KB · Views: 422
  • 11.jpg
    11.jpg
    83 KB · Views: 353
  • 12.jpg
    12.jpg
    116.7 KB · Views: 271
Generally not bad. However there are mistakes you have made. First of all ... not too good finish of seams. The one on the fuselage top should have been filled with some of a putty and then sanding and polishing for getting better surfaces. Also the same I can see at the wing leading edges. The fitting of the wing and the fuselage at the bottom area of the wing roots hasn't been done properly . Therefore there are "steps" and gaps at the wing trailing edges on both fuselage sides.
The next mistake is the choke ring antenna and the antenna mast at the fuselage top. According to the pictures below a such ring antenna ( Peil G D/F loop ) wasn't used with the kite. The antenna mast wasn't of the short type but it was the long one. It seems that there is a lack of bulges above the main landing wheel bays at the wing tops for your model. The camo scheme looks good but as you may notice while looking at the pictures of the plane , the camo layout was a little bit different and the Bf 109G-2 had sides of the fuselage quite dark. Additionally I'm not sure about these yellow tips of the prop blades. Unfortunately kit manufacturers make mistakes often and therefore it is better to check on such details using pictures of the real plane that can be found via the Internet or books that are good references. Just for future projects. As I have said .. not bad and we look forward to your next assemblings. If you have any doubts or need a help just feel free to ask. Thare are really very friendly people on the forum who can be at your disposal at any time.

Bf109G MT-222_a.jpg


Bf109G MT-222_b.jpg
 
Last edited:
Hey Wurger, thank you so much for your reply and for those two photos. If I were to do the same model over again, I would adjust the paint scheme so that the paint has a lower demarcation line and make a few changes based on observations you've made. For the camo reference, I mostly relied on a profile found in a Techmod decal sheet, which is where I got the decals from. The gap between the canopy and the top of the fuselage used to make me cringe, but now I'm used to it. However, this was a model I made about 1 year ago. Since then my standards for accuracy and detailing have changed.

For this build, I mostly used Tamiya paints from shake n' rattle spray cans. The main paints for the camo were AS3 (Gray Green)for RLM 74 and AS4 (Gray Violet) for RLM 75. I don't have an airbrush, so I depend on tamiya spray paint or brush painting.

I'm currently working on a 1/72 Academy Me 262. It's not done yet, but I'll be posting it soon. :)
 
My pleasure. :)

The lack of an airbrush isn't a shame. Also using of these Tamiya shake n' rattle spray cans is a good idea. These colours and the quality of applying look good to me. Looking forward to the Me-262 model assembled. If you would be interested you may have a look at the review of the Academy model ...

IPMS Kit Review: Academy 1/72 Me262A-1a
 
I generally agree with Wojtek but offer this:

- The seam on the top of the fuselage could be excused as 109's actually had one there, though not quite so visible.
- Yellow prop blades on Finnish machines were apparently not uncommon (see below pic)
- The "silvering" on the wing-walk decal caould have been avoided by spraying a gloss coat over the model before applying the decals and then finishing with a flat coat after the decals are applied.

Messerschmitt Bf-109G6 009.jpg
 
Not a bad effort, good advice to follow as noted above.

this G-2 was a late model/production version as the upper wing bumps were standard on the G-4.
 

Users who are viewing this thread

Back