GB-51 1:72 Arado Ar E.377a - No Propellers

Ad: This forum contains affiliate links to products on Amazon and eBay. More information in Terms and rules

A4K

Colonel
14,964
2,763
Dec 17, 2007
The back of beyond
User Name: A4K
Name: Evan
Category: Intermediate
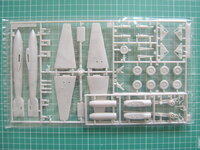
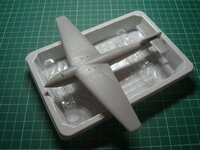
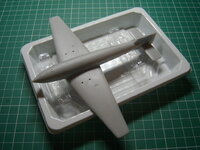
Kit: Revell - Mistel 5: He 162A-2 & Arado E 377a
Scale: 1:72
Accessories: None.

My first entry in this build, the Arado E.377a Grossbombe, the first aircraft specifically designed for Mistel operations.
Details to follow in a further post.

Progress to date: airframe assembled, now filling and sanding.
 

Attachments

  • STA57108.JPG
    STA57108.JPG
    142.9 KB · Views: 40
  • STA57109.JPG
    STA57109.JPG
    125.7 KB · Views: 38
Cheers guys!

Ralph, this kit is a reboxing of the DML/Dragon kit, of which I have both. Revell's plastic is a little softer than Dragon's, and markings are of course different.
 
Filling and sanding in progress...

Seen like this, sans engines, it is actually the original Arado E.377 design, a gliding bomb designed to be flown to the target by an Arado Ar 234C.
The E.377a of my build was to have been powered by two BMW 003 engines, as the single engine of it's intended control aircraft, the Heinkel He 162, would have been too underpowered to carry the weight of it's Arado Grossbombe.
Incidentally, a third version, the E.377c, was also planned, this being a piloted suicide version (like the Reichenberg version of the Fiesler Fi103)
In the event, the war in Europe ended before production could begin, and all E.377 designs remained on paper only.
 

Attachments

  • STA57114.JPG
    STA57114.JPG
    88.9 KB · Views: 33
  • STA57115.JPG
    STA57115.JPG
    88.3 KB · Views: 34
I see.

1. First of all, click the icon in the right corner of the post window and switch to the BB code. It allows you to keep a better control on the post layout which is displayed only as the text. Then upload all images you need with the "Attach files" button.

ssc2.jpg


2. When you already have uploaded your pics, you should get the view like that below. Click the "Insert" option in the image(s) of the uploaded shot(s). This will change it into two new options - Thumbnail and Full image. Click the Full image and your pic will be attached to the post as the full size shot. Please remember of moving the bliniking coursor to one line below your text to introduce the "space" between the writing and the pic. Also please hit the "Enter" key on your keyboard to move the coursor down before attaching the next image. The procedure has to be done for each pic.

ss1.jpg


ss1a.jpg


3. If you don't want to do that for each pic separately , you may click the "Insert multiple" button seen below the uploaded pics,

ss4.jpg


3a. Then, you should get the same options for attaching shots in the same line. Please note that there is a new button "Select all". If clicked all uploaded pics will be selected. Of course you may select images manually choosing these you want to attach to the post only. It allows to attach the different shots to different sections of your post. Just like I did it here for the one. The two options next to the "Select all" don't need to be explained do they. At the end, if your post layout is like you want ( you may check on that with the "Preview" option in the top right corner of the post window) , hit the Post Replay button at the bottom. I hope that can help.

ss4a.jpg
 
Cheers Karl!

Engine inlets and outlets have been (brush) painted, ready for dark wash and assembly. Airframe is still being filled and sanded.
 
Cheers Andy!

BMW 003A-1s in progress...

Need to drill out the intakes for the Riedel starter motors (in the bullet housings), and slightly detail them. Also need to mark the exhaust ports for same, then final washes and highlights before assembly.

Like a rookie, which I sort of am again after so long, forgot to weight Julia's nose... Instructions call for 20 grams, so will glue 10 g of fishing split shot sinkers in each engine cowling, behind the intakes.

STA57119.JPG
STA57120.JPG
 

Users who are viewing this thread

Back