GB 'Finished Thread' Photos. (1 Viewer)

Ad: This forum contains affiliate links to products on Amazon and eBay. More information in Terms and rules

Airframes

Benevolens Magister
62,351
11,468
Aug 24, 2008
Cheshire, UK
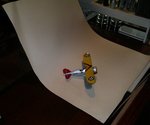
In the last couple of GBs, some of the photos submitted for judging purposes have not really been suitable, being either small, out of focus, poorly lit, or not as specified in the 'Photo Requirements', or a combination of all of these.
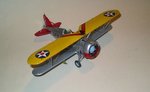
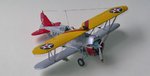
May I remind you all that the six 'Finished' photos are the most important, as these are what are used for final judging. If the judges can't see the details and overall finish of the completed entries, then points can (and will) be lost because of this.
It's therefore worth taking a little time, and a little extra effort, to set-up and expose decent images - very easy with today's digital cameras - as these are what all your hard work is judged on.
Bright daylight is not always required to do this, and in fact can sometimes be detrimental, there being no control over natural light, and if anyone needs advice or tips, please don't hesitate to ask.
If in doubt as to what is required, then please look at the thread on 'Group Build Photo Requirements', and the 'Rules', posted elsewhere in the GB threads.
(Note that the revised and up-dated Rules will be posted soon.)
 
Have to concur with Terry, it is difficult. The finished shots of the build are as important as the efforts put into making a good build, so like the building, take your time, pick your moment and make them good.
 
Background colour is better with a neutral shade, such as 'off-white', pale blue, or pale grey, depending on the main colour of the subject. Once the 'white balance' on the camera has been set accordingly, there shouldn't be a problem. A pair of simple desk lamps can provide adequate illumination, even for hand-held shots, with the average digital camera.
 
I support my judge peers in this request. Common issues are:

- the 6 required angles are not submitted
- subject is too dark (poor lighting or photographed against white backgound)
- subject is too small in the frame (make the model fit fully n your view)
- subject is out of focus (really shouldn't happen even with a basic pocket digital camera on Auto. If using an SLR, use as high an F-stop as possible)
 
I agree with all points posted above. One thing more though... I would like to remind that required size of all taken images is the 800 pixels in the width. If the width of your shots taken with your camera is more than the size , please resize them down before posting here on the forum.
 
Good point Wojtek. Even a perfectly exposed image is difficult to 'read' if it's too small, and if it's posted without re-sizing, then it takes time to load, slowing down the forum - and the patience of the judges!
Please ensure images are 800 x 600 or thereabouts, but no larger.
 
I've taken some of the suggestions by members in taking my shots. I think this works well for me.

I set up a sheet of an ivory colored craft paper outside on the shelf of my BBQ and make sure it's in the Shade. I use flash and then check each shot for sharpness. No biggee! Using a standard photo program, I crop, then re-size to 800 pixels wide. Make sure you check a little box for the settings, could be mm's or inches, make sure it's set to pixels. In this program one can adjust shadows and brightness as well to make a better entry shot.

I don't have an expensive camera, got it for 35 bucks on eBay, Pentax Optio 555.
 

Attachments

  • set-up.jpg
    set-up.jpg
    34.1 KB · Views: 193
  • photo.jpg
    photo.jpg
    29.6 KB · Views: 200
That was just a sample shot Andy. No prop!
But yes, I would have taken it closer, and a little more light. Maybe if I put one of the submitted pics here.
 

Attachments

  • GB16 VF-5  fini7.jpg
    GB16 VF-5 fini7.jpg
    51.7 KB · Views: 166
Gentelmen, please pay your attention to the fact that the Irfanview has a nice set of tools for editing of pictures. One of them is the Gamma Correction that is accessible in the menu Image/ Enchance clours option. It can be used for making pictures brighter ( instead of the standard option Brightness ) or darker. Just you have to slide the lever at the correct position. And then click the Apply to orginal button and save a picture again with the new setting.

An example...

set-up1.jpg


gama1.jpg


gama1a.jpg


set-up1a.jpg
 
Last edited:
Fine example of adjusting the a shady gray photo to a brighter one. Nice thing about doing it this way is the lack of shadows from all the light around the object,

Well done!
 
Good stuff Wojtek.
I've used 'Irfanview' ever since Wojtek told me about it, around four years ago It's quick, simple and effective - easier even than Photoshop for this sort of application, and it's free!
For lighting a shot, whenever possible it's better to use evenly balanced, simple and inexpensive artificial light, rather than flash or natural daylight. Using daylight is fine if the conditions are right, and the image can always be manipulated later, to an extent, but there is no 'fine control' over the lighting when using the average camera in this type of photography.
Using flash for relatively close-up 'table top' model photography can sometimes be too harsh, as the subject is 'flooded' with bright light which can cause colour change and a blue cast, as well as harsh shadows. However, as a 'fill in', in conjunction with artificial key lighting, it can sometimes be helpful.
 

Users who are viewing this thread

Back