Hasegawa A6M3 type:22 Zero (rookie builder) (1 Viewer)

Ad: This forum contains affiliate links to products on Amazon and eBay. More information in Terms and rules

seiseki

Airman
45
0
Dec 11, 2010
Stockholm
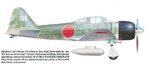
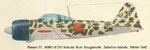
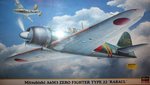
Mitsubishi A6M3 ZERO FIGTHER TYPE 22 'RABAUL' 1:48

This isn't my first actual build, but it's the first time I'm doing proper research and such before really getting into it and I've been taking it really slow.
My first build was a Revell Sopwith Camel a year ago, I never finished it because I didn't have any aluminum color, and when I finally got it I noticed the engine nose-cowling was missing.. So I'm just gonna leave that until later and focus on this zero.

I should notify you that my interest in models stem from various games, at first it was 'Rise of Flight' my Sopwith Camel, then it was 'World of Tanks' my PzkpfwII (which also isn't finished as I haven't decided on paint scheme and such).
And then a couple of weeks ago I got back into Il-2 Sturmovik and thus I bought this Zero!

Previous painting experience comes from painting warhammer figures.

Feel free to come with any tips and tricks as I'm sure I'll need all the help I can get.

As for the paint scheme I'm leaning towards painting it gray, I've found this one which seems simple enough: WINGS PALETTE - Mitsubishi A6M Reisen/Zeke/Zero/Rufe - Japan

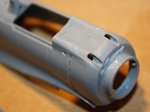
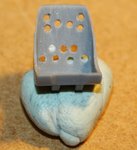
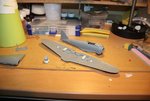
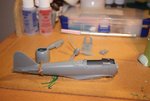
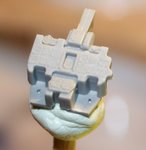
Below are some pictures of my work-bench and improvised solution for painting small stuff.
Also, this camera is insane, I'm borrowing it from my sister, the amount of detail it reveals is stunning.
I really need to get better at taking pictures though.
 

Attachments

  • IMG_7074.jpg
    IMG_7074.jpg
    55.9 KB · Views: 255
  • IMG_7071.jpg
    IMG_7071.jpg
    82 KB · Views: 260
  • IMG_7068.jpg
    IMG_7068.jpg
    75.5 KB · Views: 256
  • IMG_7078.jpg
    IMG_7078.jpg
    47.7 KB · Views: 263
  • IMG_7070.jpg
    IMG_7070.jpg
    60.7 KB · Views: 264
Last edited:
You mean the instrument panel?
Everything in the cockpit fits rather well, which is lucky, I don't think I could handle using putty in such an enclosed space..
 
Yep...I meant the instrument panel. If it fits it is fine. Please, keep working on.
 
Looking good just need to get to the end of a build.Trust me not an uncommon affliction we all have it to some degree.Now what kind of camera is that?it does take some good pics.Cheers
 
Looks like you are well set for this one and it's good to take pictures because as you say the detail is great and it will pick out the faults that the eye may not have seen, then you can fix them.
 
yep nice kit...interior colour IS NOT Aotake or Metallic Blue/green it is a medium Green colour Tamiya's XF-71 is a good representation for Mitsubishi built aircraft.

Yeah I've got the Vallejo equivalent.
Still need aotake for the wheel wells though, not sure how to mix it with Vallejo colors..
And I'm still unsure about the color theme, I think I might just pick up a dark green Vallejo color and do the box variant, less hassle with new decals and such, and the weathering should be more fun.

The camera is a Canon EOS 405D.
 
Just did a quick search on that camera and WOW! nice and a little pricey for me.A 12meg camera yeah I can see why the pics look like that :thumbleft: to your sister she must like photography.;) Cheers
 
Yeah, not sure if seeing all the details is a blessing or a curse tho :p

The project is on hold now for a while, got exams this week and then stuff to prepare for christmas..

Need to go to my hobby store to get some primer, unsure of what to get though, will any oil-based paint do? Then I'll have to get something to thin it out too..

I also need to get a hold of some future and black/white detail pencils for cockpit details.
 
Seems like you're going to have a good spend Seiseki and I naturally like your camera as I have an EOS 1000D which takes some good close-up shots with the normal 18-55mm lens.
 
I see. Of course it depends on you only what camo scheme you will choose. But you might try to make a mixed variant.
 
I have found a couple of examples for you. What do you think?
 

Attachments

  • Zero A6M3 model 22_.jpg
    Zero A6M3 model 22_.jpg
    17.8 KB · Views: 221
  • Zero A6M3 model 22.jpg
    Zero A6M3 model 22.jpg
    42.8 KB · Views: 220
  • Zero model 22.jpg
    Zero model 22.jpg
    40.8 KB · Views: 217
Last edited:
Thanks!
But I'll go with the variant on the box, my dad has an airbrush but I'm not ready to start using it yet :)
The paint scheme you linked would be hard to do without airbrushing, I'll probably still have to soften up the edges a bit though, not sure how but I'm going to try :D

I'm starting with the cockpit tomorrow, I don't want to paint it with primer because it might become too thick.. (and I still have to get primer)

I made some holes in the pilot seat using a needle which I heated with a candle.
I think it went pretty well, but the camera will reveal the truth tomorrow xD

I'm assuming pilots had some sort of pillow, because the current seat looks rather uncomfortable, so I'll make one with putty :p
 
Last edited:
I see.
The pilot's seat was just unconfortable because of the Bushido codex.Samurai warriors should rough it according to that.That's why the seat was so basic. And therefore there wasn't any pillow as memo serves. The pillow was a pilot's parachute he was sitting on.
 
Last edited:
I gotta add that I love that "sticky stuff", not sure what it's called but I use it to keep the small parts in place when sanding and I'm just about to glue together the wings, so I put some of the sticky stuff inside to make it more stable and keep it in place while it dries.

Here are the images.
The seat looks quite rough, I added an additional hole in the seat but then found out it's supposed to be asymmetrical, so I covered it up with some putty.

I also put the "thing-a-ma-jig" on the fuselage and covered the cracks with putty.

Hm, the front of the fuselage looks quite rough too, I need some really fine sandpaper, I know my dad has some but the actual paper might be too thick.
 

Attachments

  • IMG_7082.jpg
    IMG_7082.jpg
    56.1 KB · Views: 195
  • IMG_7081.jpg
    IMG_7081.jpg
    80.6 KB · Views: 200
  • IMG_7079.jpg
    IMG_7079.jpg
    91.1 KB · Views: 205

Users who are viewing this thread

Back