Horten Ho X - the unbuilt design. (1 Viewer)

Ad: This forum contains affiliate links to products on Amazon and eBay. More information in Terms and rules

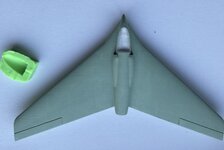
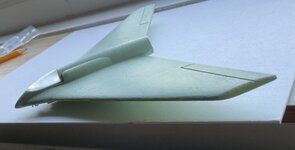
Base colour applied.Still showing grainy,so a rub down and repaint.
The canopy (not fixed)is "acceptable"Still needs some work with 7500 paper and the paste used on car headlight.
 

Attachments

  • 74957C87-CE34-4597-AEA6-B7892C0B848D.jpeg
    74957C87-CE34-4597-AEA6-B7892C0B848D.jpeg
    828.1 KB · Views: 31
  • 3551A4E2-92DE-4872-B838-D5FBF3B7C45C.jpeg
    3551A4E2-92DE-4872-B838-D5FBF3B7C45C.jpeg
    395.8 KB · Views: 30
You could have used the Tamiya white putty at the beginning for preparation of the model surface before painting.
 
That Tamiya putty is rather expensive.For about the same price I could get a decent sized tub of plastic car body filler.Ever tried it?
 
Yes. I have. However a car body filler is too hard especially for filling of the small appertures. What is more it needs to be sanded with two different grade sandpapers at least. The Tamiya putty is quite soft and doesn't crack. Also it is of a very good adhesive. Sanding is easy and may be done with a one fine sandpape either for dry or wet sanding.
The alternative is a putty that can be made by yourself. Take some of the talc powder and mix it with some of oil enamel ( eg grey Humbrol or Testors one ). Distribiute a thin layer of a such mixture all over the surface filling the holes with a small piece of a cardbaord. After a while you may use a soft rag soaked with a oil enamel thinner for wipping of the surface. Or you may wait till is dried and then sanding. The trick is to use not too much of the "putty" just slightly to fill the slots and make the surface smooth.
 
Thanks.Still tempted by the one made for plastic bumpers etc,which doesn't crack and sands easily.I'll have to see if I can "borrow" some to try.
 
Certainly you can. It depends on you only which you can choose. A note though ... use not too much of the putty. Just to fill the holes and make the surface smooth. In the way you may avoid too much of sanding.
 
Thanks.Making heavy weather of cutting the masks out but patience is a virtue.Some daylight would help,been foggy here today and yesterda.I have a 5'led northlight above my work area but daylight and the window sill are better.
 
Life! And no sunny days.To quote Larry"oh what a grey day"
'Now where did I put that illuminated magnifier…….
 
Couldn't find the magnifier so a new one on its way.Opticians earlier today,nothing has changed,which is good.She agreed that my sore eyes were symptomatic with all the close work,and better light will help.I hope to be back at it shortly
 
Run up against an unforeseen snag.You can't glue nylon!After much googling and consultation with the guys on rc groups it's been declared an impossibilit.If I still had all my faculties and rc plane building gear I'd try to make a jig to drill the centre of the legs and pin them.Not gonna happen.So for this one it's going to have to be thin wall brass tube.All future projects will have the u/c legs fitting into sockets on the airframe.
(welding was also discussed,which would work but is not worth the expense for a one off)
Hey Ho……..(there's a pun there somewhere)
 
Wow thanks! You sir are a gentleman and a scholar!Why my googling didn't turn this up I do not know.
(can I interest you in a length of thin wall brass tube🥴)
 
Only joking;it's 3.0 inner,3.5 outer.Somewhere in the postal system……
 

Users who are viewing this thread

Back