very nice indeed
Navigation
Install the app
How to install the app on iOS
Follow along with the video below to see how to install our site as a web app on your home screen.
Note: This feature may not be available in some browsers.
More options
You are using an out of date browser. It may not display this or other websites correctly.
You should upgrade or use an alternative browser.
You should upgrade or use an alternative browser.
1/32 Tamiya Merlin's Magic P-51D Reno dio
- Thread starter N4521U
- Start date
Ad: This forum contains affiliate links to products on Amazon and eBay. More information in Terms and rules
More options
Who Replied?Good work so far Bill!
- Thread starter
- #184
N4521U
Plastic Pirate
Well.
How many of us have forgotten to apply a decal?
Sometimes where the Sun Don't shine, so to speak. In this case the cockpit has been attached.
Here is one of them times. Long ago I had a decal made for the lower panel, mag switch?
Wellllll, I forgot it. So I had to trim it, then split the carrier paper, and attach it with Clearfix.
I often add a dab over the instruments to look like glass. Instruments as well.
So trimmed, split and then in the cockpit! I need alcohol.............
- Thread starter
- #186
N4521U
Plastic Pirate
So I woke up wayyyyy tooo early this morning.
Attaching oxy tube in the cockpit and waiting for it to dry.....
Perhaps I can do a decal? The nose art maybe? So I got out the 1/32nd set.
When I found them online I got all 3 scales, 72, 48 and 32. Can't find them any more!!!!
Background.
I have been doing all 3 scales cuz I did the nose art on the plane when I was sign painting in Livermore CA.
I got to know the Eberhardts and their planes. Stu was well liked at LVK and Reno.
Before I found the decals on the net I had done the artwork in Corel From a photo of the plane
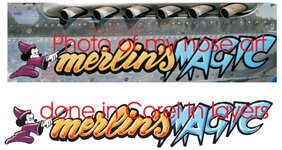
It is pretty accurate, color blends and all.
So this morning when I took out the decals they looked odd.
Then I got out my own I had printed as a test, hmmmm?
The verdict? I will use my own!!!!!! The one on top!
The bottom blue is so dark it's just a mass of WTHell........!

Getting close tho, running out of parts o to speak.
Attaching oxy tube in the cockpit and waiting for it to dry.....
Perhaps I can do a decal? The nose art maybe? So I got out the 1/32nd set.
When I found them online I got all 3 scales, 72, 48 and 32. Can't find them any more!!!!
Background.
I have been doing all 3 scales cuz I did the nose art on the plane when I was sign painting in Livermore CA.
I got to know the Eberhardts and their planes. Stu was well liked at LVK and Reno.
Before I found the decals on the net I had done the artwork in Corel From a photo of the plane

It is pretty accurate, color blends and all.
So this morning when I took out the decals they looked odd.
Then I got out my own I had printed as a test, hmmmm?
The verdict? I will use my own!!!!!! The one on top!
The bottom blue is so dark it's just a mass of WTHell........!

Getting close tho, running out of parts o to speak.
Snautzer01
Marshal
- 46,292
- Mar 26, 2007
Well done on the decal. I agree. Yours is far better.
Mickey has eyes in stead of lsd stars, formally known as said eyes.
Mickey has eyes in stead of lsd stars, formally known as said eyes.
Nicely done so far Bill!
- Thread starter
- #189
N4521U
Plastic Pirate
Why stop since I've started.
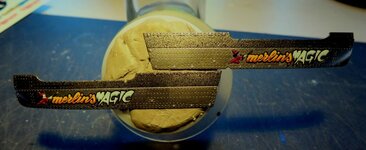
Bad photo of the Nose Art , but nonetheless!
Now the decals are much Shorter in length than the Real Thing and this
is because the panel where the nose art is located is short in height
but it will do in this case.
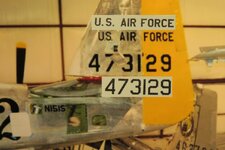
Above is a comparison of decals versus the Real Thing.
Now Draw Decals had the same picture, why oh why couldn't they do an overlay
and get the size and spacing accurate? It's might have taken another 10 min but come-onnnnn.
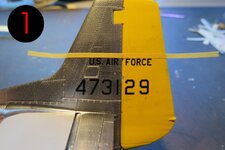
So this is how I sometimes align one side with the other.
1. I have applied Future to all decal surfaces and serial numbers.
As well as a coat Over the decals and let them both dry overnight.
I have now cut a 1-2mm strip of Tamiya tape and lay it across the Top
of the line I want to align on the other side. I did this with the serial no.
(I DO NOT press the tape down hard,
it's just hanging on or it can pull up the attached decal).
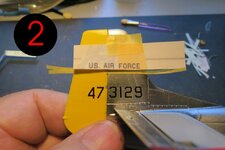
2. Now I go to the Other side, serial already done.
Another thin strip of tape to match the first side.
I then attach an Actual size print of the serial as it Should be.
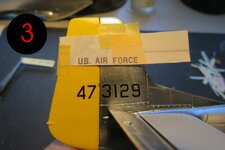
3. I then remove the alignment tape and eyeball the placement.
For this bugger i have cut close to the edge of each letter
and moved them into place the tail one by one.
I crack on!
Irritating piece of Shite!

Bad photo of the Nose Art , but nonetheless!
Now the decals are much Shorter in length than the Real Thing and this
is because the panel where the nose art is located is short in height
but it will do in this case.

Above is a comparison of decals versus the Real Thing.
Now Draw Decals had the same picture, why oh why couldn't they do an overlay
and get the size and spacing accurate? It's might have taken another 10 min but come-onnnnn.

So this is how I sometimes align one side with the other.
1. I have applied Future to all decal surfaces and serial numbers.
As well as a coat Over the decals and let them both dry overnight.
I have now cut a 1-2mm strip of Tamiya tape and lay it across the Top
of the line I want to align on the other side. I did this with the serial no.
(I DO NOT press the tape down hard,
it's just hanging on or it can pull up the attached decal).

2. Now I go to the Other side, serial already done.
Another thin strip of tape to match the first side.
I then attach an Actual size print of the serial as it Should be.

3. I then remove the alignment tape and eyeball the placement.
For this bugger i have cut close to the edge of each letter
and moved them into place the tail one by one.
I crack on!
Irritating piece of Shite!
Vic Balshaw
Major General
View attachment 664489
3. I then remove the alignment tape and eyeball the placement.
For this bugger i have cut close to the edge of each letter
and moved them into place the tail one by one.
I crack on!
Irritating piece of Shite!
It may be irritating but its damn fine work.
Good work so far Bill!
- Thread starter
- #193
N4521U
Plastic Pirate
Thank you guys for looking in and the kind comments.
So I have lost more of my mind.
Was looking at the kit exhaust shroud, it will be laying on a table out of the way and just thought there was not enough detail...........!
So I have begun whittling away at the parts.
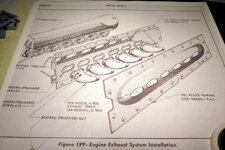
Exhibit "A" a diagram, granted, for the Packard version but non the less I'm doing it!
As you can see there are 3 sheet metal parts as well as the exhaust pieces!
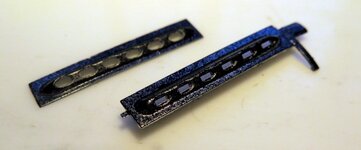
So here goes, the outer cover.
I snipped away all the Irrelevant bits from the back and end.
Opened the holes, as they slip over the exhaust tubes.
I then thinned the back to about .5mm thick.
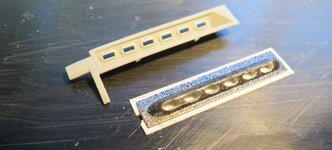
I cut from styrene the proper sheet metal back plate Before trimming to fit the modified kit part.
The back piece is from a 32nd P-51 I abandoned, the Tamiya kit was lacking this part, shown before modifying.

I cut the faked on ribs and added the two end tabs,
I will cut in the slots and do a final shaping.
I have yet to attach the shrouds to the mounting backs and will fiddle with them some more.
Now I know why some work from TWO kits when doing this kind of stuff.
Have to be careful not to bugger up an irreplaceable part!
The work goes on!!!!!!!! and on!!!! and.......!
So I have lost more of my mind.
Was looking at the kit exhaust shroud, it will be laying on a table out of the way and just thought there was not enough detail...........!
So I have begun whittling away at the parts.

Exhibit "A" a diagram, granted, for the Packard version but non the less I'm doing it!
As you can see there are 3 sheet metal parts as well as the exhaust pieces!

So here goes, the outer cover.
I snipped away all the Irrelevant bits from the back and end.
Opened the holes, as they slip over the exhaust tubes.
I then thinned the back to about .5mm thick.

I cut from styrene the proper sheet metal back plate Before trimming to fit the modified kit part.
The back piece is from a 32nd P-51 I abandoned, the Tamiya kit was lacking this part, shown before modifying.

I cut the faked on ribs and added the two end tabs,
I will cut in the slots and do a final shaping.
I have yet to attach the shrouds to the mounting backs and will fiddle with them some more.
Now I know why some work from TWO kits when doing this kind of stuff.
Have to be careful not to bugger up an irreplaceable part!
The work goes on!!!!!!!! and on!!!! and.......!
fubar57
General
Vic Balshaw
Major General
Some good whittling there Bill. 
Lovely work so far Bill!
- Thread starter
- #198
N4521U
Plastic Pirate
Thanks all you Blokes!

So I finished the exhaust Shroud backing plates.
Just need to paint to look like Stainless.
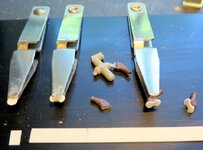
So call me Silly but if I have the Shrouds off and onna a table......
then I must have the stacks inna box on the same table!!!!!
Well, it wouldn't do to Not have the mounting flange onnem!
So here's my take.
1. Cut 3mm wide piece from 5mm wide x .35thk styrene.
2. Clamp the little baby inna clamp, DOH, and round both ends with a sanding block.
3. Trim the bottom mounting boss from the bottom of the stack.
4. Square file the slot on Both sides of #1.
5. A drop of thin cement to the stack, pick up the flange, slide into place let dry.
Just need to repeat 11 more pieces!!!!!!!!!! and paint.
It goes on.

So I finished the exhaust Shroud backing plates.
Just need to paint to look like Stainless.

So call me Silly but if I have the Shrouds off and onna a table......
then I must have the stacks inna box on the same table!!!!!
Well, it wouldn't do to Not have the mounting flange onnem!
So here's my take.
1. Cut 3mm wide piece from 5mm wide x .35thk styrene.
2. Clamp the little baby inna clamp, DOH, and round both ends with a sanding block.
3. Trim the bottom mounting boss from the bottom of the stack.
4. Square file the slot on Both sides of #1.
5. A drop of thin cement to the stack, pick up the flange, slide into place let dry.
Just need to repeat 11 more pieces!!!!!!!!!! and paint.
It goes on.
Crimea_River
Marshal
Lotta love going into those details Bill. Great work.
Users who are viewing this thread
Total: 1 (members: 0, guests: 1)
