great work Dogsbody
Navigation
Install the app
How to install the app on iOS
Follow along with the video below to see how to install our site as a web app on your home screen.
Note: This feature may not be available in some browsers.
More options
You are using an out of date browser. It may not display this or other websites correctly.
You should upgrade or use an alternative browser.
You should upgrade or use an alternative browser.
1/32nd scale Mosquito FBVI conversion.
- Thread starter Airframes
- Start date
Ad: This forum contains affiliate links to products on Amazon and eBay. More information in Terms and rules
More options
Who Replied?- Thread starter
- #103
Airframes
Benevolens Magister
Thanks Karl and Herman.
It should be possible to use a vacuum cleaner motor, or a fridge compressor, reversed. The important part is the actual 'suction' and the frame itself, which must use equal area draw down.
It should be possible to use a vacuum cleaner motor, or a fridge compressor, reversed. The important part is the actual 'suction' and the frame itself, which must use equal area draw down.
This also got me wondering about whether it's possible to use a household vacuum cleaner and other items to do Vac forming?
Yep... it's possible but you have to have a vacuum vorming table. It can be scratchbuilt or bought. Here is an example , please scroll a screen a little bit down.
Vacuum Forming Tables and More -- The Kingston Vacuum Works
Terry... well done.

- Thread starter
- #105
Airframes
Benevolens Magister
Thank you my friend, and good info on the vacuum frames.
Good work Terry!
- Thread starter
- #108
Airframes
Benevolens Magister
Thanks Hugh, it's appreciated.
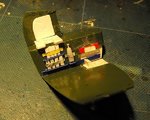
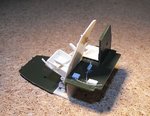
A little more progress has been made, in between sessions at the easel. Having test-fitted the pilot's seat, I found that the fabricated support was too low, so this was ripped out (literally!), and a new one fitted, more substantial, and higher up the bulkhead. The flare racks and flares have also been made and fitted, along with the fire extinguisher and a few smaller items.
PIC 1. The flare racks and flares, made from plastic rod, plastic strip and foil from a yoghurt container, and the fire extinguisher, from shaped sprue, and a length of stretched sprue flattened at the end. To the right is the beginnings of the 'new' seat support, and the sanitary tank has also been removed, fitted in a slightly higher position later.
PIC 2. The new seat support and the higher position for the sanitary tank. On the shelf can be seen the Morse key, transformer, regulator and basic wiring.
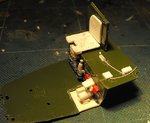
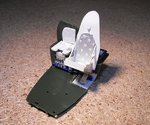
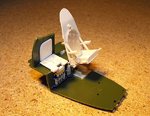
PICS 3 to 5. The pilot's seat cemented in place.
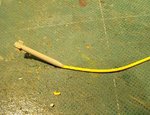
PIC 6. The relief tube and funnel for the sanitary tank under construction. A hole was drilled into the tip of a 1/48th scale HVAR missile, and a length of telephone bridging wire superglued in place. Once set, the bulk of the missile body was cut off, creating the funnel, and this will be fitted under the pilot's seat later.
Next step is to finish the relief tube and fit it, which I think is going to be fiddly, and then paint the main cockpit area, before making and fitting the seat harnesses. Then it's time to move on to the difficult part - scratch-building the cockpit fittings and instrument and switch panels.
Thanks once again for your continued interest and support, and I'll try to post another up-date soon.
A little more progress has been made, in between sessions at the easel. Having test-fitted the pilot's seat, I found that the fabricated support was too low, so this was ripped out (literally!), and a new one fitted, more substantial, and higher up the bulkhead. The flare racks and flares have also been made and fitted, along with the fire extinguisher and a few smaller items.
PIC 1. The flare racks and flares, made from plastic rod, plastic strip and foil from a yoghurt container, and the fire extinguisher, from shaped sprue, and a length of stretched sprue flattened at the end. To the right is the beginnings of the 'new' seat support, and the sanitary tank has also been removed, fitted in a slightly higher position later.
PIC 2. The new seat support and the higher position for the sanitary tank. On the shelf can be seen the Morse key, transformer, regulator and basic wiring.
PICS 3 to 5. The pilot's seat cemented in place.
PIC 6. The relief tube and funnel for the sanitary tank under construction. A hole was drilled into the tip of a 1/48th scale HVAR missile, and a length of telephone bridging wire superglued in place. Once set, the bulk of the missile body was cut off, creating the funnel, and this will be fitted under the pilot's seat later.
Next step is to finish the relief tube and fit it, which I think is going to be fiddly, and then paint the main cockpit area, before making and fitting the seat harnesses. Then it's time to move on to the difficult part - scratch-building the cockpit fittings and instrument and switch panels.
Thanks once again for your continued interest and support, and I'll try to post another up-date soon.
Attachments
Crimea_River
Marshal
Looks fantastic Terry. I'd really like to get a look at the references you're using for all that detail. Would the set-up be similar on a B Mk IV as that's what I have in my stash?
- Thread starter
- #110
Airframes
Benevolens Magister
Thanks very much Andy. Some of the references are from 35mm transparencies I took in the 1980s, of the now lost, BAe operated T.MkIII (similar to the MkII and FBVI), plus memory and first-hand accounts from former crews. The others are from pics found on the 'net, and the Squadron Signal books. I'll send you the books via e-mail, when I get a chance, along with the 'net pics. Afraid I've loaned my transparency scanner to a friend, so might be a delay getting the slides done.
The MkIV was similar internally, although some fittings were in different places, due to the requirements of the bomber, and of course there was the extra stuff in the nose compartment. However, I have a drawing of the latter which should clarify most things. Pity I also loaned-out the PSL book on the Mossie - to a friend in Denmark! That had a load of detail info.
The MkIV was similar internally, although some fittings were in different places, due to the requirements of the bomber, and of course there was the extra stuff in the nose compartment. However, I have a drawing of the latter which should clarify most things. Pity I also loaned-out the PSL book on the Mossie - to a friend in Denmark! That had a load of detail info.
vikingBerserker
Lieutenant General
Dang dude, NICE!!!!
- Thread starter
- #112
Airframes
Benevolens Magister
Thanks very much David! Bet you didn't think you'd start me off on a marathon scratch-build job!!
vikingBerserker
Lieutenant General
Heck, I'm wondering why you even needed it, you could have just scratch-built the entire thing!

- Thread starter
- #114
Airframes
Benevolens Magister
He He !
- Thread starter
- #116
Airframes
Benevolens Magister
Thanks Wojtek.
looks good Dogsbody, even better close up
- Thread starter
- #118
Airframes
Benevolens Magister
Cheers mate, and good to see you today. Hope you got home OK.
Night Fighter Nut
Master Sergeant
Well done mate.
- Thread starter
- #120
Airframes
Benevolens Magister
Thanks Bill. I hope to make more progress in the next few days.
Users who are viewing this thread
Total: 1 (members: 0, guests: 1)