1/48 Cyber Hobby BF-110D, G9+HM, 4./NJG.1, Ofw.Paul Gildner - Me/ Fw Group Build

Ad: This forum contains affiliate links to products on Amazon and eBay. More information in Terms and rules

So, with the work on the upper-deck insert cut out for me and a pretty good idea how to go about this matter I went ahead and did it as planned.

Thinned the part down with the multi-tool (as shown in my previous post) Once at the appropriate thickness some evergreen plastic strips were glued in place on the sides. After that has sufficiently set and cured is was on to sanding, test fitting, some more sanding and test fitting, and yet more sanding and test fitting. Until it fits.

The fit is so tight right now the part almost pushed itself out. The left front side of the part was slightly bend during all the work, but using a clamp of sorts to keep it in place while glueing it should take care of that.
 

Attachments

  • 37 - past ie.JPG
    37 - past ie.JPG
    88.8 KB · Views: 117
  • 36 - plastiek strippes.JPG
    36 - plastiek strippes.JPG
    119.4 KB · Views: 118
  • 38 - past ie.JPG
    38 - past ie.JPG
    63 KB · Views: 118
Some minor progress to show today.

With major surgery on the insert part done (boy that darn part sure kept me busy) I went to slightly polish it smooth. After that I build up the rest of the insert part with the typical 'cage' on top and few other small bits and pieces of equipment. I left out the parts that were supposed to hang on the 'roof' of that cage. Based on a few pics Crimea_River posted (in another section of the forum) of the bordfunker area without radar equipment I could make a pretty good guess as to which kitpart was part of the FuG202 equipment...with which this a/c was not equipped and as such had to be left out.

Afterwards I gave the insert part it's initial coat of Vallejo RLM02. Details etc. still need to picked out, but with little time left during the week I guess this is as far as I'll get today. Hopefully tomorrow another hour or so available to start work on detailing it.
 

Attachments

  • 39 - boven deck.JPG
    39 - boven deck.JPG
    53.3 KB · Views: 128
Last edited:
Thanks guys.

A bit of a situation developed with the kit yesterday:oops:
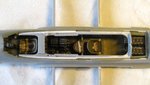
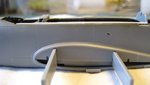
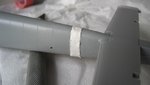
. Some more surgical procedures will be needed on the fuselage I'm afraid:mad:, not on the insert part thank god, but still. As I was doing some dryfitting to see how the one-piece elevator would sit I noticed it wasn't horizontal and couln't get it in the right position without it looking off on the other side. So a good hard look at the fuselage revealed some sort of minor twist towards the rear end of the fuselage. The fuselage halves were lined up perfectly good, but the elevator still wouldn't sit right. I'm unsure if this is 'self inflicted' (it most likely is) or is a defect on the kit part, but there it is. With the fuselage put together I fear it will be impossible to track down the cause (be it on the kits end or on my end) so I guess I'll focus on dealing with the consequences

The trouble is the one-piece elevator and thin aft fuselage allow little room for sanding down an area without causing another area to go completely off, or at least postitioning seperate parts in such a way that it would look good if only from a purely optical point of view)

So...what to do....razor-saw time :shock:. I sawed off the aft fuselage halfway through a fuselage section (as it holds little detail and panel lines that need restoring afterwards). Put a little plastic disc in place, and I glued it back in place except I gave the aft section a minor twist to compensate for the bent area and make sure the elevator is perfectly horizontal. So now it's off to making that area nice and smooth again. A little putty in place that's left to dry and then the sanding can begin.

Pis*ed off as I was about the whole thing I forgot to take pic's of the operation. Just wanted to get it out of the way I guess. I fear you'll be seeing 'scar tissue' only when it's done ;)
 

Attachments

  • 40 - fuselage.JPG
    40 - fuselage.JPG
    38.6 KB · Views: 121
Last edited:
I really dreaded chopping off the back end knowing it would take considerable effort to work it into a smooth surface again, but I know I'll slap my myself in the face all the time afterwards if hadn't figured out a way to somehow work around this defect (be it a mistake on my end or a defect in the kit) . Under other circumstances I might have done it differently, but with this build I want to really make it work. Since the tail section has little 'room to play with' without sanding away what detail is there I figured this was probably the best, and in the end the easiest way to get this out of the way
 
Last edited:
Looks like you did a good job Jelmer!

(Btw, some advice from a swearer - use atleast 1 cursor instead of writing out in full (maybe that's why it's called 'cursing'? :) ). Tolerated to an extent, but that's the thing - to an extent.)
 
Very well spotted Jelmer and nicely sorted. :lol: Also no worries about the pics mate, getting it sorted to your satisfaction is more important. :p
 

Users who are viewing this thread

Back