User name: jjp_nl
Name: Jelmer
Category: 2, Intermediate
Kit: Hasegawa P-40N Warhawk
Scale: 1/48
Aftermarket: some decals to turn it into a Dutch a/c (a small set of Dutch markings came for free with the kit, but technically they are aftermarket decals made by Dutch Decals/Dutch Profile)
My Tomahawk has been shelved temporarily , but I did feel like making some sort of contribution to this GB. Since this GB will keep running for a little while a new subject came to mind that doesn't deviate too much from my first contribution. A Dutch P-40N serving in the Dutch East-Indies during the mid to late nineteen fourties. Initially I had the Italeri P-40M/N kit in mind, but it turned out to be out-of-stock and the webshop offered to send me a Hasegawa kit in stead for the same prince....well, needless to say this was an offer I couln't refuse So here goes.
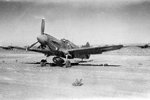
Most of you have heard of the P-40, so I'll skip the development/tech history of the aircraft and leave that for you to figure out. The story of how the Dutch came to fly the P-40 is all the more interesting. With war looming over the Pacific the Dutch government in exile was looking to reinforce the ML-KNIL (Military Aviation Service of the Royal Dutch East Indies Army) with more modern fighters in 1940-1941. They were looking to buy P-40 Warhawks, but this was impossible since the US was in the process of equipping it's fighter units with P-40's and all available production capacity was allocated to that (and prolly to producing P-40's for the RAF as well). Ultimately an order for some 100 Hurricanes was placed but they never made it to the Indies. The ML-KNIL did end up with a handful of Hurricanes though, which originally were meant for the RAF defence of Burma and other British areas in the South-East Asia, but they were directed else where due to the speedy Japanese advance. The same goes for a handful of partially assembled P-40E's that ended up being shipped to Java on two ships. On of these two ships (carrying assembled a/c) was attacked and sunk by the Japanese and on 28 febr. 1942 the other ship (carrying mostly unassembled P-40E's in crates) arrived on Java. Just in time to be destroyed by their new owners (to prevent them from falling into enemy hands) shortly before Java fell to the Japanese. A few P-40E's apparently were assembled, and got to make a few test flights, but that was it. Very little additional information on these P-40E's (and Hurricanes too) is available.
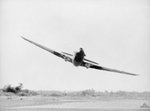
Part of the ML-KNIL personnel had escaped from the Dutch East Indies to Australia and they were at some point sent to the USA to be trained as fighter pilots. They did so, training on a ragtag fleet of poorly maintained P-40E, P-40F, P-40L and ultimately a few P-40N which (given all the different types and poor condition of the a/c) was a difficult task. But sometime in late 1943 early 1944 the Dutch pilots finished their training and were sent back to Australia where in the mean time 120th Sqn (under RAAF command) was established and the first new P-40N were beginning to arrive. In Australia 120th Sqn completed (combat) training. Sometime in July 1944 120th Sqn flew it's first operational missions. Until the end of the war 120th Sqn (under RAAF command) was mostly involved in ground attack missions (over New-Guinea and Indonesia) since Japanese airpower in those areas had all but disappeared by the time 120th Sqn became operational.
From early 1946 until 1949 120th Sqn (no longer under RAAF control) took part in operations against the recently declared republic of Indonesia to assist attempts of the Dutch Government to re-establish Dutch control over the East-Indies. This included many missions during the so-called 'police actions' of 1947 and 1949. Conditions were trying and spare parts and maintenance facilities were limited so apparently Dutch maintenance units resorted to looking up American/British and Australian equipment dumps to look for usable spare parts. When one compares unit logs of the day it's interesting to see how, despite trying conditions and in time the worn out state of the equipment, P-40's flew way more hours/sorties then any other type involved in these operations. Which I guess is evidence of their 'tried-and-trusted-warhorse' reputation and the creativity of the maintenance units to keep them flying. By 1948/1949 the Dutch P-40's were completely worn out with only 9 a/c still serviceable and 10 remaining airframes being cannibalized to keep others serviceable. All this out of some 60+ a/c originally allocated to 120th Sqn during 1944-1945) . From early to mid 1949 the remaining P-40's were replaced by some long awaited P-51 Mustangs and by July 1949 all P-40's were gone. None of them were sold/turned over to other owners, all went to the scrap yard too worn out to be of any use to others.
A box containing the excellent Hasegawa kit. OOB a very well detailed kit indeed.

Some Dutch markings for an overall NMF P-40N

Which by cutting up the decals can be used to turn it into J-302 (profile obviously for J-301, but the color scheme for J-302 is indentical) I do need to make some new decals for the small J-302 in front of the windscreen. Basically the standard color scheme of Olive Drab over light gray with bare metal patches on the fuselage and rudder. Interesting to note is that according to my sources J-302 prior to 15 August 1945 was the perhaps a little better known P-40N 'Wham Bam' C3-502. This a/c came into service on 01-01-1944 and on March 3rd 1949 made a wheels-up landing near Purwakarta, Java, and subsequently was scrapped in september 1949.


On to the actual build
Cutting out and cleaning up some of the basic parts. Fuselage and interior parts prior to painting

Spraying on some basic interior colors

Dry brushing the intake a little bit

Forward fuselage section glued together and (due to the multi-version part breakdown of the kit) rear fuselage/tail section glued in place.

Nose area need some minor filling/sanding. A bead of Mr.Surfacer was enough though

Same goes for the forward fuselage/rear fuselage join. Fit was excellent, but some cleaning up of the join is inevitable. I ran a bead of Mr.Surfacer over it as well (better be save then sorry) A few panel lines still need to be restored

Sanded and polished you'll get a perfectly smooth join

The interior was also painted. A basic mix somewhat resembling zinc-chromate green was used and details were picked out by means of dry brushing

A wash of Van-Dyke brown was applied to add a little dirt/shadow effect and some future and ultimately a flat coat was used to blend it all together into this


With the interior done in terms of painting, it could be glued together and inserted into the fuselage


Upper wing parts were glued to the fuselage first


Then the lower wing part was glued to the fuselage/upper wings

The part needed to accomodate the revised hood was also glued in place. Obviously a little cleaning up of the join was needed and I ran a bead of Mr.Surfacer over it as well and sanded/polished that smooth.

This is the work of the past two or three days. The small upper nose intake area needs a little more attention in terms of filling/sanding, but othert then that this has been a smooth build sofar.
Name: Jelmer
Category: 2, Intermediate
Kit: Hasegawa P-40N Warhawk
Scale: 1/48
Aftermarket: some decals to turn it into a Dutch a/c (a small set of Dutch markings came for free with the kit, but technically they are aftermarket decals made by Dutch Decals/Dutch Profile)
My Tomahawk has been shelved temporarily
, but I did feel like making some sort of contribution to this GB. Since this GB will keep running for a little while a new subject came to mind that doesn't deviate too much from my first contribution. A Dutch P-40N serving in the Dutch East-Indies during the mid to late nineteen fourties. Initially I had the Italeri P-40M/N kit in mind, but it turned out to be out-of-stock and the webshop offered to send me a Hasegawa kit in stead for the same prince....well, needless to say this was an offer I couln't refuse So here goes.Most of you have heard of the P-40, so I'll skip the development/tech history of the aircraft and leave that for you to figure out. The story of how the Dutch came to fly the P-40 is all the more interesting. With war looming over the Pacific the Dutch government in exile was looking to reinforce the ML-KNIL (Military Aviation Service of the Royal Dutch East Indies Army) with more modern fighters in 1940-1941. They were looking to buy P-40 Warhawks, but this was impossible since the US was in the process of equipping it's fighter units with P-40's and all available production capacity was allocated to that (and prolly to producing P-40's for the RAF as well). Ultimately an order for some 100 Hurricanes was placed but they never made it to the Indies. The ML-KNIL did end up with a handful of Hurricanes though, which originally were meant for the RAF defence of Burma and other British areas in the South-East Asia, but they were directed else where due to the speedy Japanese advance. The same goes for a handful of partially assembled P-40E's that ended up being shipped to Java on two ships. On of these two ships (carrying assembled a/c) was attacked and sunk by the Japanese and on 28 febr. 1942 the other ship (carrying mostly unassembled P-40E's in crates) arrived on Java. Just in time to be destroyed by their new owners (to prevent them from falling into enemy hands) shortly before Java fell to the Japanese. A few P-40E's apparently were assembled, and got to make a few test flights, but that was it. Very little additional information on these P-40E's (and Hurricanes too) is available.
Part of the ML-KNIL personnel had escaped from the Dutch East Indies to Australia and they were at some point sent to the USA to be trained as fighter pilots. They did so, training on a ragtag fleet of poorly maintained P-40E, P-40F, P-40L and ultimately a few P-40N which (given all the different types and poor condition of the a/c) was a difficult task. But sometime in late 1943 early 1944 the Dutch pilots finished their training and were sent back to Australia where in the mean time 120th Sqn (under RAAF command) was established and the first new P-40N were beginning to arrive. In Australia 120th Sqn completed (combat) training. Sometime in July 1944 120th Sqn flew it's first operational missions. Until the end of the war 120th Sqn (under RAAF command) was mostly involved in ground attack missions (over New-Guinea and Indonesia) since Japanese airpower in those areas had all but disappeared by the time 120th Sqn became operational.
From early 1946 until 1949 120th Sqn (no longer under RAAF control) took part in operations against the recently declared republic of Indonesia to assist attempts of the Dutch Government to re-establish Dutch control over the East-Indies. This included many missions during the so-called 'police actions' of 1947 and 1949. Conditions were trying and spare parts and maintenance facilities were limited so apparently Dutch maintenance units resorted to looking up American/British and Australian equipment dumps to look for usable spare parts. When one compares unit logs of the day it's interesting to see how, despite trying conditions and in time the worn out state of the equipment, P-40's flew way more hours/sorties then any other type involved in these operations. Which I guess is evidence of their 'tried-and-trusted-warhorse' reputation and the creativity of the maintenance units to keep them flying. By 1948/1949 the Dutch P-40's were completely worn out with only 9 a/c still serviceable and 10 remaining airframes being cannibalized to keep others serviceable. All this out of some 60+ a/c originally allocated to 120th Sqn during 1944-1945) . From early to mid 1949 the remaining P-40's were replaced by some long awaited P-51 Mustangs and by July 1949 all P-40's were gone. None of them were sold/turned over to other owners, all went to the scrap yard too worn out to be of any use to others.
A box containing the excellent Hasegawa kit. OOB a very well detailed kit indeed.
Some Dutch markings for an overall NMF P-40N
Which by cutting up the decals can be used to turn it into J-302 (profile obviously for J-301, but the color scheme for J-302 is indentical) I do need to make some new decals for the small J-302 in front of the windscreen. Basically the standard color scheme of Olive Drab over light gray with bare metal patches on the fuselage and rudder. Interesting to note is that according to my sources J-302 prior to 15 August 1945 was the perhaps a little better known P-40N 'Wham Bam' C3-502. This a/c came into service on 01-01-1944 and on March 3rd 1949 made a wheels-up landing near Purwakarta, Java, and subsequently was scrapped in september 1949.
On to the actual build
Cutting out and cleaning up some of the basic parts. Fuselage and interior parts prior to painting
Spraying on some basic interior colors
Dry brushing the intake a little bit
Forward fuselage section glued together and (due to the multi-version part breakdown of the kit) rear fuselage/tail section glued in place.
Nose area need some minor filling/sanding. A bead of Mr.Surfacer was enough though
Same goes for the forward fuselage/rear fuselage join. Fit was excellent, but some cleaning up of the join is inevitable. I ran a bead of Mr.Surfacer over it as well (better be save then sorry) A few panel lines still need to be restored
Sanded and polished you'll get a perfectly smooth join
The interior was also painted. A basic mix somewhat resembling zinc-chromate green was used and details were picked out by means of dry brushing
A wash of Van-Dyke brown was applied to add a little dirt/shadow effect and some future and ultimately a flat coat was used to blend it all together into this
With the interior done in terms of painting, it could be glued together and inserted into the fuselage
Upper wing parts were glued to the fuselage first
Then the lower wing part was glued to the fuselage/upper wings
The part needed to accomodate the revised hood was also glued in place. Obviously a little cleaning up of the join was needed and I ran a bead of Mr.Surfacer over it as well and sanded/polished that smooth.
This is the work of the past two or three days. The small upper nose intake area needs a little more attention in terms of filling/sanding, but othert then that this has been a smooth build sofar.
Last edited: