Navigation
Install the app
How to install the app on iOS
Follow along with the video below to see how to install our site as a web app on your home screen.
Note: This feature may not be available in some browsers.
More options
You are using an out of date browser. It may not display this or other websites correctly.
You should upgrade or use an alternative browser.
You should upgrade or use an alternative browser.
1/48th Mitchell II - Allied Advance and Defense of the Reich WWII.
- Thread starter Airframes
- Start date
Ad: This forum contains affiliate links to products on Amazon and eBay. More information in Terms and rules
More options
Who Replied?- Thread starter
- #142
Airframes
Benevolens Magister
OK my friend, I'll sort them out and e-mail them later tonight.
T Bolt
Colonel
Looking good Terry
- Thread starter
- #145
Airframes
Benevolens Magister
Thanks Glenn.
Just about to start on the final parts of the main internal structure, before moving on to the first stage of detailing - might have some pics later.
Just about to start on the final parts of the main internal structure, before moving on to the first stage of detailing - might have some pics later.
Lovely work so far Terry!
- Thread starter
- #148
Airframes
Benevolens Magister
Thanks Wojtek and Hugh, it's starting to progress nicely.
The bulkheads forming the bomb bay have been completed, although the bay itself will remain bare, and have the doors fixed in the closed position. The 'U' shaped formers in the entrance well have been made and fitted, and one half of the fuselage has had frames and stringers fitted.
PIC 1. The completed bomb bay structure. Like the rest of the interior, this is not quite totally accurate in shape, being a simplified addition, more to create depth and show that there's something on the inside, rather than an empty space, in those areas where parts of the interior can be seen.
PICS 2 and 3. The frames for the 'U' shaped entrance well have been fitted on each side, and will have more structure, and detail in the form of radio and nav equipment, added later. They're a bit difficult to see (and understand) clearly in these pics, but should be more visible, and make more sense, once the main cockpit area is fitted and joined to the frames.
PICS 4 to 6. A very basic representation of frames and stringers has been added to the starboard fuselage side, a long and monotonous task, especially as not that much of the interior will be seen. But, because what can be seen of the interior would look bare without them, they had to be done.
PIC 7. The internal frames also act as rebates on which the waist windows will sit when fitted.
Next step is to continue with the frames and stringers on the port side, and then start to fabricate and add some basic interior detail, such as the radios and nave aids, ammo boxes etc etc.
Some of these additions will be in the form of ' educated guesswork', as detailed photos showing the interior of RAF Mitchells, and the equipment specific to these models. are as rare as rocking horse s*it !
I've just discovered that the late B-25D versions received by the RAF which had the waist and tail gun positions, and known as the Mitchell Mk.IIa or MkII srs ii in RAF service, apparently did not have the gun fitted in the tail in most cases (note that just a single .50 cal Browning was specified for this earlier mount), but I intend to fit a single gun anyway, later in the build.
I have confirmed that, as of February 1944, the 'Gee' nav-aid was fitted, and have identified the positions, in photographs, of the whip antenna for this, and also for the later 'G-H' equipment fitted to some aircraft from mid 1944. I haven't been able to discover the precise location of the receiver and monitor unit inside the aircraft, although apparently there is some film footage of this included in a IWM film covering the development of RDF/Radar, so again, the positioning will be a 'best guess' decision.
Thanks again for your continued encouragement and interest in this build, and I'll post another up-date soon.
Donivanp
Lieutenant Colonel
Some really great work, Looks near like a scratch build might have been an easier place to start. I know that's not true but some ways. You do have a Plastic MD don't you.
T Bolt
Colonel
It's really starting to shape up Terry
- Thread starter
- #152
Airframes
Benevolens Magister
Thanks Wojtek, Don and Glenn.
Just taking a break from the monotony of laying-in the frames and stringers on the port fuselage half, and looking forward to adding a bit of detail, although I'll be keeping it to a minimum, in those areas where at least something can be seen through the canopy and side windows.
As there aren't any period interior photos of RAF Mitchell II or IIa aircraft, I'll have to position such items as the radio and 'Gee' equipment, based on photos of USAAF aircraft, taken from the Flight Manuals, but substituting British radio equipment etc, sourced from the spares box and/or scratch-built.
The radios were probably fitted on the starboard side of the compartment behind the cockpit, and I'll be working from memory of the build of a similar model 25+ years ago, when I had a diagram of the layout, and also using the photos of the American layout as a guide. As for the 'Gee' equipment, that has to be a 'best guess' and, without photo evidence to prove otherwise, I guess no one can say I'm wrong !
I might have some pics to show later.
- Thread starter
- #153
Airframes
Benevolens Magister
The frames and stringers are compete, the rear and forward entrance hatch wells have been 'boxed -in' and the floor added to the forward hatch compartment, and a basic representation of the bicycle saddle seat and kneeling cushion, along with the floor, added to the tail gun position. All of these areas have yet to have final sanding and clean-up where needed, particularly the very small gunner's seat, which will be easier to sand now that it's fixed in place.
As mentioned earlier, the single .50 cal gun was not fitted to the tail gunner's position in the RAF Mitchel IIa/ series ii, which explains why it is not visible in photographs, and I've decided not to fit a gun to the model, although the gun mount will be fabricated and fitted, along with a partial 'canvas' shroud. This will save a lot of tricky work making the ammo feeds, gun sight and sight mount etc, and will, of course, save a lot of time.
With the time-consuming internal structural work complete, detail can now be added in the form of various cable and electrical fittings, radios, ammo boxes and feeds etc, and the waist gun windows and gun mounts can be added at this stage too, together with some basic cockpit detail. When that's all done, and the interior painted, the fuselage can be buttoned-up,before starting on the construction proper.
I'm hoping to get a lot of this done tomorrow, and over the weekend, and I'll post more progress pics as the work is completed.
Crimea_River
Marshal
Beauty work Terry. Hope we can see it all when she's shut.
Donivanp
Lieutenant Colonel
Agreed!
- Thread starter
- #157
Airframes
Benevolens Magister
Thanks chaps.
Some of the internal detail will not be that noticeable once the fuselage is closed, particularly as the cockpit canopy is quite thick, and distorts the view (I had hoped to use the spare canopy from the B-25J kit, which is thin and very clear, but the fit is far from perfect.), but had the interior been left totally bare, then that would be very noticeable.
It's more a case of adding minimal detail in areas where it can just about be seen, creating the illusion of a fully fitted-out interior, where, for example, the throttle levers will be seen, or the radios might be seen as 'something is there', rather than an obvious empty space with bare plastic walls.
On the other hand, the waist windows, spare items from the 'J' kit, are very clear, and the waist area can be seen through these, making it necessary to add the internal structure, and those items of equipment which will be seen easily, such as the guns, ammo boxes and the dorsal turret pedestal. Likewise the nose compartment, which lacks any detail with the exception of a seat, needs to be detailed, as this can easily be viewed, even if somewhat distorted.
I will, however, be restricting the detail to those items which are absolutely necessary, and I won't be 'going overboard' on fine detail items such as switches, brackets etc etc.
I might have some more pics to show later tonight, if my hands and wrists hold out !
- Thread starter
- #159
Airframes
Benevolens Magister
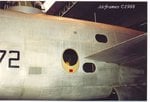
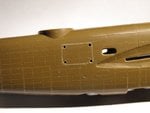
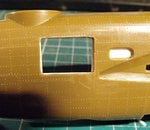
Yes, the C and earlier D models had the oval and circular windows, the latter shown as moulded panels without the circular window, on the kit parts, with only the upper oval windows being 'open' on the kit.
The late D (RAF Mitchell Mk.IIa/series ii) with the waist windows did not have these, and the kit oval windows have been filled, with the others having the moulded detail removed.
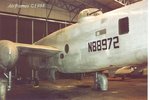
The pics below are of the B-25C Mitchell II which arrived in the UK in November 1997, and was at that time in bare metal - later painted in OD/NG with RAF markings, as 'Grumpy' of 98 Sqn.( It returned to the USA in August 2009, and Karl and I saw it do it's last UK flight the day before it departed.)
These clearly show to advantage the oval and round windows. the latter set in a vertical, oval, knock-out panel. The other pics show the kit mouldings, and the upper oval window, backed with plastic, awaiting 'Milliput' filler.
Attachments
Users who are viewing this thread
Total: 1 (members: 0, guests: 1)


