1/72 P40B Curtiss Tomahawk [academy]

Ad: This forum contains affiliate links to products on Amazon and eBay. More information in Terms and rules

Maglar

Tech Sergeant
1,570
8
Jan 29, 2009
Florida
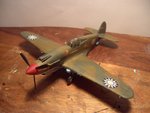
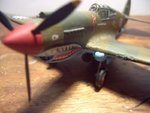
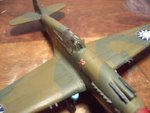
Finished it today, it was a great build! I got it for $5 and it had minimal issues until the decals. I hand painted the brown camo and the underside. There is some long debate over whether the bottom is light gray or sky, I picked sky blue and I am sticking with it. After everything was in place I attempted a thin wash of "buff" to simulate sun weathering since these birds saw lots of sunlight, it isnt very noticeable and that was the goal. I also attempted my first exhaust streak using a q-tip since this is 1/72, it looks ok... :lol:

Let me know what you think!
 

Attachments

  • PICT0891.JPG
    PICT0891.JPG
    68.8 KB · Views: 206
  • PICT0892.JPG
    PICT0892.JPG
    66 KB · Views: 200
  • PICT0893.JPG
    PICT0893.JPG
    72.8 KB · Views: 210
  • PICT0894.JPG
    PICT0894.JPG
    73.7 KB · Views: 222
  • PICT0895.JPG
    PICT0895.JPG
    66.1 KB · Views: 216
  • PICT0896.JPG
    PICT0896.JPG
    63.9 KB · Views: 206
  • PICT0897.JPG
    PICT0897.JPG
    65.2 KB · Views: 321
Looks good Maglar. That is a fun kit and a wonderful piece of history. Gotta love it.

Couple of suggestions that have been mentioned to others who have used this kit. The wing dihedral is all wrong (not your fault, its molded wrong). If you are as so bold as to take some stock off of the fuselage join lines it will allow the dihedral to be larger likes it's supposed to.

And FYI, your bomb rack is too far aft.

But all in all a good build, buddy. The one thing about 1.72nd is the ability to keep doing them over and over without breaking the bank. I can't tell you how many Warhawk/Tomahawks I have made over the years. One of my favorites.

Bravo!
 
Looks good Maglar, and Matt's suggestions are good ones. Exhaust staining is effective too.

Don't you just hate it when the decals are out-of-register? They're virtually the last step in the build, they look fine on the sheet, and then you apply them and the white edge leaps out at you. If you're really careful you can paint that white edge out using the camo colours and a fine brush.
 
Thanks all, I know Migrant, I was quite mad when I saw the white edging, but even trying to patch it would cause color variation because the buff wash and all those factors. Thats why I turned the decals with the white edge facing the bottom so the top would look better, I still like it but hopefully my next academy model wont have this!

Did anyone notice my milliput replacement gun? :D
 
Taking that the kit is of Academy into consideration and that none of mistakes weren't corrected the model looks really great.Well done Mag..:D :D :D
 
I agree with Wojtek, nice work Mag. The Milliput gun looks good mate. For future reference, there's an easier way to make/repair small items such as guns, using platic rod or tube, or stretched sprue. In this small scale, the latter would suffice. If you don't know how to do sprue stretching, give me a shout, and I'll throw together a quick 'tutorial'.
 
In addition to Terry's post I suggest using the injection needles for MGs and cannons barrles.This makes they look like real ones.
 

Users who are viewing this thread

Back