B-26 Marauder Tail Gunner Question

Ad: This forum contains affiliate links to products on Amazon and eBay. More information in Terms and rules

Mr. Ed

Airman 1st Class
153
0
Oct 27, 2009
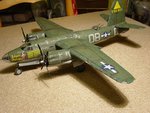
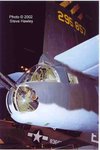
I've been building the Hasegawa B-26 Marauder in 1/72 scale. I'm the type of guy that likes aircraft to have their landing gear retracted, and pilot figures in place. It's obvious how the pilot fits in the plane, but I wonder about the tail gunner. Where exactly did he sit - behind a bulkhead wall with his head directly below the tail fin? Was he on his knees or did he actually sit in a seat? His head was not seen through the canopy that's directly above the machine guns?

I would appreciate any input on this.
 
There was a 'tractor' seat in the tail gunners positon. Immediately in front of the gunner, at the rear of the compartment, there was an armour plate, with the gunsight mount, linked to the guns in the swivel mounting below. If you have a look at the web-sites for the National Museum of the Air Force, (used to be USAF Museum),there should be some pics.
I found quite a few internall and externall detail pics by Googling 'Pictures of B26 Marauder interior' when building a 1/48th scale model some months ago. To be honest, in 1/72nd scale, not very much will be visible. I built the compartment in 1/48th scale, and only about 5% can be seen! I think the gunner figure, positioned in the compartment, would probably suffice in this smaller scale.
 
Thanks a lot, that was very helpful. What threw me is that I would assume the gunner sat inside the canopy over the rear guns, but in fact that only seems to be there for added visibility and was not where anyone actually sat. I'm with you 100% about the futility of worrying too much about aircraft interiors. However the heads of the figures are usually pretty visible. Now to figure out how to cram the bombadier into the nose...
 
Yep, the gunner's seat was a couple of feet back, towards the front of the aircraft. The small side windows of the gunner's compartment are about where his head would be, next to the small door. The Bombardier sat on a 'bench' type seat, sort of straddliong it, like a saddle, and was huddled over the Norden sight, and just about filled the space. Pictures of the bombardier in position show that hardly any of the interior behind him can be seen, especially with the .50 cal in place.
 
I've been staring at those pictures a lot lately, Airframes. What strikes me are the various things that ARE very visible from the outside that are in the nose cone itself (and outside, such as the window wiper on the bomb aiming part of the glass). I'm not even going to attempt to make any of it, expect perhaps the ammo belt for the .50 caliber. Perhaps I'll try it when I get around to building the Monogram 1/48th scale kit. The Hasegawa 1/72 kit has a little box of some sort that's supposed to be glued directly onto the clear plasic nose cone from the inside.

Do you have any idea what this could be?

I'm thinking about not using it as it will pretty much guarantee an ugly glue stain fully visible from the outside. And I'm talking as an owner of 3 different types of "clear" cement: Jewler's cement, Testors cement for clear plastic and good old elmer's white glue. Even though they dry clear I think all of these would still look like a blob of glue.
 
The box is a .50 cal ammo box and, like you, I doubted if it would be possible to mount it onto the clear nose without leaving marks. The real thing was on a bracket attached to the tubular frame inside the nose cone. However, when building the Revell (ex-Monogram) 1/48th scale kit, I did quite a bit or research, and found that this box had previously been floor mounted, on the starboard side. It appears that the nose mounting was on late aircraft. I went to a lot of trouble to detail the nose compartment, including the 'flexi-feed' chute for the ammo belt, only to find that most of the detail can't be seen properly, due to slight distortion through the clear nose cone! But, the area does need some detail, as if it isn't theer, it's noticeable by its abscence!
If the Norden sight is fitted in the 'in use' position, a lot of the view into the nose is obscured and, with the 1/48th scale kit, if the sight is to be mounted in the stowed position, swung back against the port wall, it, and the mounting area, need some trimming and modificarion to allow it to fit.
 
This is exactly what I need to hear, considering that the 1/72 kit is really a rehersal for tackling the 1/48 Revell/Monogram again (I built it as a kid and actually still have it) I understand the kit was reissued in the 90's with a photoetch set. Does this include the windshield wiper on the nose cone? Did you happen to post anything about your experience building this kit? I've heard that only certain Maurauders carried the norden bomb site while the others simply aimed after the lead ship. Is this true? Did you weather your model extensively? Most seem to have been heavily worn.

Now you see how things work with me - if you answer a question I'll only have more for you. Be careful - this conversation could never end!
 
My model was built from the currently available Revell kit, which does not have any photo etch parts. I think these were in a release possibly under the 'Pro Modeller' label.
You're correct, depending on the unit, and the mission, many B26's did not have the Norden sight fitted, as some B17 and B24 units also flew. On certain missions/targets, a 'box', or perhaps the whole formation, would drop when seeing the bombs go from the 'togglier', or lead ship. However, as my model is of a 9th Air Force, UK based aircraft, I included the sight, as the 9th was mainly involved in tactical operations.
Those B26's based in the UK almost always exhibited extensive weathering, paint fade and paint stripping. I think this was possibly due not only to the harsh climate, but also because of the paints used, on a very smooth skin. The kit included decals for an aircraft I had some information on, and photos, so I painted and weathered it accordingly, depicting it part way through it's time with the Bomb Group - it looked even worse at the end of its tour!
Here's a quick general view of the, as yet, unfinished model, which will eventually form the centrepiece of a diorama. I'm afraid I didn't photograph or record the build as such, but if there are any areas you might have questions on, just ask, and I'll see if I can remember if there were problems or whatever.
Terry.
 

Attachments

  • models 10 -08 004.jpg
    models 10 -08 004.jpg
    115.5 KB · Views: 376
Questions, you ask? Here are a preliminary few:

1) Weathering. What are your techniques? In particular, the chipped paint on B-26s is usually extensive - something you've reproduced well. How did you do this? What about the faded paint and other effects?

2) How did you restore the raised panel lines on this kit after you'd filled and sanded the joints?

3) It looks like you drilled out the little windows above the tail gunner's station and filled them in with a clear medium. Am I correct? My kit doesn't even have an outline of those windows.

4) You mentioned that you made an ammo belt for the .50 in the nose. How did you do this?

5) What's your idea for the diorama? What are your plans for figures, if any?

6) What isn't finished on this model?

7) Is there any limit to the number of questions I can ask? If not, I could go on all day...
 
I use various techniques for weathering, depending on the requirements of the finished results. In this case, the model was airbrushed in the basic colours, using home-mixed Humbrol enamels. The various shades of 'faded' or 'dirty' OD were then brush painted, using thinned enamels. (I find acrylics lack the versatility for this.)
The paint chipping, and the stripped areas, were again brush painted, using a mix of silver and matt white enamel, in varying densities.
I seem to recall there was a vey small indentation for the circular window at the rear, possibly even a 'hole', but no transparent part. I cleaned up this area, and used Microscale 'Kristal Klear' to fill in and make the 'window'.
The ammo belt, or more correctly, the 'flexi-feed' chute in which the belt is carried, was made from a strip of folded lead foil, taken from the neck of a wine bottle. This was scored to represent the joints of the feed chute and the ammunition rounds, then the edges painted in dull (silver) metal for about a quarter of the width, either side, the rounds in brass, and a thin black line down the centre to represent the links. The same was done for the waist guns, one of which is fitted in the stowed position, the other will be shown being loaded into the aircraft by a ground crew member in the diorama.
The model had to have some of the unit code letters hand painted, as some of the decals, which were very thin, folded back on themselves when being applied, and wouldn't straighten out.
The diorama will show the aircraft at dispersal on it's Essex, UK field, modelled as close as possible to the actual location, and will have the ground crew finishing off the final servicing, and ready to load the bombs. The figures will be from the spares box, some of which are from the kit anyway, and from Tamiya Panzer Servicing Crew figures, all converted and painted as required. The Bomb trolley will either be from the Monogram 1/48th B17G kit, or a scratch-built item of a different design and the tractor, if used, will be converted from the Italeri NATO Ground Handling set.
The unfinished areas of the model include some re-touching and fine detail painting, but mainly involve the addition of delicate parts, such as the pitot tubes, antennas and antenna wires etc. I always leave these until about to place the model on its base, to avoid breakages!
Note, if you're considering a diorama, or even just a B26 on the ground, the props were always placed in a symetrical 'X' position, even if it meant 'pulling them through', in order to prevent damage should a main gear tyre deflate - a not uncommon occurence. If this occured, being big and long, if the prop blades were vertical, they would contact the ground, not only damaging the prop, but shock - loading the engine or prop shaft. Just a snippet I found during extensive research for the model !
EDIT; I forgot to add, I didn't re-scribe the model. I'm old enough to see engraved panel lines as a luxury, so can live with the 'traditional', raised variety! However, those few panel lines on the kit parts weren't too bad anyway, and some of the actual aitcraft's panels were lapped, so there was an almost visible joint. I did shave the lines slightly though, in those areas I thouight might benefit and, under the paint and clear coats, the result is more than acceptable.
 
Last edited:
What's your preferred method for attaching the antenna wires? What material do you use to depict them?

Are there a few of your favorite references that you might be able to point me towards? Are any online?

Have you tried to depict chipped paint by underpainting in silver and then removing the overcoat with tape? I usually find that the overcoat adhers too well for this to work for me. And when scraping or sanding away paint to reveal the silver underneath I can't seem to prevent scraping or sanding away the silver as well.
 
Again I use a number of methods for making and attaching antenna wires, depending on the scale (usually 1/48th or 1/32nd), and the set-up and accessability of the antenna mast or mounts. Normally I use stretched sprue, but often 'invisible' thread. In most cases this attached at one end with a tiny drop of CA glue, then taughtened and attached at the other end in a similar fashion.
The bulk of my references are from my own library and photograph collection, plus some books downloaded from the 'net. The rest is either from experience of a type, and/or searches as required on the net.
I can't be bothered messing about with peeling off paint for chipping etc, although I have used this method on a few occassions. I tend to do it the way I have for (well) over 40 years, as previously described, by painting-in the individual chips etc. As I'm also an aviation artist, I find the sequence and method straight forward, and as there's never really a 'quick' way of doing some things effectively, and absolutely no need to rush, it's not a problem.
As a modeller for the enjoyment, as well as the finished product, I tend to do things by 'traditional' methods, which is probably why I will scratch-build before even considering after-market parts - I see it as a craft and an art, not a way of assembling someone else's bits and pieces - though I have nothing against such aids of course.
 
So you're an aviation artist. Interesting. One more question and I'll leave you alone: How did you paint the dorsal turret interior?

Actually, I lied. One more: Since you mentioned not using aftermarket parts, is there anything in particular that you do to improve the kit's .50 guns?
 
As far as I remember, having built this model over a year ago (and still not finished it!), I assembled the turret as per the instructions, added some scratch-built detail in the way of gun charging cables etc, then brush-painted it in the Interior Green, with detail areas picked out in the appropriate colours. As it was not possible in this kit to add the turret after the fuselage was assembled, the turret and its transparent dome were fitted as directed, and masked using baking foil and Tamiya masking tape. The turret was rotated as required during spraying, in order to reach those areas covered by the masked guns etc.
Generally, if it's Browning .50 cal guns on a bomber, I'll use the kit provided items, improved as required. On some occassions, where the kit parts have been poor, I've used better examples of wing-mounted Brownings from the spares box, adding those parts required from scratch. For example, I used some from the Academy F86 Sabre.
The additions or improvements will depend on the type of mount, and the aircraft concerned, determined through the previous research. For example, on the B17 later F, and the G, the waist guns and the cheeck guns had a 'shock absorbing' frame around the reciever, connecting to one of three types of gun mounting. This will be scratch-built from stretched sprue and thin plastic card. The hand grips will also be made from slightly thicker stretched sprue, and gunsights added according to type. Ammunition was belt fed, through the 'Flexi-feed' metal chutes, and these are added to the appropriate side feed slot, made as described earlier.
Normally, where guns are in hatches, these will not be fitted until after paintingv the model, which means that any connections to the gun ( ammo belts, restraint strops, empty case bags etc) have to be planned and fitted accordingy. Where a gun is in an enclosed position, for example the glazed waist windows on later B17's, if it is not possible to add the gun and glazing later, which is normally the case, then the gun will be mounted as required, minus its barrel. The barrel(s) will be fitted after painting and finishing, locating into a small hole pre-drilled into the window or mount.
 
Call me crazy, but I'd rather install the guns and hope that I somehow don't break them off. That way I'm at least giving myself a chance that I won't have to glue the barrels back in place at the end. I guess it's a matter of what we can't be bothered to do and the lengths we are willing to go.
 
Thanks. Looks like the interior color is bare aluminum on this one, at least in the tail gunner's position.
 
Here's another, showing the painted interior. The armoured bulkhead, in front of the gunner, is just behind where you can see the ammo feed. The gunsight mounting and linkage is the part seen projecting behind this. Even in 1/48th scale, most of this is not visible very much. The previous pic is of the French aircraft at Paris. Pics of the nose show that it is also painted internally, including the rear fuselage, although i agree, the flash photography makes it look like bare metal.
 

Attachments

  • 05_B-26_Tail_Gun.jpg
    05_B-26_Tail_Gun.jpg
    17.5 KB · Views: 1,313
If it isn't visible in 1/48 scale, just imagine 1/72! As I recall, Humbrol has a shade called World War I RAF green that would be perfect for this interior color. I don't understand why more modelers don't build cut-aways of their aircraft to show off all the interior detail they labor to make. I'm planning on doing a distinctly mediocre job on the interior of this model since it won't be seen. But the figures - especially their heads - will be. That's another story.

As an FYI - the Eduard pre-cut mask set for the Hasagawa Marauder does NOT include a mask for the armored glass window in the tail gunner's bulkhead wall (which is made out of clear plastic). I had to cut one out MYSELF last night, with MY OWN hands and a x-acto knife! After paying all that money (around $5.00)! Poor me!!
 

Users who are viewing this thread

Back