Bitten by a Mosquito... (Tamiya 1/48)

Ad: This forum contains affiliate links to products on Amazon and eBay. More information in Terms and rules

Thanks A4! Last of today's update. A spritz of gloss and a few decals - did a bit of tamping and Solvaset, more tomorrow.
 

Attachments

  • 002.JPG
    002.JPG
    104.4 KB · Views: 115
Looks great John. Colours look right but you might be seeing some "scale effect" wherein the darker colours tend to look even darker on small subjects. Many modelers try to counteract this by toning down the darker colours with a few drops of white. The smaller the scale, the more toning down is needed. I've also seen this overdone though with the colours appearing completely washed out.

I like what you did though - looks good to me. A coat of flat finish, if you plan on that, will also lessen the "pop" of the dark green.
 
Ok thanks CR! Flat finish it is then. I had heard the term "scale effect" before but wasn't quite sure of its meaning.
 
Looking good. I agree with Andy, and the only thing I'd add is that the upper surface grey (Ocean Grey) is a tad light, but that might be the lighting in the pics. However, all colours darken down when the clear gloss and clear matt coats go on, so this has to be taken into account when painting.
 
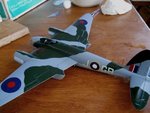
...the only thing I'd add is that the upper surface grey (Ocean Grey) is a tad light...

Yeah I was afraid of that, but it is a bit darker than it appears in the pics. Live and learn. I did record the recipe I used for these mixes so next time I'll be able to tweak it accordingly.
 
Thats a cracking model mate. Looks really good.
 
Thanks guys! Still working on decals. The folks at Tamiya didn't pull any punches when it came to the decals in this kit - it's got every single itsy-bitsy teeny-weeny marking. Trying to get everything settled around details with Solvaset and a bit of cutting...

005ci.jpg


The one area this kit doesn't quite live up to its own high quality is in the wheels. The rear wheel/strut for instance is molded like this...

006ch.jpg


Even after it's painted it will still look like the strut and wheel is one piece. I wasn't going to add any aftermarket to this build but CMK has a resin replacement which consists of a seperate strut and wheel and I ordered that. I also got the True Details weighted wheels for the front and an express mask. So much for OOB.
 
Last edited:
Looking good John. Are you going to paint the canopy framing?

Thanks AF, yes I'll paint the framing - just waiting for the mask. I just dry-fitted some pieces on to take a pic.
 
Looking good John. I find Tamiya funny that way where they can replicate fantastic details and at the same time cheap out on some of the other stuff like solid tail wheels and those horid decal seatbelts.
 
Looking good John. I find Tamiya funny that way where they can replicate fantastic details and at the same time cheap out on some of the other stuff like solid tail wheels and those horid decal seatbelts.

Quite right CR. And I would add that the decals overall are too thick, although they are beautifully printed. I know Tamiya has recently addressed the thickness issue but I probably got one of the original boxings of this kit from the 90's.
 
A bit of an update today. This project has really slowed down for the time being, not only because of the nature of the work but because of my time constraints. I've been applying all the little tiny decals and I'm almost done. I've found that Solvaset really takes a few days and several applications to work to its full potential. It eventually subdues the blank film so that it can't be seen but you can see it in my pics because I've just applyed these decals today. I know the flat coat will also blend that in later.

I tried a wash of Payne's Gray and acrylic thinner to highlight the gaps between the stabs and control surfaces, and also to highlight the rivets on the control surfaces, and it seems to have come out fairly well...

002voh.jpg


Here's a view of the tail. As you can see I have a bunch of microscopic paint touch-ups to do. All this tedious fiddley work is what's taking so long now, but I'm under no deadline so no big deal...

005eq.jpg


One question though: after I've got all the decals on and the lines/rivets washed what should I use to clean up the model before the flat coat? It's been handled a lot and no doubt is covered with oils and dust. What can I use to get rid of that without disturbing the wash and decals?

My intention is to give it a flat coat, apply some pastel weathering, then seal it with another flat coat. Does that sound like a good idea?
 
Last edited:
One question though: after I've got all the decals on and the lines/rivets washed what should I use to clean up the model before the flat coat? It's been handled a lot and no doubt is covered with oils and dust. What can I use to get rid of that without disturbing the wash and decals?

My intention is to give it a flat coat, apply some pastel weathering, then seal it with another flat coat. Does that sound like a good idea?

probably a damp cloth and just carefully run it over the surfaces...you shouldn't cause any grief...if everything is dry and set!

My process is to paint, apply the pastels, gloss coat, apply decals, gloss coat again, flat coat, add a bit more weathering if necessary, flat coat once or twice more depending on sheen required...possible additional weathering and done!
I'm usually careful with handling and storage to minimise for any problems of cleaning etc....

You should also consider some decal setting solution to get in under those stencil decals ro help reduce or get rid of the silvering effect....
 
Last edited:
Thanks Wayne! I'm using Solvaset, which is about as strong as it gets, but it takes a few applications over a few days. The decals that have been set for a week have lost all the silvering.
 
You might find Microscale's 'Micro Sol' and Micro Set' work better. The titles are self-explanatory, but I normally find that even just the 'Sol' works for both applications.
 
Be careful with the Solvaset it pretty strong stuff, wish I could still get it here in Oz...once you apply a bit use a tissue to soak up a bit of the excess , it can affect your surrounding gloss coat and paint if you apply too much and let it sit too long.
 

Users who are viewing this thread

Back