Bitten by a Mosquito... (Tamiya 1/48)

Ad: This forum contains affiliate links to products on Amazon and eBay. More information in Terms and rules

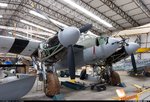
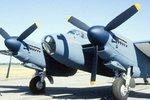
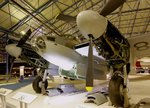
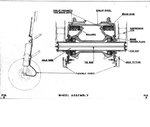
John, I found these surfing around the web a bit. I'm afraid I don't having anything in my library other than some profiles that show no more than these pics do.
 

Attachments

  • 3-1-3_e000762779.jpg
    3-1-3_e000762779.jpg
    98.5 KB · Views: 126
  • 1036380.jpg
    1036380.jpg
    222.7 KB · Views: 125
  • De_Havilland_DH_98_Mosquito_USAF.jpg
    De_Havilland_DH_98_Mosquito_USAF.jpg
    97.4 KB · Views: 138
  • HendonMosquito11oClock.jpg
    HendonMosquito11oClock.jpg
    104.5 KB · Views: 121
Thanks for the encouragement gentlemen. I really enjoy the fact that people actually TALK on this forum. Why would you join a forum and not talk? And yet I belong to a few wherein you can post a thread, get 1000 views and three responses.

Anyway, here is today's progress. I decided to mate the fuselage halves before I attached the nose to make the seam-sanding easier. As you can see I've started some coarse sanding along the spine. I'll need to do a little scribing but nothing too complicated. The bomb bay doors need to be split in this kit if you want them open. I also mated the horizontals and wing tips (starting to look like an airplane...) The canopy is nice and thin - true to scale and I've started gluing the pieces together with Testors Window Maker. Also started painting the props...

67962993.jpg
 
Nice job there John shes looking real good!I have several in 1/72 built but have not tackled my 1/48's maybe on the next group build if it applies.Cheers Kevin
 
Nice job there John shes looking real good!I have several in 1/72 built but have not tackled my 1/48's maybe on the next group build if it applies.Cheers Kevin

72nd is my preferred scale as well but this kit was hyped up by some reviewers as the best Mosquito kit in any scale so I had to give it a go. I'm no Mosquito expert but so far I have no disagreement.

CR: All joking aside those pics are exactly what I needed, particularly this one...

95303017.jpg


In this scale it looks like a bit of 1mm styrene rod should do the trick. Thanks for taking the time to post those!
 
Last edited:
I liked this model as well but when you paint it be careful of the lights under the wings. They can push in fairly easily if you don't have them cemented well enough. Then you will have to make a new light using the clear sprue. :)
 
..... Thanks for taking the time to post those!

No problems mate, glad to help. But I must admit this was a simple google serach you could easily do yourself. This one was "D H Mosquito landing gear" then click on "Images" rather than the various links.

For all those touting the Tamiya kit, I must say I'm VERY impressed with the Revell one which I've only just did a bit of work on now and then between GBs. And it has decals for the bombs!
 
More planning and dry-fitting than actual modeling today but I don't want to make any more mistakes on this pricey kit. Got the fuselage halves sanded and polished - only had to scribe some of the details directly behind the cockpit. Canopy looks like it should be a great fit. Nose pieces installed covering up all that wonderful detail, alas. But that's the way it is with WWII bombers...

001duf.jpg


I have to say though that I think Tamiya got the amount of inside detail just right. You'll be able to see lots of things going on through the canopies...

002db.jpg


Here's the underside. Somehow I misread the instructions and installed the wheels incorrectly so I had to cut them off. The plan is to add new axles with styrene rod and reattach them with the proper orientation. The landing gear assembly is the trickiest I've ever encountered and the instructions aren't much help - just an exploded view.

003gn.jpg
 
Last edited:
Beautiful work mate! D*mn....I need to finish my BOAC Mosquito! :oops:

Thank you sir! This one sat in my stash for a while before I picked it up but I'm certainly glad that I did.

Fighting the urge to just keep building merrily along I spent some time planning out the rest of the project and here's how I see it. (My apologies if this bores anyone.)

1. Sand out the seams in the nose once the glue has set.
2. Fill the seams between the bomb bay bulkheads and fuselage.
3. Weather the bomb bay and gear wells with a wash.
4. Attach the wing tips and attend to any sanding.
5. Attach the horizontal stabilizers and fill/sand the gaps. (I'm thinking that would be easier before the wings get attached.)
6. Attach the wings, fill and sand the underside gaps.
7. Install all of the clear pieces except the main canopy and nose. (The main canopy is very thin and consists of three pieces – the idea of pulling tape off of it worries me. And the nose canopy is sharply curved – I've never had much luck masking those things. I think both of those canopies need to be detailed separately and then installed.)
8. Overall masking and then off to the paint booth.

I generally wait to install the gear and doors until after the overall scheme painting – it avoids a lot of fussy masking. I'm going to sit on this for a day and see if I've forgotten anything.

Edited to add: I think I'll go with the kit decals in this case as I'm looking to join the Commonwealth/Night Fighter group build and I need to set aside a spot of cash for those kits. I like the green/gray scheme of 105 squadron DZ367/J-GB. Here it is by another modeler...

aa34601tri.jpg


Also, Tamiya was nice enough to include a three-view with the camo scheme in 1/48 so that makes painting easier.
 
Last edited:
Ah, cool CR! Thank you again! I was wondering whether that line ran straight up the main gear or took a detour along one of the rear struts.
 

Users who are viewing this thread

Back