simply amazing craftmanship, i'm in awe wojtec
Navigation
Install the app
How to install the app on iOS
Follow along with the video below to see how to install our site as a web app on your home screen.
Note: This feature may not be available in some browsers.
More options
You are using an out of date browser. It may not display this or other websites correctly.
You should upgrade or use an alternative browser.
You should upgrade or use an alternative browser.
Fw190A6 Sturmjager of Sturmstaffel1
- Thread starter Wurger
- Start date
Ad: This forum contains affiliate links to products on Amazon and eBay. More information in Terms and rules
More options
Who Replied?Damn fine work Wojtek!..Well done mate!
Maximowitz
Tech Sergeant
In his next thread he'll be showing you how to turn a 1/72 scale Sopwith Camel into a 1/32 Mig 29 using only twigs and moss.
Fantastic build my friend!
Fantastic build my friend!
ccheese
Member In Perpetuity
I'm waiting for the next installment. Come on sun... shine in Pila ! Or did
you guys know he only works by sunlight ??
Charles
you guys know he only works by sunlight ??
Charles
Airframes
Benevolens Magister
With those mystic skills, I thought perhaps Wojtek only came out at night, shunning the sunlight.......
lesofprimus
Brigadier General
Amazing work Wojtek.....
Im very interested in how ur going to sand all this down to a smooth surface and then rescribe the lines.....
Im very interested in how ur going to sand all this down to a smooth surface and then rescribe the lines.....
A4K
Brigadier General
Beautiful work again my friend! No offence, but I'm going to steal your technique!
- Thread starter
- #208
Thank you all guys for these nice words.Some jokes here made me very sunny.So I can continue my working even though the Sun is not shinning.
Evan , no problem Mate.I have started the thread and uploaded pics for this purpose as well.
Evan , no problem Mate.I have started the thread and uploaded pics for this purpose as well.
marek
Senior Airman
Wow!!! and no more then wow!!! You are the surgeon. More Wojtus please Soon!
Soon! - Thread starter
- #210
Hi to all,
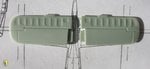
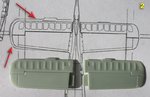
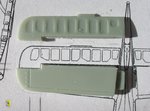
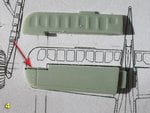
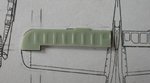
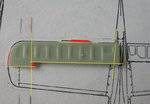
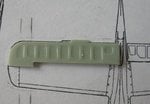
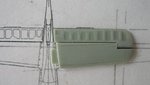
Today I started corrections to the horizintal stabilizers and elevators.A few pics of the progress below.The main mistakes that have to be corrected : both parts are oversized, too thick in head-on view, incorrect partition into the stabilizer and elevator ( the stabilizers are slightly too narrow,the elevators are too wide), the laeding edges of stabilizers aren't of a proper angle.
1. Comparing to drawings.
2. I have marked with a pencil the kit part ( red arrows in the pic) to show how these are oversized.
3. The first step was to cut off the elevator in order to get horizontal stabilizer separated.
4. The black line is indicating where some of plastic has to be removed to achieve the correct partition.
5. Done.
Attachments

Airframes
Benevolens Magister
Fantastic attention to detail again Wojtek, marvellous!
- Thread starter
- #212
Airframes
Benevolens Magister
Great stuff my friend! Could you tell me which programme you use to insert the coloured markings, arrows etc? It's so long since I did it, I've forgotten which software system I used on my PC!!
ccheese
Member In Perpetuity
Looking good, Wojtek ! I hope the sun continues to shine in Pila, so you can
get some more done. When do you sand and rescribe the fuselage ?
Charles
get some more done. When do you sand and rescribe the fuselage ?
Charles
109ROAMING
2nd Lieutenant
 Excellent work my friend!
 marek
Senior Airman


great work master Wojtec
Great work Wojtek! 8)
8)A4K
Brigadier General
With everyone else - great work again my friend!
I'm interested to see how you'll overcome the stabilizer form problem - (cut off the tip, cut the main stabilizer in half, reposition the leading edge, fill in the gap and sand?)
I'm interested to see how you'll overcome the stabilizer form problem - (cut off the tip, cut the main stabilizer in half, reposition the leading edge, fill in the gap and sand?)
- Thread starter
- #220
Hi guys,
Thanks for kind words here. Really appreciated !!!
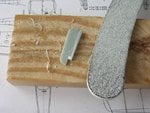
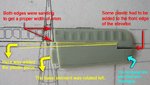
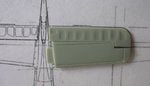
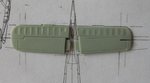
As Evan asked a few questions I must to tell you that there are two ways of correcting such elements.The first one is that I decided to use here.The stabilizer was slightly rotated left to get the proper angle of the leading edge.Having the part set apart I added some plastic to the trailing edge of the tail-plane to get the one going horizontally. I used for that a piece of the kit mould frame.It was glued with the Superglue to get stronger joint.What is more I didn't have to use a putty.Then I was sanding the part in order to get the correct shape.Then I checked the almost ready part with drawings if all was OK.In the last pic you can see the finished one ( on right ) comparing to the one ( on left ) without corrections.
In addition, the elevator had to be fitted by sanding of both the laeding and trailing edges in order to achieve its correct width.A small piece of plastic ( black colour in a pic) had to be added to front part of it.
BTW I use Photoshop for adding of graphic effects.
Thanks for kind words here.
Really appreciated !!!As Evan asked a few questions I must to tell you that there are two ways of correcting such elements.The first one is that I decided to use here.The stabilizer was slightly rotated left to get the proper angle of the leading edge.Having the part set apart I added some plastic to the trailing edge of the tail-plane to get the one going horizontally. I used for that a piece of the kit mould frame.It was glued with the Superglue to get stronger joint.What is more I didn't have to use a putty.Then I was sanding the part in order to get the correct shape.Then I checked the almost ready part with drawings if all was OK.In the last pic you can see the finished one ( on right ) comparing to the one ( on left ) without corrections.
In addition, the elevator had to be fitted by sanding of both the laeding and trailing edges in order to achieve its correct width.A small piece of plastic ( black colour in a pic) had to be added to front part of it.
BTW I use Photoshop for adding of graphic effects.
Attachments

Users who are viewing this thread
Total: 1 (members: 0, guests: 1)