- Thread starter
- #321
Navigation
Install the app
How to install the app on iOS
Follow along with the video below to see how to install our site as a web app on your home screen.
Note: This feature may not be available in some browsers.
More options
You are using an out of date browser. It may not display this or other websites correctly.
You should upgrade or use an alternative browser.
You should upgrade or use an alternative browser.
Fw190A6 Sturmjager of Sturmstaffel1
- Thread starter Wurger
- Start date
Ad: This forum contains affiliate links to products on Amazon and eBay. More information in Terms and rules
More options
Who Replied?Airframes
Benevolens Magister
Excellent work Wojtek.
marek
Senior Airman
Wojtek the master!
Airframes
Benevolens Magister
What a bl**dy good idea M!
- Thread starter
- #326
Oh...  thanks guys.I appreciate !!!!
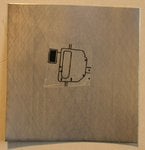
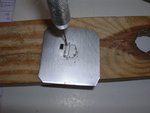
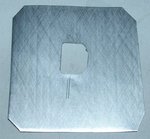
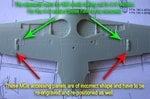
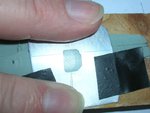
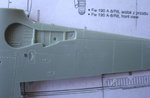
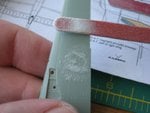
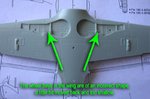
For my farther work I needed to make a pattern for the accessing panels of the outer MG151/20 cannons that were on the undersides.These on lower surfaces of the model wing are of incorrect shape totally. For that purpose I bought a can of beer and made it empty by drinking ( quite tasty was ).Then I cut open the can and made the aluminium plate flat.Second step was to use drawings that I printed on the adhesive transparent foil.The panel was cut off and sticked to the plate.Then using drills I made some holes and cut down the panel with a scalpel razor.For finishing edges and getting a proper shape I used files.
thanks guys.I appreciate !!!! For my farther work I needed to make a pattern for the accessing panels of the outer MG151/20 cannons that were on the undersides.These on lower surfaces of the model wing are of incorrect shape totally. For that purpose I bought a can of beer and made it empty by drinking ( quite tasty was
Attachments
Airframes
Benevolens Magister
Superb job! It must be difficult having to drink the contents of the modelling materials, but I suppose someone's got to do it!!
Lucky13
Forum Mascot
What we men have to suffer through, eh? Be strong Wojtek, we're all here for you in time of need!
marek
Senior Airman


- Thread starter
- #330
Not especially Terry.But I don't suggest any glue, paints etc.. drinking.
Thanks Jan and Marek.
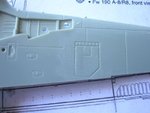
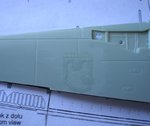
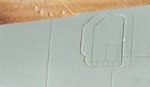
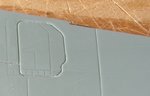
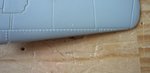
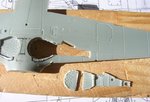
Here next pics of the work progress.The first step was to sand off these panel projections.Then I used Superglue as a putty to fill the wrong panel lines.
Thanks Jan and Marek.
Here next pics of the work progress.The first step was to sand off these panel projections.Then I used Superglue as a putty to fill the wrong panel lines.
Attachments

marek
Senior Airman
Keep working, master! We are watching!
Airframes
Benevolens Magister
Great stuff, and so accurate, Wojtek. Amazing!
Lucky13
Forum Mascot
You know Wojtek, you should retire from your present job and start for one of the modeling manufacturers OR start your own company!
marek
Senior Airman
...start your own company![/QUOTE]
We are good company for him, I think!
We are good company for him, I think!
- Thread starter
- #335
I agree with Marek, you are the best company and I don't want any other.
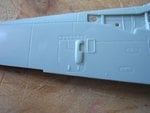
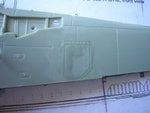
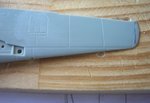
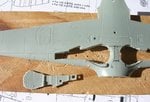
OK. Here a couple of shots that show the work on these panels to its end. The next step was sanding the Superglue with
a nail-file and then engraving.
For that I used a thin needle and the Trumpeter engraver.Two last pics let see the effect of this.
OK. Here a couple of shots that show the work on these panels to its end. The next step was sanding the Superglue with
a nail-file and then engraving.
For that I used a thin needle and the Trumpeter engraver.Two last pics let see the effect of this.
Attachments

Lucky13
Forum Mascot
Permission to swear! 
marek
Senior Airman
Yes! And with That optymistic accent...!
A4K
Brigadier General
Wojtek - bloody fantastic mate!!!! I love seeing your work!!!
- Thread starter
- #339
- Thread starter
- #340
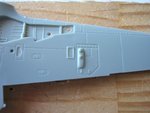
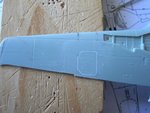
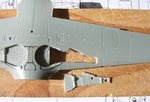
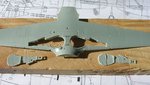
Also I started making corrections to the main landing grear bays..the first step was to remove "interiors" of the wheel bays......a couple of pics here.
To be continued.....
To be continued.....
Attachments
Users who are viewing this thread
Total: 1 (members: 0, guests: 1)