User Name: Luftace
Name: Chad
Category: Advanced
Kit: Tamiya J1N1-S Gekko (Early)
Scale: 1/48
Accessories: Scratchbuilt details

So I finally picked my next victim out of the stash. I've had this kit since it was first released. I was lucky enough to find the book to go with this at a hobby shop in Kentucky. I have also recently acquired the new AK Interactive IJN and IJA paint sets and will be using the IJN one for this build. I have two other books on the way that should answer a few things for me that I am undecided about as far as which specific aircraft I want to depict.
Lets jump on in.
My favorite part of any build is the cockpit and that is of course where I will start. Gonna do some minor detailing along the way as the kit is already very detailed and doesn't need a whole lot extra.
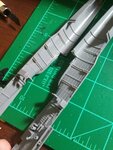
First thing to take care of is the numerous ejector pin marks that will possibly be visible on the inside. I scraped them down with a curved Xacto blade the smoothed things out with a fiberglass pen. The fuselage half on the left has been worked over while the one on the right still has to be dealt with.
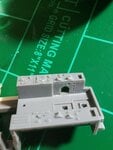
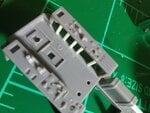
The side consoles for the pilot had flat sides with no detail. I cut away, drilled and scribed both sides to better match pictures I had at hand. The starboard side was completely removed and styrene strips were added to represent framing. Before closing the fuselage I will add plumbing and wiring that will be seen through the newly opened areas.
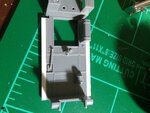
In the rear cockpit area I added 2mm wide styrene strips to either side of the floor to extend it a bit. This will hopefully help hide the open areas caused by the way Tamiya molded the wing roots. I'm not up for extending the inner fuselage sides down to the floor as this would require obliterating a lot of the fine stringer and plumbing detail molded into the sides. The compromise was to widen the floor a bit instead. I am carefully checking and rechecking fit of the fuselage, wings and other areas as I make modifications so that I don't have anything come back to bite me later (hopefully).
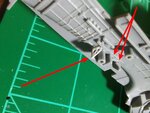
This is where the drift sight will be stowed, the kit part mounting in the two round receptacles. The arrows show where I replaced part of the kit mount with a piece styrene with lightening holes as well as two lightening holes drilled in the forward mount that will later hold an electric generator.
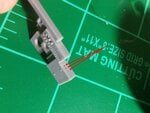
I drilled holes in an electrical junction box that will have wiring feeding into the top from a switch box mounted above.
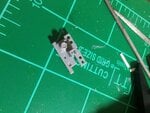
This is the shelf that sits between the pilot and observer stations. It will be the most visible part of all the cockpit components so it will get some extra attention for sure.
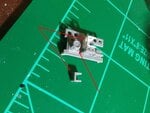
The housing for the RDF loop was removed with a razor saw and a better scale represention was made from .010 sheet styrene with lightening holes drilled. Also notice the hole drilled to the right of the compass to receive the compass wiring later.
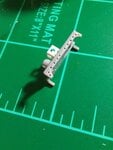
The shelf frame also had lightening holes marked out with a pencil and then drilled out.
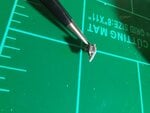
A bit hard to see but I added small triangles with a single drilled hole to flesh out the mounting frame for the airspeed indicator and altimeter that is mounted on the observer's instrument shelf. The kit already had the flat top part of this frame and I drilled two holes there as well, seen above the white triangle pieces.
That's all so far. I really want to start the painting already but I am making sure I don't get ahead of myself and planning out what to add and what to not bother with and how best to implement extra details.
Thanks for looking guys, will post more updates soon.
Name: Chad
Category: Advanced
Kit: Tamiya J1N1-S Gekko (Early)
Scale: 1/48
Accessories: Scratchbuilt details
So I finally picked my next victim out of the stash. I've had this kit since it was first released. I was lucky enough to find the book to go with this at a hobby shop in Kentucky. I have also recently acquired the new AK Interactive IJN and IJA paint sets and will be using the IJN one for this build. I have two other books on the way that should answer a few things for me that I am undecided about as far as which specific aircraft I want to depict.
Lets jump on in.
My favorite part of any build is the cockpit and that is of course where I will start. Gonna do some minor detailing along the way as the kit is already very detailed and doesn't need a whole lot extra.

First thing to take care of is the numerous ejector pin marks that will possibly be visible on the inside. I scraped them down with a curved Xacto blade the smoothed things out with a fiberglass pen. The fuselage half on the left has been worked over while the one on the right still has to be dealt with.


The side consoles for the pilot had flat sides with no detail. I cut away, drilled and scribed both sides to better match pictures I had at hand. The starboard side was completely removed and styrene strips were added to represent framing. Before closing the fuselage I will add plumbing and wiring that will be seen through the newly opened areas.

In the rear cockpit area I added 2mm wide styrene strips to either side of the floor to extend it a bit. This will hopefully help hide the open areas caused by the way Tamiya molded the wing roots. I'm not up for extending the inner fuselage sides down to the floor as this would require obliterating a lot of the fine stringer and plumbing detail molded into the sides. The compromise was to widen the floor a bit instead. I am carefully checking and rechecking fit of the fuselage, wings and other areas as I make modifications so that I don't have anything come back to bite me later (hopefully).

This is where the drift sight will be stowed, the kit part mounting in the two round receptacles. The arrows show where I replaced part of the kit mount with a piece styrene with lightening holes as well as two lightening holes drilled in the forward mount that will later hold an electric generator.

I drilled holes in an electrical junction box that will have wiring feeding into the top from a switch box mounted above.

This is the shelf that sits between the pilot and observer stations. It will be the most visible part of all the cockpit components so it will get some extra attention for sure.

The housing for the RDF loop was removed with a razor saw and a better scale represention was made from .010 sheet styrene with lightening holes drilled. Also notice the hole drilled to the right of the compass to receive the compass wiring later.

The shelf frame also had lightening holes marked out with a pencil and then drilled out.

A bit hard to see but I added small triangles with a single drilled hole to flesh out the mounting frame for the airspeed indicator and altimeter that is mounted on the observer's instrument shelf. The kit already had the flat top part of this frame and I drilled two holes there as well, seen above the white triangle pieces.
That's all so far. I really want to start the painting already but I am making sure I don't get ahead of myself and planning out what to add and what to not bother with and how best to implement extra details.
Thanks for looking guys, will post more updates soon.
Last edited:
