How to make your own pilot's seat for models. (1 Viewer)

Ad: This forum contains affiliate links to products on Amazon and eBay. More information in Terms and rules

Wurger

Siggy Master
Staff
Admin
Mod
105,472
24,409
Jun 19, 2005
Poland
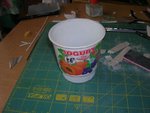
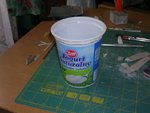
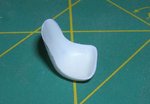
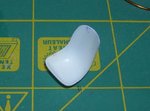
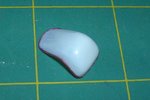
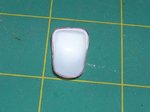
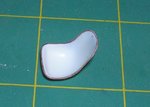
Some of you might have encountered a problem with incorrect seats for cockpis of your models. Of course there are different rasin part offered and it is no problem to find them via the net for instance. But the cost of a such sets is quite huge often. That's why I would like to show you a way you can make them yourself.

First of all , I would like to emphasize that the final effect depends on you only. The accuracy, your patience and thinking about what you do, are the main factors of that. I think the way is quite easy and all of you can malke their own seats without any troubles

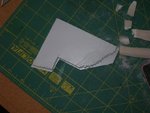
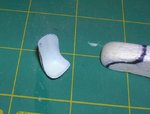
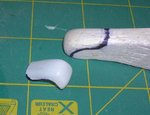
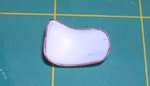
!!! The important note ....please be careful of your hands as the warmed styrene is used. I put chunky gloves used in the kitchen on my hands when making the part. !!!


OK..let's start.

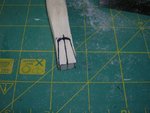
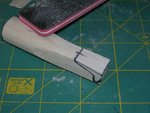
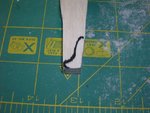
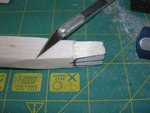
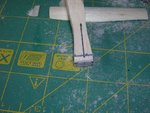
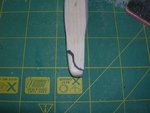
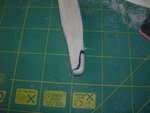
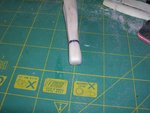
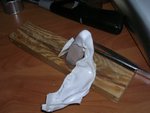
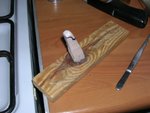
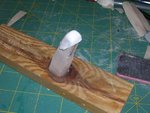
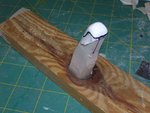
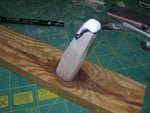
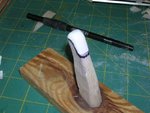
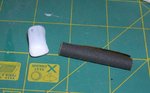
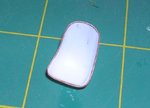
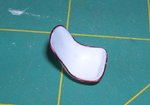
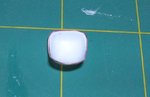
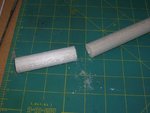
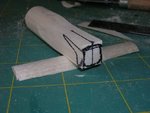
The first step is to make a wooden former. The former dimensions have to be a little bit lesser than the maximal ones of a seat we want to make. I used balsa stick for that. Because I didn't have a square slat I used a round one.Certainly I had to remove some of the wood in order to get the square cross-section. Having it done I marked the central line of the symmetry.
One more thing guys...almost all lines have been drawn by hand. But is it better to use cardboard templates that can be obtained from drawings of any cockpit that are availabe in many books for modellers.I did it because of the time .
To continue..

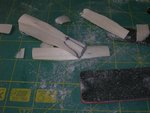
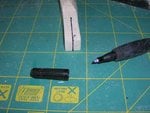
What templates are needed ? .... the side view, the back view and the top view.Also the front one can come in handy.
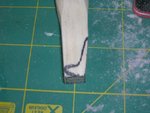
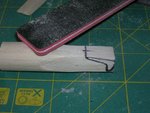
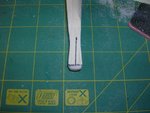
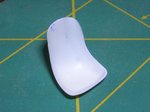
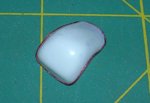
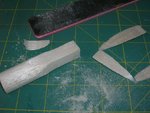
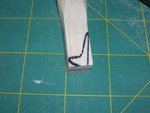
The template of side view has to be retraced on both sides of the wooden slat or block. Then the top view has to be redrawn on the botton of the slat. I would like to make a focus on the fact that the drawing at the bottom presents the inner shape of the mesh of the seat seeing from above. Dimensions of the general top view of a seat determine maximal size of the slat.

I hope these pics below let you understand my English explanation.
 

Attachments

  • Dscn3473.JPG
    Dscn3473.JPG
    93.8 KB · Views: 461
  • Dscn3474.JPG
    Dscn3474.JPG
    122.2 KB · Views: 443
  • Dscn3475.JPG
    Dscn3475.JPG
    120.7 KB · Views: 479
  • Dscn3476.JPG
    Dscn3476.JPG
    115.6 KB · Views: 485
  • Dscn3479.JPG
    Dscn3479.JPG
    96.6 KB · Views: 466
Last edited:
OK..let's go farther...

Then I sanded down the rear surface in order to get a correct angle for a seat backrest.Then I refresh the central line and traced the chair back shape ( the back view or the front one)
 

Attachments

  • Dscn3483.JPG
    Dscn3483.JPG
    118 KB · Views: 377
  • Dscn3482.JPG
    Dscn3482.JPG
    98.5 KB · Views: 397
  • Dscn3481.JPG
    Dscn3481.JPG
    118.7 KB · Views: 422
  • Dscn3480.JPG
    Dscn3480.JPG
    124.7 KB · Views: 401
Then I removed the excess of balsa from sides of the slat going along the seat back shape ( side lines). And marked again the side views of the chair.
 

Attachments

  • Dscn3485.JPG
    Dscn3485.JPG
    119.7 KB · Views: 353
  • Dscn3484.JPG
    Dscn3484.JPG
    123.5 KB · Views: 391
Last edited:
The next step is to shape the chair. I rounded edges of the backrest of the seat ( the correct shape of all surfaces we can make looking at a pic of a pilot's seat we need.) Also I sanded the front area and bottom one.
 

Attachments

  • Dscn3486.JPG
    Dscn3486.JPG
    123.8 KB · Views: 392
  • Dscn3487.JPG
    Dscn3487.JPG
    129.9 KB · Views: 400
After that I obtained a former of the seat.
 

Attachments

  • Dscn3491.JPG
    Dscn3491.JPG
    115.9 KB · Views: 384
  • Dscn3490.JPG
    Dscn3490.JPG
    114 KB · Views: 356
  • Dscn3489.JPG
    Dscn3489.JPG
    112.7 KB · Views: 381
  • Dscn3488.JPG
    Dscn3488.JPG
    119.9 KB · Views: 366
Here examples of useful materials for our seats. In the third pic it can be seen a white styrene I used.It is an old part of vacu debris from a plastic house for a diorama.
 

Attachments

  • Dscn3496.JPG
    Dscn3496.JPG
    105.8 KB · Views: 400
  • Dscn3499.JPG
    Dscn3499.JPG
    109.4 KB · Views: 422
  • Dscn3501.JPG
    Dscn3501.JPG
    105.5 KB · Views: 355
Having the former made I went to the kitchen and used the cooker for worming up the sheet of styrene.
But before I did that I had put the former into a king of a holder :lol: and placed close to the cooker.
I stretched the warmed up styrene plate onto the former.

Remeber protect yourself against the hot and fire !!!
 

Attachments

  • Dscn3503.JPG
    Dscn3503.JPG
    91.4 KB · Views: 433
  • Dscn3502.JPG
    Dscn3502.JPG
    99 KB · Views: 419
Last edited:
In a few minutes the styrene got colder and stiffened. I removed all pieces of the styrene that weren't needed any longer. Then I traced the seat lines again. One note... styrene when stretched in that way , gets some of transparency becuase it becomes thinner.These lines you had traced on the former can be seen through the plastic. You can use them or if there are needed any corrections you should draw new ones on the formed plastic part. Then I cut off the seat with a sharp scalpel and razor blade. It is not necessary to fallow lines strictly. It is better to leave some more of styrene for sanding and final fitting.
 

Attachments

  • Dscn3504.JPG
    Dscn3504.JPG
    129.7 KB · Views: 396
  • Dscn3505.JPG
    Dscn3505.JPG
    113.4 KB · Views: 400
  • Dscn3506.JPG
    Dscn3506.JPG
    125.8 KB · Views: 381
  • Dscn3507.JPG
    Dscn3507.JPG
    118 KB · Views: 406
  • Dscn3509.JPG
    Dscn3509.JPG
    98.9 KB · Views: 369
  • Dscn3510.JPG
    Dscn3510.JPG
    109.8 KB · Views: 394
Last edited:
The next step was to make the seat edges regular by sanding. I rolled a piece of sandpaer and sanded on all edges.
 

Attachments

  • Dscn3514.JPG
    Dscn3514.JPG
    88.2 KB · Views: 380
  • Dscn3513.JPG
    Dscn3513.JPG
    89 KB · Views: 403
  • Dscn3512.JPG
    Dscn3512.JPG
    97.8 KB · Views: 393
  • Dscn3511.JPG
    Dscn3511.JPG
    96.4 KB · Views: 394
Last edited:
Now it's time for finishing the seat edges. For that you can use brassy wire, stretched sprues, thin strips of styrene etc.... Which of these you will use , will depend on the kind of edges of a chair. I decided to make rolled ones.And I use some of the brassy wire and Superglue for sticking. When the wire was fixed to the seat I sanded it again. The effect below...
 

Attachments

  • Dscn3519.JPG
    Dscn3519.JPG
    92.1 KB · Views: 405
  • Dscn3518.JPG
    Dscn3518.JPG
    93.4 KB · Views: 386
  • Dscn3517.JPG
    Dscn3517.JPG
    88.7 KB · Views: 355
  • Dscn3516.JPG
    Dscn3516.JPG
    92.2 KB · Views: 412
  • Dscn3515.JPG
    Dscn3515.JPG
    116.6 KB · Views: 393
And the final touch. I sended edges a little bit more and gentle shaped the chair backrest with my fingers.

The final product in pics below. The all work on the seat took me an hour and a half.So it is quite nice result.
Making of all additional pieces for the pilot's chair is a piece of cake I think. The main part is done now.
 

Attachments

  • Dscn3521.JPG
    Dscn3521.JPG
    93.8 KB · Views: 394
  • Dscn3522.JPG
    Dscn3522.JPG
    92.6 KB · Views: 389
  • Dscn3523.JPG
    Dscn3523.JPG
    84.2 KB · Views: 387
  • Dscn3524.JPG
    Dscn3524.JPG
    78 KB · Views: 372
  • Dscn3525.JPG
    Dscn3525.JPG
    94.6 KB · Views: 394
wow, that looks so easy. cos my main concern for the B-17 airliner were the seats. if I decide to actually go for it and make one, would you mind building the seats for me?
 
wow, that looks so easy. cos my main concern for the B-17 airliner were the seats. if I decide to actually go for it and make one, would you mind building the seats for me?

Rather no Rob I wouldn't. It depends on when and how many of these chairs you would like to have.
 
No problem. Let me know when you decide to start the build. Of course a few dimensions would be welcome.
 
Excellent demonstration my friend ! When I tried to mould my Bf109E seat, I used a female mould also, as for making canopies, which is why I couldn't get the complete shape in one go. I'll do it again, only this time without the female mould, just forming over the main, male, seat mould.
 
Thank you Terry. Yes the way can be easy used for making cockpit conopies etc.... The only problem is a material for them.
 

Users who are viewing this thread

Back