JohnAnthony
Senior Airman
- 340
- Jul 26, 2010
I've noticed that some non-WWII builds get occasionally posted on this forum so I hope y'all doin't mind this one. Apologies if it's not appropriate.


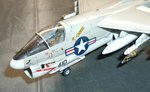
Judging by various pics these planes weathered mostly by sun-bleaching. I've seen builds of this particular scheme on the internet where the modelers slathered a wash over the plane without having first lightened the paint colors and it looks all wrong – way too dark. Since my paint went on full strength I don't really have a choice but to keep this build as a factory-fresh rendition of the plane.


Here's a bit of breakdown on the project, starting with the kit itself.
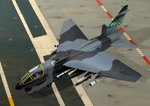
Accuracy: there are several accuracy issues with this kit. There is a lack of detail in the front gear bay and a tow hook would have been nice as well. As there is no intake detail one is basically forced to use the FOD cover – it would have been nice if Italeri had included one for the exhaust as well. I made an overlay of the model with Vought's own line drawings of the plane and discovered that the horizontal stabs are way out of shape…

Also, according to Vought specs the horizontal stabs should have a slight positive dihedral. The kit instructions have them tilting down which is an error. I'm going to have to remove the stabs and reconnect them on my build, just don't feel like doing it at the moment. Perhaps once they've been correctly installed the overlay won't look as egregiously wrong. You can also see that the wings are a bit too narrow as they as they go outboard but it's not a huge discrepancy.

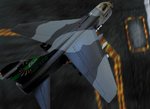
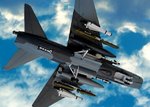
Fit: The fit is average for a kit of this era, no better or worse than some of the old Monograms. The fuselage halves need sanding once they're mated and gaps need to be filled between the wings and fuselage. All of the small pieces that go onto the curved fuselage are molded with flat surfaces so there is some work involved there as well. The sprues are thicker than usual and some of the small pieces need a lot of care to extricate them, and they're got flash – lots of it, especially the external stores.
Instructions/Decals: The instructions are vague at times, especially when it comes to fuselage externals. Frequently all you get is an arrow pointing in a general direction. Pics of the plane and specs come in very handy. The decals are nicely printed but this kit is old and my sheet was quite dry and brittle. A long soak in hot water with a drop of dish soap got them loose however and only one silvered. The painting scheme Italeri gives is a bit too angular. It appears this gunship/medium gray wrap-around had smoother, broader lines.
I'm going to order another one of these kits along with the Hobbyboss A-7D in order to compare them. The HB kit has some good aftermarket for it as well. Perhaps a kitbash would yield the most accurate model. I also need to print my own decals for the window linings. Cutting strips and trying to bend them around the frames was too fussy, and they need to be thinner to be in scale. I'm also going to use Hasegawa's set of 1/72 stores as the ones in this kit are ****. I also need to learn how to paint better on a microscopic scale. My painting needs work.
Judging by various pics these planes weathered mostly by sun-bleaching. I've seen builds of this particular scheme on the internet where the modelers slathered a wash over the plane without having first lightened the paint colors and it looks all wrong – way too dark. Since my paint went on full strength I don't really have a choice but to keep this build as a factory-fresh rendition of the plane.
Here's a bit of breakdown on the project, starting with the kit itself.
Accuracy: there are several accuracy issues with this kit. There is a lack of detail in the front gear bay and a tow hook would have been nice as well. As there is no intake detail one is basically forced to use the FOD cover – it would have been nice if Italeri had included one for the exhaust as well. I made an overlay of the model with Vought's own line drawings of the plane and discovered that the horizontal stabs are way out of shape…
Also, according to Vought specs the horizontal stabs should have a slight positive dihedral. The kit instructions have them tilting down which is an error. I'm going to have to remove the stabs and reconnect them on my build, just don't feel like doing it at the moment. Perhaps once they've been correctly installed the overlay won't look as egregiously wrong. You can also see that the wings are a bit too narrow as they as they go outboard but it's not a huge discrepancy.
Fit: The fit is average for a kit of this era, no better or worse than some of the old Monograms. The fuselage halves need sanding once they're mated and gaps need to be filled between the wings and fuselage. All of the small pieces that go onto the curved fuselage are molded with flat surfaces so there is some work involved there as well. The sprues are thicker than usual and some of the small pieces need a lot of care to extricate them, and they're got flash – lots of it, especially the external stores.
Instructions/Decals: The instructions are vague at times, especially when it comes to fuselage externals. Frequently all you get is an arrow pointing in a general direction. Pics of the plane and specs come in very handy. The decals are nicely printed but this kit is old and my sheet was quite dry and brittle. A long soak in hot water with a drop of dish soap got them loose however and only one silvered. The painting scheme Italeri gives is a bit too angular. It appears this gunship/medium gray wrap-around had smoother, broader lines.
I'm going to order another one of these kits along with the Hobbyboss A-7D in order to compare them. The HB kit has some good aftermarket for it as well. Perhaps a kitbash would yield the most accurate model. I also need to print my own decals for the window linings. Cutting strips and trying to bend them around the frames was too fussy, and they need to be thinner to be in scale. I'm also going to use Hasegawa's set of 1/72 stores as the ones in this kit are ****. I also need to learn how to paint better on a microscopic scale. My painting needs work.
Last edited:
")