Work moves slowly these days the red Himors were very thick even Walthers hardly touched them so on the wings had to knife the seams and more Walthers even then....
Beauty. I used to fear Walthers but I feel, with my bottle, I could pop the decal in the bottle, leave it for a few days and it still wouldn't settle. I've had the bottle for eons so maybe there's a past due date. Having said that, it did work very well on a Lifelike test decal
Beauty. I used to fear Walthers but I feel, with my bottle, I could pop the decal in the bottle, leave it for a few days and it still wouldn't settle. I've had the bottle for eons so maybe there's a past due date. Having said that, it did work very well on a Lifelike test decal
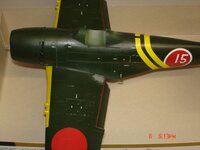
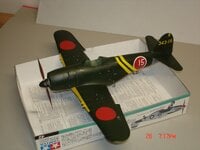
While I wait for the glue on those Tamiya decals release in the water for the F84g I started chipping on the George .I scrap lightly with the knife in different directions esp. where the pilot would get in thought the color looked to grey(scrapping to deep) brought out the silver pencil got the same exact look so scrapping it is.
javlin
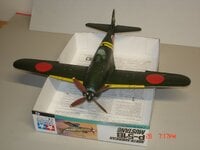
I've cut down a #0 brush for most of my chipping. I dip it in the paint, wipe it off as you would if you are dry-brushing but when most of the paint is off, I gently dab it on the paper towel to flair the brush out. Then I slowly build up the chipping. If I want bigger chips I for go the gentle dabbing. I purposely flaired the brush for the pic
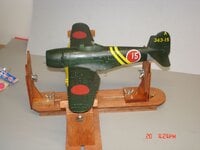
Coming along slowly got a bit of chipping done last night it seems a bit geometric to me will try to break that habit.The stand I built today had all the wood of course(lyptus,black oak,red oak and 3/16 plywood) scraps just had to buy wingnuts.

")