Me 262 problem blending replacement engine with wing

Ad: This forum contains affiliate links to products on Amazon and eBay. More information in Terms and rules

JonCOlsen

Airman 1st Class
197
14
Mar 14, 2015
Hello, everyone.

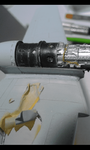
I'm working on a Revell 1/72 Me 262. I've attached and glued on a resin, replacement engine to the wing. However, after attaching the engine, I noticed there was a long gap that runs between the side of the engine and the kit part. I filled this gap with grey tamiya putty ("basic type") and have sanded it quite a bit, but the surface of the puttied area still looks rough. Any thoughts about how I can improve the appearance of the puttied area? How can I get it to blend in better with the wing? Help! :)

Any advice would be tremendously appreciated!

>Jon
 

Attachments

  • Screenshot_2015-05-01-17-14-03.png
    Screenshot_2015-05-01-17-14-03.png
    116.9 KB · Views: 165
Last edited by a moderator:
I would usen sandpaper of higher grade. the best on would be of 900-1200 grade for wet sanding. I mean with some of water. Sand the puttied area trying to keep the shape of the wing area as long as the roughness there will disappear.. Remember about keeping the sandpaper wet. If the gap isn't still filled fully, apply some of the putty again and let it get hardened. Then sanding again.
 
Last edited:
Hey guys, thank you so much for the great advice. Wurger, after I read your post I tried wet sanding more, and it definitely does look better now than it did before. :) Thanks! Now, should I just continue wet sanding and adding more putty until it's completely smooth? I've read that medium-srength nail polish remover might be useful...has anyone heard about using nail polish remover to smooth out putty and fill in gaps? Also, I have Tamiya "fine surface primer." Do you think it would be a good idea to spray some of that stuff onto the puttied area?
 
Nail varnish remover often contains a solvent (acetone) which will dissolve the putty. I would be wary of using it on your dried filler. It is useful as a method of avoiding sanding filler in small gaps. You can apply the putty/filler and then remove the excess, smoothing that left in the gap, with a cotton bud moistened with the nail varnish remover. If you get it right you won't need to sand at all.Almost all model putties shrink as they dry, so more than one application may be needed.

I often use a filler made from CA glue (superglue) and talcum powder as a filler. This does not shrink BUT, and it's a big but, you must sand it before it hardens and cures, usually within a minute or two of application. If you don't it will dry harder than the surrounding plastic which can be a bit tricky. The advantage is that it won't shrink and is also an adhesive, unlike model putty.

On bigger gaps an epoxy filler like Milliput might be needed.

On really gaping gaps, like this on a PCM Spitfire:

GULLWING_GAP_WEB_zpsk7yffbhu.gif


I will insert some plastic and cut and sand it to shape like this:

plastic_web_zpsqfrrxrak.gif


Before applying a bit of putty and doing some final finishing with fine wet 'n' dry:

plastic2_web_zps0vpk4d61.gif


On the finished model:

PRQtr_web_zpsdhzflgfm.gif


There are lots of techniques and you'll have to find out which work best for you. I am not a big fan of model putties, except for small gaps and to smooth out relatively small imperfections.

Cheers

Steve
 
Once I think the puttied joint is smooth enough, instead of adding more putty, I'll brush on a good surface primer (I use Tamiya's grey primer) and then sand that off with wet fine grit paper. The primer will fill a small imperfections and sand extremely smooth. Keep doing this until you are happy with the result.
 
Steve, thank you so much for your excellent explanation and help. On your advice, I've decided not to use nail polish remover. I will continue wet sanding, spray on Tamiya primer and sand some more as Crimea River has suggested. In hindsight, I think it would have been better for me to have used epoxy filler instead of basic putty. Thanks guys! :)
 
I agree with Steve on the using of the nail polish remover and the acetone. Unfortunately it may cause nothing but troubles. Filling of gaps with some of polistyrene and a CA glue is a good alternative. But sanding is still required in order to shape the area of the gap.

As far as the father wet sanding and applying the Tamiya Basic putty is concerned. All depends on the final effect you can get when sanding. The most common mistake with applying of a putty is the way it was done. I mean if you want to fill a gap , it is therefore a mistake to apply a putty all around the apperture while the main goal is to fill the gap. That's why the sanding of a such "large" surface can be a problem. For a such filling of a chink , the need is to push the putty into but not applying all around. Therefore it is needed to use a tool for applying like a small putty knife/spatula. Of course it can be the scalpel blade, knife blade etc..as well. Personally I use a piece of cardboard for applying and some of Tamiya masking tape for protection the entire surface around a gap.

Well... if your gap has been filling properly and the surface around the gap looks good you don't need to apply the putty again and sanding the filling again. But if the aperture hasn't been filled properly you may need to repeat the whole process. One tip thiugh , please keep controlling over the sanding process because it may result in excessive removing of plastic what can cause changing to the shape of plastic parts or curvature of the surface.
 
I agree, minimising the loss of detail and avoiding excessive sanding is important.

I recently fitted a completely new resin tail to a Spitfire to convert it to a float plane version. You must be as accurate as possible at every stage to minimise the remedial work at a later stage.

First I carefully measured the kit and removed its tail as nearly as possible in the correct place using a razor saw. Here's the truncated kit offered up to the new tail:

IMG_1362_zps38fnq3ia.gif


You can see the fit is already fairly good, but inevitably some filling and sanding was needed. Next you see the initial results of this, under a coat of primer which has revealed some minor issues still to be fixed:

IMG_1378_zpska9adxk6.gif


This was filled with CA glue and talcum powder. The sanding has resulted in the loss of some detail. There is no way to avoid this completely on such major surgery. I re-scribed a couple of panel lines which ran across the join and re-made a few rivets to give a final result like this:

IMG_1400_crop_zps2l8dnzvf.gif


Not a great photo, cropped from a larger one, but you get the idea :)

Cheers

Steve
 

Users who are viewing this thread

Back