SH-60B 1/35 Seahawk by Kitty Hawk

Ad: This forum contains affiliate links to products on Amazon and eBay. More information in Terms and rules
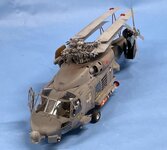
Thanks Guys! SketchUp can don anything, but reluctantly. It will produce very complex objects, but you need a ton of extensions and a PhD in Computer Graphics. I have an honorary degree that comes from years of wrestling with the beast. There are other programs out there (Blender) that work better on organic forms and curves, but the learning curve is very steep and I'm going to be 77. So I do what I know. That said, I'm in a constant learning mode with SU and every project seems to be more complex than the last.

First of all I'm getting this error when trying to enter yesterday's post in the FSM Forum.


23_12PM.thumb.png.06b7dd9abe98d40b91868c59d66f5c9c.png


And I can't seem to enter a new post in the troubleshooting forum. Any ideas?

Secondly, I did (FINALLY) get the four blades attached to the hub. My new parts worked although they still required a styrene spacer and then do some creative carving of both the claw and the rotation motor head on the hub to get the new parts to sit correctly on the hub. Again, the pinning idea was the reason I could do this at all. The hub's taken quite a beating and will need some TLC to bring it back to it's prior self.

Here are the two sets of claws. I'm glad I made a bunch since I did use a few before I got it right.


bPrints.thumb.jpg.b22b9ac3c61d524da22531ddb7e7caeb.jpg


And here are the four blade facing in the correct direction. The broken hub came loose again, but the pin I inserted kept it in position. I'm letting it float until I put the blades into their racks and then I'll hit it with some CA. I have to hook up the blade deicer lines and repaint the rest that show their underlying copper. Actually, considering the abuse it took and the number of times I dropped it on the floor, the fact that it looks this good is a minor miracle. I have to put back most of those PE straps on the ends of the blade lock indicators. I have to touch up the blade paint, detail the sensors on the hub end and do some slight weathering on the bolt heads.

ladesON.thumb.jpg.fb087c746e36441a09fe50d80a6f40f5.jpg
 
I finished the rotor head, did the repaint, connected the deice lines, and refinished the blades including painting the pop-out nitrogen leak indicator. I also did the anti-collision belly light and finish painted the rear landing gear. I fixed all the blade lock indicators putting on fresh little slivers of PE fret to complete them. They do need some touch up paint. And I notice that I didn't trim the phos-bronze rotating pins.

SH-60-B-Blades-Done.jpg


There may be a few more areas needing attention such as cleaning up the accent around the blade bolts.

While mounting the rotor and attempting to position the blades into the holders, I broke one of the holders. I also knocked off one of the blade clamps. I drilled both and pinned them.

SH-60-B-Blade-Brace-Whoops.jpg


Ran out of time today to put it all back together. I also broke off the engine hatch by grabbing the model in the wrong spot. It's a very delicate beast. It will be finished on Monday.

So everyone have a happy Super Bowl Sunday! I'd like Cincy to win, but really don't care who does as long as it's a good game that doesn't embarrass anyone.
 
Big day! Had a gall bladder imaging session this morning to see if it's working right and finished the Seahawk this afternoon. Won't know about the gall bladder for a couple of days, but you'll learn about the finished Seahawk tonight.

Before putting the rotor on I had to get the tail boom on. I chose to use epoxy putty since there wasn't much gluing surface for conventional adhesive AND the surfaces themselves were not very secure. I put a wad of putty on the back of the fuze side of the ResKit hinge component and pushed the parts together. Had to hold it for a while by hand and then used some tape. The putty cures pretty fast, and while this was going on I removed a lot of the stuff that had oozed out of the joint all over the place.

SH-60B Gluing on the Tail.jpg


After it cured I did more fine cleaning using various dental tools. BTW: you may want to ask you dentist if he has any tools that are no longer usable in the practice, but could be very useful for us modelers. I got a bunch from my dentist. After cleaning I had to go back and touchup paint any areas that degraded during all this fussing.

I did final touchup on the main rotor, trimmed all the extra-long pins that are now holding the blade hubs, and did final finish on all the wires and bits.

I had to repair the rear blade brace since it fractured right near the fuze joint. Don't know when it happened. I drilled and pinned it. Not easy with the model so far completely and the brace glued to it. Kitty Hawk styrene was a bit brittle and broke way too often way too easily. The rotor went on easily and all the blades aligned perfectly with the braces. Miracle!

I then remembered that I had to add paint and add the missile warning sensors that go onto the port and strbrd EMS pods in front, and the HF antenna wire. I also had to reattach the open engine cover this time with wire. It's now a bit flexible so you can bump it without it fracturing off. CA is too darn brittle!

For the antenna, I used E-Z Line Lycra inserted into a 0.030" Albion micro tube held with some thin CA. For those that haven't use E-Z Line, it's great for rigging antenna and small naval ship rigging. It is hugely elastic and when slightly stretched stays taut. It also glues almost instantly with thin CA. I think it has to do with the huge surface area within the fiber itself. The stands making up the yarn are very fine. The tube was inserted into a hole I drill in the fuze at the antenna entry point. Also a pain in the butt since the model (including the rotor) was already there and in the way.

With that it was done. I still plan on doing the base, but the model stands on its own nicely. Here's the album.

SH-60B Final 3-4 View.jpg

SH-60B Final Port 3.JPG
SH-60B Final Port Side 2.JPG
SH-60H Port Side 1.JPG
SH-60B Final Strbd Top.jpg
SH-60B Final Strbd Side.jpg
SH-60B Final Overhead.jpg
SH-60B Overhead.jpg
SH-60B Final Nose.jpg


So there you have it. Work started in mid-Oct and ended in mid-Feb about 4 months of pretty intensive work. My opinion of the model:
Pros:
1. Beautiful surface detail especially with the addition of the ResKit parts.
2. Lots of choices on build and configuration. (Huge amount of parts still left on many sprues.)
3. It's a great model in a great scale. You can really go to town on super-detailing.
Cons:
1. Instructions leave something to be desired. Terrible instructions on creating the stowed version
2. That reversed part HD33 that i had to redraw and 3D print.
3. Styrene was fragile and broke at the worst possible times. You better be a good problem solver.
4. The ResKit parts did not mate 100% accurate with the kit's requiring further problem solving.
5. Fits - While having the interior as a separate box seemed like a good idea at the time, in reality it made getting a good main joint nearly impossible requiring a lot of filling.

It was singularly the most complex aircraft build I ever did and I've been building models almost non-stop since 1954 at my 9th birthday. I've made a practice recently to have each project I attempt to push my skills. This project did not disappoint. That said, I love how the rotor head and engine came out. They met the image I had in my mind's eye and for that all the work was worth it.
 

Attachments

  • SH-60B Final 3-4 View.jpg
    SH-60B Final 3-4 View.jpg
    525.1 KB · Views: 20
Big day! Had a gall bladder imaging session this morning to see if it's working right and finished the Seahawk this afternoon. Won't know about the gall bladder for a couple of days, but you'll learn about the finished Seahawk tonight.

Before putting the rotor on I had to get the tail boom on. I chose to use epoxy putty since there wasn't much gluing surface for conventional adhesive AND the surfaces themselves were not very secure. I put a wad of putty on the back of the fuze side of the ResKit hinge component and pushed the parts together. Had to hold it for a while by hand and then used some tape. The putty cures pretty fast, and while this was going on I removed a lot of the stuff that had oozed out of the joint all over the place.

View attachment 658035

After it cured I did more fine cleaning using various dental tools. BTW: you may want to ask you dentist if he has any tools that are no longer usable in the practice, but could be very useful for us modelers. I got a bunch from my dentist. After cleaning I had to go back and touchup paint any areas that degraded during all this fussing.

I did final touchup on the main rotor, trimmed all the extra-long pins that are now holding the blade hubs, and did final finish on all the wires and bits.

I had to repair the rear blade brace since it fractured right near the fuze joint. Don't know when it happened. I drilled and pinned it. Not easy with the model so far completely and the brace glued to it. Kitty Hawk styrene was a bit brittle and broke way too often way too easily. The rotor went on easily and all the blades aligned perfectly with the braces. Miracle!

I then remembered that I had to add paint and add the missile warning sensors that go onto the port and strbrd EMS pods in front, and the HF antenna wire. I also had to reattach the open engine cover this time with wire. It's now a bit flexible so you can bump it without it fracturing off. CA is too darn brittle!

For the antenna, I used E-Z Line Lycra inserted into a 0.030" Albion micro tube held with some thin CA. For those that haven't use E-Z Line, it's great for rigging antenna and small naval ship rigging. It is hugely elastic and when slightly stretched stays taut. It also glues almost instantly with thin CA. I think it has to do with the huge surface area within the fiber itself. The stands making up the yarn are very fine. The tube was inserted into a hole I drill in the fuze at the antenna entry point. Also a pain in the butt since the model (including the rotor) was already there and in the way.

With that it was done. I still plan on doing the base, but the model stands on its own nicely. Here's the album.

View attachment 658036
View attachment 658038View attachment 658039View attachment 658040View attachment 658041View attachment 658042View attachment 658043View attachment 658044View attachment 658045

So there you have it. Work started in mid-Oct and ended in mid-Feb about 4 months of pretty intensive work. My opinion of the model:
Pros:
1. Beautiful surface detail especially with the addition of the ResKit parts.
2. Lots of choices on build and configuration. (Huge amount of parts still left on many sprues.)
3. It's a great model in a great scale. You can really go to town on super-detailing.
Cons:
1. Instructions leave something to be desired. Terrible instructions on creating the stowed version
2. That reversed part HD33 that i had to redraw and 3D print.
3. Styrene was fragile and broke at the worst possible times. You better be a good problem solver.
4. The ResKit parts did not mate 100% accurate with the kit's requiring further problem solving.
5. Fits - While having the interior as a separate box seemed like a good idea at the time, in reality it made getting a good main joint nearly impossible requiring a lot of filling.

It was singularly the most complex aircraft build I ever did and I've been building models almost non-stop since 1954 at my 9th birthday. I've made a practice recently to have each project I attempt to push my skills. This project did not disappoint. That said, I love how the rotor head and engine came out. They met the image I had in my mind's eye and for that all the work was worth it.
Absolutely gorgeous!
 
Thanks gents!!! So far, the first test said my gall bladder is working sufficiently well to be considered 'normal'. The ejection factor test showed no blockages of any kind. I'm waiting for the ultrasound results, but I suspect that will be okay too.

Total cost of the build was $142 USD for the kit, $8.00 USD for Paint, $87 USD for the ResKits upgrades and $40 for those darn carbide drills. Those were some expensive holes. I still may buy some naval deck crew figures from Reedoak, but haven't decided yet.

The next projects are going to be for the railroad and that Missouri 16" turret with interior. I have a massive amount of drawing to do for the turret.
 

Users who are viewing this thread

Back