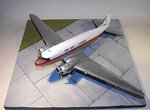
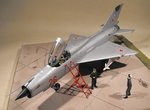
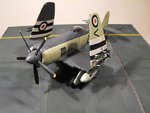
Show me your model bases please

Ad: This forum contains affiliate links to products on Amazon and eBay. More information in Terms and rules

s1chris

Staff Sergeant
781
121
Dec 10, 2011
England
Hello,

Just after ideas of something a bit different or something I may not have thought of.

I display all of my models on the same size bases so that they fit into my shelving system.
I use a base that is 30x40cm (cork notice boards).

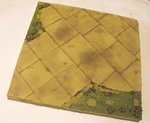
Here are a couple I have made so far.

F64351F6-89F9-40EB-8AA5-D0FA09BC6CCE-851-000000D42F2C63A7.jpg


0C34C2A8-7559-4F87-A9B2-8484A35FE13A-851-000000D45F40C967.jpg


665A46BC-31D7-4E48-9EB4-75D0B1D88627-851-000000D47C818CE4.jpg


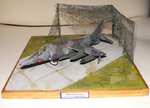
I cut the last one down to size and fitted inside a frame -
54D99670-BABE-4F5E-81BE-83A2FCC4DF90-851-000000D49F5E8D05.jpg


For me vehicles and figures are a no, no. So I rely on the base to paint the scene really.

Cheers Chris
 
Last edited:
Nice. :thumbright:

Personally I don't use bases because of a lack of room. However it is a very good idea. At least you don't have to touch them directly when moving etc...
 
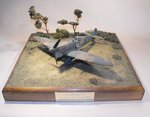
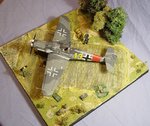
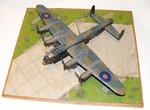
Here's a few of mine Chris.
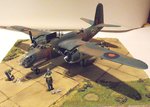
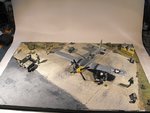
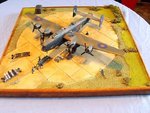
I use 15 mm MDF, and for 'concrete', card is glued in place, scored to represent the 'slabs', and brush-painted with either emulsion, or airbrushed enamel, depending on scale. When painting the emulsion, for larger scales, I use a stiff brush to add 'texture' to the paint.
Ground cover can be static grass, grass mat or 'scatter' material, depending on requirements, with other stuff added as needed, and sometimes embossed plastic sheet, from model railways supplies, is also used, for example to represent the block paving in the 1/32nd scale Bf109 diorama.
Bushes and scrub are from various scenic materials, and trees are either hand made, using wire armatures or grape vines, with again various scenic materials, or sometimes model railway trees, with added foliage from scenic materials, dried tea leaves and dried, mixed herbs, painted as required. Other items are scratch-built.
 

Attachments

  • Bob Cross Spit V 138.jpg
    Bob Cross Spit V 138.jpg
    102.8 KB · Views: 162
  • 21 Gustav 328.jpg
    21 Gustav 328.jpg
    92.7 KB · Views: 172
  • Avro, Bomber GB 183.jpg
    Avro, Bomber GB 183.jpg
    87.2 KB · Views: 170
  • Bombers Build 202.jpg
    Bombers Build 202.jpg
    72.3 KB · Views: 163
  • Bombers Build 203.jpg
    Bombers Build 203.jpg
    100 KB · Views: 161
  • Bottisham diorama 032.jpg
    Bottisham diorama 032.jpg
    116.3 KB · Views: 169
  • Halifax build 357.jpg
    Halifax build 357.jpg
    128.1 KB · Views: 181
  • Harrier 052.jpg
    Harrier 052.jpg
    84.6 KB · Views: 178
  • Dak build 063.jpg
    Dak build 063.jpg
    91.4 KB · Views: 174
  • MiG 21 282.jpg
    MiG 21 282.jpg
    62.3 KB · Views: 159
  • Sea Fury Build 184.jpg
    Sea Fury Build 184.jpg
    79.4 KB · Views: 183
Thanks all.

Terry, wow they are stunning. love the Spitfire base, the trees are excellent.

Do you cover the whole base with the card, then score etc and finally build up the grass over the card? Or only apply the card where it is to be solid ground?
I get the concrete effect from the cork finish of the original notice board. Each base only costs me £1.99 so it's the cheap cork topped chipboard type. I just then apply the desired colour after lightly scoring the surface.

When I look at a display like yours it's safe to say that the added vehicles, people etc really paint the bigger picture.
My only reason for not using people was because as you know, my models represent relics that I have and I didnt really want to depict the "human" side of the crash.
More out of respect as I don't think I could do the crews who persished justice or by being in accurate. I may have to rethink that though.

What gauge railway items do you find comparable to 1/72? Is it 00
Safe to say that the kitchen cupboard will be getting raided today for tree and bush material.


Cheers Chris
 
Also I did some more work in getting my display unit together yesterday. Also made all of the unpainted boxes you can see -

85C1BECE-4063-432C-953A-97006F6806E3-1714-000001FB34A96585.jpg


It's at my Grandma's house so slightly random wall paper will be painted "green" when I eventually get my way. She's not so keen on the idea, which I find a bit strange considering she has given me the room for the sole purpose of displaying my ww2 collection.


Cheers Chris
 
Thanks Wojtec. It's a long long way from being complete. Just to model and frame the relics I already have will need me to have 8 columns of what you can see already. On top of that, when I buy my own house in April '14 I will have to move it all to its new location.
 
Chris, any 'hard' areas are covered in the card (sourced from the boxes the kits come in), which is scored 'in situ', leaving the 'grass' or 'bare earth' areas clear. This gives the impression of depth between the 'concrete' and grass, with the latter added from the mats, static grass or whatever, once the 'concrete' has been painted and weathered. Where variations in surface are required, such as hillocks, slopes etc, these are built-up using either layers of card to form contours, or the same using expanded polystyrene packing material, as described in Part One of the Diorama Guide I posted some time ago (I still haven't got around to doing Part Two!!)
Note that I don't normally have 'grass' or 'weeds' growing out of the expansion joints - this might happen when an airfield is 70 years old, and abandoned, but, during the period depicted, these joints would normally be filled with tar. However, at the edges of, for example, a dispersal pan, I may add the odd bit of weed or grass, particularly if there are 'cracks' in these areas.
The nearest 'railway scale' for 1/72nd scale is '00', but I use various scales, as, for example, a large '00' barrel might work well as a smaller '1/48th scale barrel, and so on. It's a case of what can be adapted to suit a particular need, and useful items might be found in various scales, in ship modelling, car and military vehicle accessories , doll's house accessories and some toys, as examples, others being scratch-built as needed.
The majority of my models are 1/48th scale, although in the posted pics, the Bf109G is 1/32nd scale, and the Lancaster, Halifax and Dakota are 1/72nd scale, built for commissions. Figures are from various sources, with, for example, the crew and ground crew in the Boston diorama, being modified Tamiya 'Panzer Servicing Crew', with a couple being modified Japanese aircrew figures, from a Tamiya kit, donated by Karl (rochie).
The 1/32nd scale figures are modified from Airfix 1/32nd scale 'Multi-Pose' German Infantry and a (very)old Airfix slot car figure.
Note that 1/35th figures, accessories and vehicles do not look right next to a 1/32nd scale aircraft - the difference in scale does show!!
 
Terry, your head must hurt constantly with that much knowledge inside!
Anything bigger than 1/48th is not an issue for me unless I just fancy building the odd model but to keep things uniform i/will build singles in 48th and twins upwards in 72nd to keep in with the base size.

I never even thought about the weeds in the concrete joins! I'll be removing them next week when I got to do some more work on the displays.

Poor LMS's mean my choice of actually viewing the railway gauge stuff before purchase is limited but I may just buy a load of scenery and fit it on where possible. I'll be on the look out for figures now as I've decided they should be included.

I'm still stuck really for ideas of something different though.
Take for example the Training School Bü181.
How would you display that?

Cheers Chris
 
The actual 'scene' in all my displays, whether just a 'plain' grass or concrete base, or a full diorama, depends on the subject, and how the real location looked. This, of course, involves research into a particular airfield or location, and the time period being depicted in the model/diorama.
For example, the Lancaster is from 625 Sqn,in July 1944, who at that time were based at Kelstern, which had 'loop' dispersals, whilst the Halifax was at Holme on Spalding Moor, on a 'frying pan' dispersal at the south edge of the field, hard up against a local 'B' road.
For all the scenes modelled, period photos are studied, along with OS maps, the books I have covering WW2 airfields, period aerial photos where available, 'Google Earth' and, in many cases, personal visits, current, or in the past.
For the Bucker, if no photos or other info is available, I think I'd go with just a plain grass field, or maybe a concrete taxi way with a grass border. If figures are to be included, then perhaps a 'student pilot' in the standard ,Luftwaffe, buff-coloured flying suit,boots and leather helmet, complete with gauntlets, as only a student would wear (!), possibly standing at attention, with an officer in standard 'service dress' uniform standing in front of him, pointing towards the aircraft?
This could then be telling the viewer that this student is about to be sent off, possibly for a first solo on type, thereby giving a bit of 'life' to an otherwise static scene.
Think of a model display, particularly a diorama, as a picture or painting ( a diorama is a picture in 3D), where the 'picture' is telling a story, and this should help you to construct a convincing scene accordingly.
Hope this helps.
 
That's it I am fully resigned to including figures now.
I think i will also start to use flock as an alternative to static grass. That in itself should add a bit of variety to the bases.

I'm building a RCAF Wellington at the minute so this will be the first of my "new generation" bases.
Ill also go with your idea on the Bücker once I finally pull my finger out and deal with the yellow canopy situation.

Then I'll be into my Catalina which needs a lake base, now that will be a challenge.

Cheers Chris
 
Great displays! Wish i had more time to do them...

How do you store/display your models Wayne?

I wish I was 13 again and could have them hanging from my bedroom ceiling.
The Missus just won't stand for it now!
 

Users who are viewing this thread

Back