1/32 P-51d man o' war

Ad: This forum contains affiliate links to products on Amazon and eBay. More information in Terms and rules

aqua_ta

Airman 1st Class
119
0
Aug 9, 2008
Southampton,England
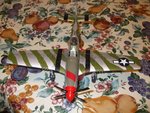
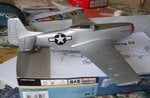
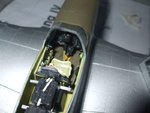
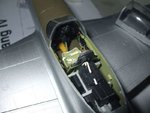
Hi guys, just a couple of pics of my Hasegawa P-51D that I'm slowly(very slowly) building.
I've fitted a Paragon cockpit set that is a vast improvement over stock,everything else is a OOB build.
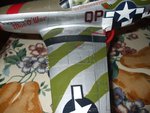
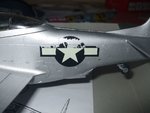
I have however come across a problem, I applied the fuselage stars and bars as a reference for painting on D-Day stripes. But although I applied a satin gloss over them the masking tape (DIY masking tape) has pulled off chunks of the decal.
Anyone know where in the UK I can get just the stars and bars decals from?
 

Attachments

  • p-51d model.jpg
    p-51d model.jpg
    109.4 KB · Views: 302
  • p-51d model2.jpg
    p-51d model2.jpg
    111.5 KB · Views: 375
  • cockpit left.jpg
    cockpit left.jpg
    78.2 KB · Views: 335
  • cockpit right.jpg
    cockpit right.jpg
    80.9 KB · Views: 323
Last edited:
That's true. But you can use these especially if a separate decal sheet with the US national insignias of 1/32 scale might be unavaialble.

Or if you want you can make themself.
 
Looking at the damage, if you can't get any Stars and Bars, and I have seen some advertised somewhere, most likely at Hannant's, then it should be fairly easy to paint-in the missing bits.
However, for future reference, when doing a bare metal or any other metallic finish, it's best to paint solid colours first, then mask. This will reduce the risk of the metallic particles from the paint contaminating the solid colours. So, do the AEAF stripes first, then take care of the damaged decals.
If in future you need to use the Stars and Bars, Roundels or Crosses as a reference point, then trace the design and stick it lightly in place with thinned PVA, or drawn onto masking tape - saves a lot of hassle!
BTW, nice work so far!
 
I'm not sure but the problem happened because of incorrect steps with applying decal markings. Masking on decals always causes the kind of peeling.
 
Thanks guys, I guess I was optimistic that the semi gloss coat would prevent it but then I will learn for the next time.:oops:
 
These masks are for painting entire US stars from scratch. However this set will need to remove these damaged markings. So the choice is yours.
The same effect you can achieve if you use large Tamiya masking tape and sharp scalpel for cutting out masks.
 
Thanks Wurger, I have in fact removed the damaged decal...using masking tape funnily enough..:lol:
I like the idea of painting the insignia from scratch hence the mask idea as I don't think I'd be able to cut one out myself accurately enough, and since this mask set is only £1.99 it seems worth it.
My only concern is that the USN star and bar are the same size the Air Force version.
 
The dimensions of the national markings was standard throughout, regardless of branch of service. The criteria was the type of aircraft, for example, Bomber, fighter etc, where the dimensions were related to proportion of the area applied. You should find that at least one of the masks will 'fit the bill'. Don't worry about the red surround, just use blue; the red was a short-lived addition, in August 1943.
 
Hi guys, just one more question if I may.
After spraying on the D-Day stripes I had some bleed through and touched up the silver paint carefully using a brush, however despite being the same paint I sprayed with the paint that I brushed has dried noticeably darker.
Is there a solution for this? I tried thinning it as I would for airbrushing but to no avail.:(
 
Not a lot you can do, other than very carefully rub down, re-mask, and re-spray. The brushed-on paint will be 'thicker' than that which was sprayed, and hence darker. This is another reason why 'solid' colours are applied first, then masked and the metallic colours applied. Any bleeding will then be metallic on solid, which is much easier to rectify.
 
Hi fellas, I got my National insignia mask today and applied one to the fuselage side to check it out.
The set is actually for the F4U Corsair with the red bordered star and bar, and I had the intention of leaving out the red part of the instructions. Unfortunately however it seems that the stars and bars on the F4U are somewhat larger than U.S.A.A.F type as applied to the Mustang, so a proposition for you all and that is who would like to swap an unused set of masks for a set of insignia decals that WILL fit my blasted P-51D before it takes its first and last flight!!!!!!!? :twisted:
 
Last edited:
Well she's nearly completed, and I have to say I was getting a little bit fed up with the project.
However once the decals were on and I started to do the weathering I guess it gave ne a second wind....so to speak..lol
I may of overdone the weathering but I wanted to practice panel lines, pastels and chipping of the paint.
 

Attachments

  • p51 top.jpg
    p51 top.jpg
    146.8 KB · Views: 231
  • p51  wing.jpg
    p51 wing.jpg
    105 KB · Views: 226

Users who are viewing this thread

Back