Navigation
Install the app
How to install the app on iOS
Follow along with the video below to see how to install our site as a web app on your home screen.
Note: This feature may not be available in some browsers.
More options
You are using an out of date browser. It may not display this or other websites correctly.
You should upgrade or use an alternative browser.
You should upgrade or use an alternative browser.
1/32nd Scale 'Revegawa' Spitfire MkXIVc
- Thread starter Airframes
- Start date
Ad: This forum contains affiliate links to products on Amazon and eBay. More information in Terms and rules
More options
Who Replied?- Thread starter
- #22
Airframes
Benevolens Magister
Thanks for the compliments guys! Andy, go for it with the XV, it'll be the turning point of good times! I'll be posting the 'hulk' of the Spit 22 separately.
Wojtek, glad you like it so far. I could use a nurse, maybe the rather gorgeous Czech girl I know could help?
Wojtek, glad you like it so far. I could use a nurse, maybe the rather gorgeous Czech girl I know could help?
ellis995
Staff Sergeant
looking good Terry
I couldn't do what you guys do to your kits
I couldn't do what you guys do to your kits
- Thread starter
- #24
Airframes
Benevolens Magister
Thanks Keith. I reckon you could do it mate. It just takes a bit of thought before hand, patience and careful work. Why not try a simple conversion, or some scratch-building? It's a good way to improve skills and learn.
ellis995
Staff Sergeant
thanks for that Terry
i will have to wait till i can get some cash saved up so i can buy a cheap model to try it out on
i will have to wait till i can get some cash saved up
so i can buy a cheap model to try it out onellis995
Staff Sergeant
thanks Worjtek
I'd be to scared in case i fluffed it up. but i would try it on a very cheap bit of kit
I'd be to scared in case i fluffed it up. but i would try it on a very cheap bit of kit
Tony Hill
Tech Sergeant
Watching with interest Terry,
Such a pity about the Griffon engine though....
Darryl
Such a pity about the Griffon engine though....
Darryl
- Thread starter
- #30
Airframes
Benevolens Magister
Yeah, I know what you mean. But the bang of that Coffman starter doesn't half scare the S**t out of 'Joe Public'!!
Tony Hill
Tech Sergeant
Yeah, I know what you mean. But the bang of that Coffman starter doesn't half scare the S**t out of 'Joe Public'!!
looking good Terry, must be hard to move in your house with all these kits on the go !!!
- Thread starter
- #33
Airframes
Benevolens Magister
Thanks Karl, and you're right! I've got some new shelves cut for the spare room, but haven't got the right sized brackets to put them on yet! The sooner the better, as I've run out of space in the lounge - there are four and a half more models since you were here, and another two or so on the way very soon!
- Thread starter
- #35
Airframes
Benevolens Magister
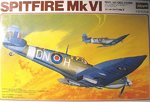
The Hasegawa Spitfire MkVI kit has finally arrived, delayed due to family illness at the model outlet. Unfortunately, contrary to what I was told, the kit does not include the 'normal' span wingtips. But, with all the other butchery needed for this conversion, I think that can be classed as a very minor problem! No doubt I can re-profile the 'pointed' tips supplied.
PIC 1 Is the box art for the Haegawa kit, now approaching 30 years old, and with the instructions in Japanese only - somehow, I don't think I'll need a translation!!
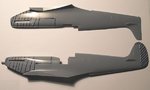
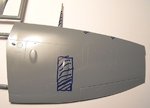
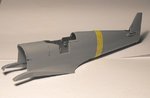
PIC 2 Shows the MkVI fuselage marked out ready for surgery.
PIC 3 Is a closer shot of the cowlings. The hatched areas will be removed, with the outlined area saved if possible, in order to provide more strength for the fitting of the scratch-built firewall, on to which the engine bearers will be mounted.
If this doesn't work out, then I'll use the already cut rear cowling sections from the Mk22 kit.
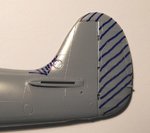
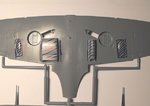
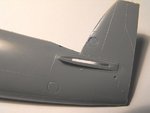
PIC 4 Shows the rudder, and the small area at the fromt of the fin, which need to be removed. A fillet will be added to the leading edge of the fin, and profiled to match the shape of the broad-chord MkXIV fin, whilst the Mk22 rudder will be cut and sanded to match the shape of the MkXIV rudder.
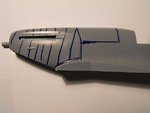
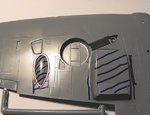
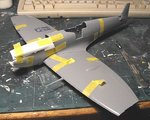
PIC 5 Is an overall view of the wing tops. Again, the hatched areas will be removed, and new gun bays etc either scribed or cut open. The removed areas will be 'plated over' with plastic card, then filled and blended into the wing's surface. The MkVI's cannons will also be removed, and replaced with the correct layout of armament.
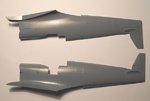
PIC 6 Is the bottom of the wings, again showing those areas to be attended to.
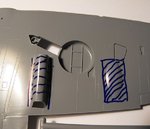
PICS 7 and 8 Are closer shots, giving an indication of how neat the 'surgery' needs to be when removing the radiator, oil cooler and gun blisters. The latter will be replaced with 'home moulded' small blisters, whilst the former will have their areas plated, and then the deeper radiators from the Mk22 fitted, and blended in.
I hope to start the first cuts very soon, on the cowlings. Then it's a case of lots of test-fitting, in order to line up the scratch-built firewall. This needs to be as accurate as possible, in order to locate and fix the bottom cowling piece and the engine bearers, so that the other cowling panels, the engine, and the prop and spinner will all line-up correctly. Once that's complete, the rest of the conversion should be fairly straightforward, plus, of course, the assembly and detailing of the interior!
PIC 1 Is the box art for the Haegawa kit, now approaching 30 years old, and with the instructions in Japanese only - somehow, I don't think I'll need a translation!!
PIC 2 Shows the MkVI fuselage marked out ready for surgery.
PIC 3 Is a closer shot of the cowlings. The hatched areas will be removed, with the outlined area saved if possible, in order to provide more strength for the fitting of the scratch-built firewall, on to which the engine bearers will be mounted.
If this doesn't work out, then I'll use the already cut rear cowling sections from the Mk22 kit.
PIC 4 Shows the rudder, and the small area at the fromt of the fin, which need to be removed. A fillet will be added to the leading edge of the fin, and profiled to match the shape of the broad-chord MkXIV fin, whilst the Mk22 rudder will be cut and sanded to match the shape of the MkXIV rudder.
PIC 5 Is an overall view of the wing tops. Again, the hatched areas will be removed, and new gun bays etc either scribed or cut open. The removed areas will be 'plated over' with plastic card, then filled and blended into the wing's surface. The MkVI's cannons will also be removed, and replaced with the correct layout of armament.
PIC 6 Is the bottom of the wings, again showing those areas to be attended to.
PICS 7 and 8 Are closer shots, giving an indication of how neat the 'surgery' needs to be when removing the radiator, oil cooler and gun blisters. The latter will be replaced with 'home moulded' small blisters, whilst the former will have their areas plated, and then the deeper radiators from the Mk22 fitted, and blended in.
I hope to start the first cuts very soon, on the cowlings. Then it's a case of lots of test-fitting, in order to line up the scratch-built firewall. This needs to be as accurate as possible, in order to locate and fix the bottom cowling piece and the engine bearers, so that the other cowling panels, the engine, and the prop and spinner will all line-up correctly. Once that's complete, the rest of the conversion should be fairly straightforward, plus, of course, the assembly and detailing of the interior!
Attachments
-
 Spit XIV Build.jpg54.8 KB · Views: 183
 -
 Spit XIV Build 022.jpg21.9 KB · Views: 175
 -
 Spit XIV Build 023.jpg34.1 KB · Views: 176
 -
 Spit XIV Build 025.jpg36.5 KB · Views: 179
 -
 Spit XIV Build 027.jpg22.6 KB · Views: 177
 -
 Spit XIV Build 030.jpg36.7 KB · Views: 160
 -
 Spit XIV Build 029.jpg36.1 KB · Views: 182
 -
 Spit XIV Build 028.jpg29.4 KB · Views: 164
- Thread starter
- #36
Airframes
Benevolens Magister
Well, the first stages of surgery have been completed, and I have to say, it went smoothly, and a lot quicker than I expected, relatively speaking.
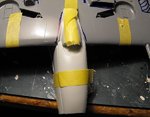
PIC 1. Shows the fuselage halves after the removal of the cowling panels, rudder, and the base of the fin.
PIC 2.Is the forward angled cut at the front of the fuel tank cowling, with the curve around the wing root ready for trimming and sanding.
PIC 3. Is a close-up showing the rudder and the base of the fin leading edge removed, ready for re-profiling to the correct shape for the Mk.XIV.
PIC 4. The foreshortened fuselage halves have been taped together, to check alignment of the upper cowling angle, and in preparation for setting the position of the lower cowling panel.
PIC 5. The wings have been taped together and temporarily fitted to the fuselage. Again, this is neccessary in order to ascertain an accurate alignment for the lower cowling, and the firewall. This is a vital stage, which must be done as accuarately as possible, otherwise the whole front end, including the engine and prop, will be out of kilter.
PIC 6. The cowlings from the Mk22 have been loosely taped in place, again to identify the position where the forward end of the lower cowling should sit. From this, the position of the joint with the lower fuselage and wing centre section can be obtained.
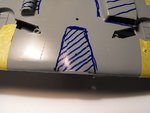
PIC 7. With the lower cowl position now identified, the part from the Mk22 kit is taped in position, and the trailing edges marked onto the bottom of the MkVI centre-section.
PIC 8. This shows the area that needs to be removed, in order to fit the lower cowling. This will be 'tacked' into place initially, whilst the engine bay firewall is constructed, in order to achieve the correct alignment. Once the long Griffon engine has been fitted, the cowlings can once again be checked for alignment, and any neccessary adjustments made, before cementing the lower cowling in place.
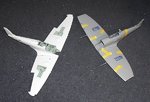
PIC 9. Two of a kind!
Now that I've got this far with both conversions, I've had another stupid idea. Mate the modified fuselage of a MkV or MkVI to the wing of the Mk22, and I've got a Mk21, and then use the remaining parts from both kits to make a low- back LFXVI !!!
I think I need to get out more!!
PIC 1. Shows the fuselage halves after the removal of the cowling panels, rudder, and the base of the fin.
PIC 2.Is the forward angled cut at the front of the fuel tank cowling, with the curve around the wing root ready for trimming and sanding.
PIC 3. Is a close-up showing the rudder and the base of the fin leading edge removed, ready for re-profiling to the correct shape for the Mk.XIV.
PIC 4. The foreshortened fuselage halves have been taped together, to check alignment of the upper cowling angle, and in preparation for setting the position of the lower cowling panel.
PIC 5. The wings have been taped together and temporarily fitted to the fuselage. Again, this is neccessary in order to ascertain an accurate alignment for the lower cowling, and the firewall. This is a vital stage, which must be done as accuarately as possible, otherwise the whole front end, including the engine and prop, will be out of kilter.
PIC 6. The cowlings from the Mk22 have been loosely taped in place, again to identify the position where the forward end of the lower cowling should sit. From this, the position of the joint with the lower fuselage and wing centre section can be obtained.
PIC 7. With the lower cowl position now identified, the part from the Mk22 kit is taped in position, and the trailing edges marked onto the bottom of the MkVI centre-section.
PIC 8. This shows the area that needs to be removed, in order to fit the lower cowling. This will be 'tacked' into place initially, whilst the engine bay firewall is constructed, in order to achieve the correct alignment. Once the long Griffon engine has been fitted, the cowlings can once again be checked for alignment, and any neccessary adjustments made, before cementing the lower cowling in place.
PIC 9. Two of a kind!
Now that I've got this far with both conversions, I've had another stupid idea. Mate the modified fuselage of a MkV or MkVI to the wing of the Mk22, and I've got a Mk21, and then use the remaining parts from both kits to make a low- back LFXVI !!!
I think I need to get out more!!
Attachments
-
 Spit XIV Build 046.jpg62.2 KB · Views: 180
 -
 Spit XIV Build 042.jpg19 KB · Views: 173
 -
 Spit XIV Build 038.jpg22.6 KB · Views: 167
 -
 Spit XIV Build 037.jpg25.5 KB · Views: 177
 -
 Spit XIV Build 039.jpg20.6 KB · Views: 171
 -
 Spit XIV Build 045.jpg44.9 KB · Views: 175
 -
 Spit XIV Build 044.jpg41.7 KB · Views: 158
 -
 Spit XIV Build 047.jpg43.9 KB · Views: 178
 -
 Spit XIV Build 049.jpg61.2 KB · Views: 166
- Thread starter
- #38
Airframes
Benevolens Magister
Thanks Surgeon General Wojtek!

A4K
Brigadier General
That last pic does it for me - I have to start my Seafire conversion !!!!!!
Users who are viewing this thread
Total: 1 (members: 0, guests: 1)