- Thread starter
- #261
N4521U
Plastic Pirate
I'm having a goooood old time!
Follow along with the video below to see how to install our site as a web app on your home screen.
Note: This feature may not be available in some browsers.
Ad: This forum contains affiliate links to products on Amazon and eBay. More information in Terms and rules
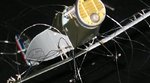
Invisible thread....... silver in color.
Just got the bottom wing attached this a.m. What a test of the nerve endings.
I'll see about attaching the top wing in a bit. I'm leaving the horiz stabs off till I get all the up front wires strung. The attachments for them is pretty wishy washy and I don't want to have to repair them buggers. There are 10 wires attached at the rear tail feathers!
The toughest ones will be the criss cross at the landing gear, they are just so short in length, not much to work with. I'll have to do them first just to get them over with.